DaVinci Resolve has a fairly steep learning curve, and a big part of that is simply not knowing what you’re looking at. You download a template, unzip it, and find four different file types staring back at you. Why are there so many? And what do they do?
Below, we explain DaVinci Resolve’s supported file types that you’ll encounter most: .settings, .drfx, .dra, and .drp. Each one has a different job, and knowing the difference will save you time on every future project you work on. Watch the video below for a quick walkthrough, or read on for the full breakdown.
What file type does DaVinci Resolve use? A quick reference
DaVinci Resolve has four file types you’ll regularly bump into with customizable templates:
- .settings: A file that stores a custom transition, title, effect, or generator built inside Resolve’s Fusion compositor. When you install one, it appears in your Effects panel as a usable template you can drag onto clips.
- .drfx: A packaged bundle of one or more .settings files plus any assets they depend on. The bundle format means Resolve can install everything in one step when you double-click the file, rather than manually placing files into folders.
- .dra: A project archive folder that contains both your Resolve project file and a copy of every media file the project uses. Everything travels together, so the project opens without any relinking on another machine.
- .drp: A project file that stores your timelines, edit decisions, color grades, and settings, but not the media itself. The media stays on disk wherever it already lives, and the .drp just references it. Small enough to email, but only useful if the recipient already has the media files.
If you’re working with LUTs, we also have a separate guide on .cube files and how to import and export them in DaVinci Resolve.
.settings files: Multi-use macros
Let’s begin with the .settings files. A .settings file in DaVinci Resolve is a Fusion macro, which is a fancy way of saying it stores the instructions for an effect as a reusable template that you can apply to any project.
When you want to share effects, transitions, or titles that you have built in Resolve’s Fusion page, you first save it as a .settings file.
It contains all the instructions Resolve needs to recreate that effect, including the nodes and parameters that you’ve chosen. After you install a .settings file, it shows up in your Effects panel ready to use right away.
How to open .settings files in DaVinci Resolve
To illustrate how to open .settings files in DaVinci Resolve, we’ll be using Storyblocks’ 50 Seamless Transitions Pack, which includes fifty transitions as .settings files.
Here’s what to do.
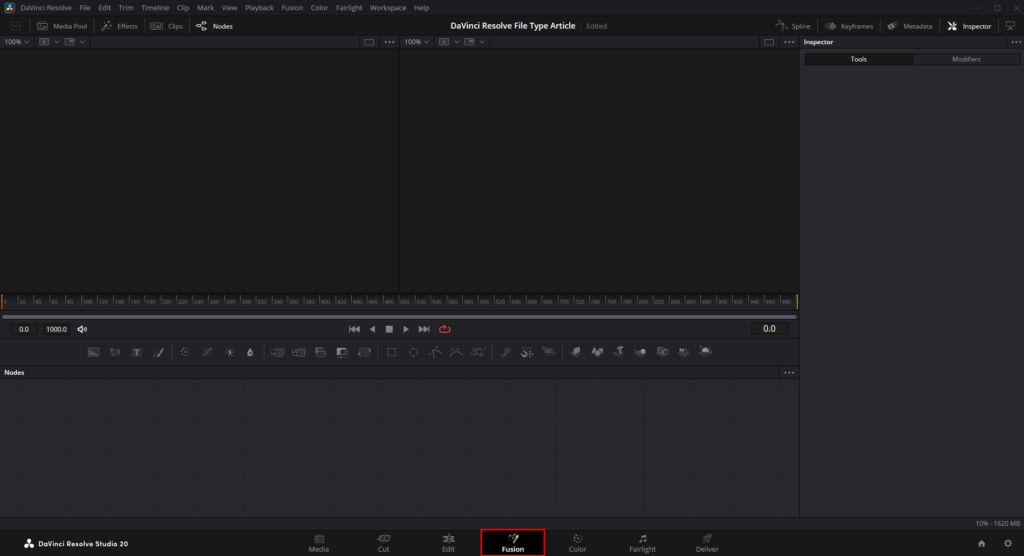
1. Open the Fusion Page
Start by clicking the Fusion tab in the bottom toolbar.
2. Navigate to the templates folder
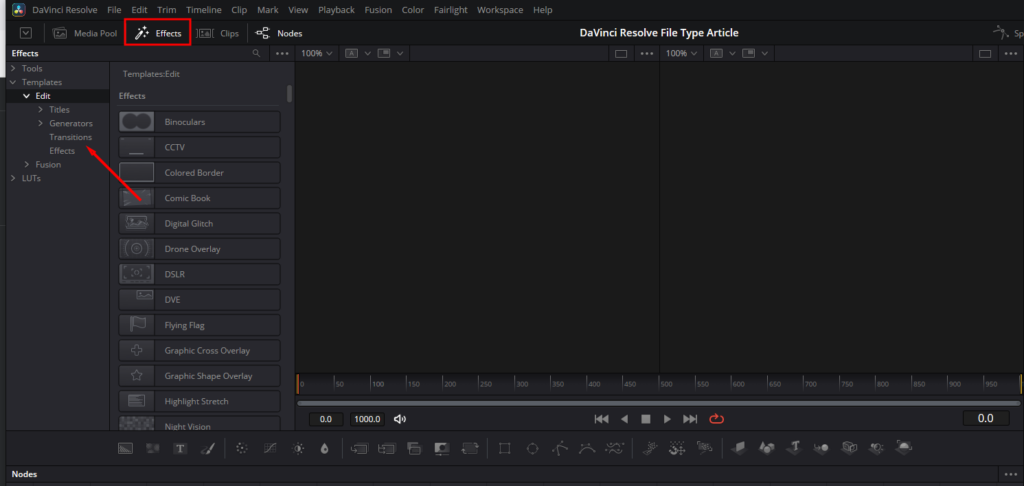
In the Effects panel, go to Effects > Templates > Edit.
3. Open the Category folder
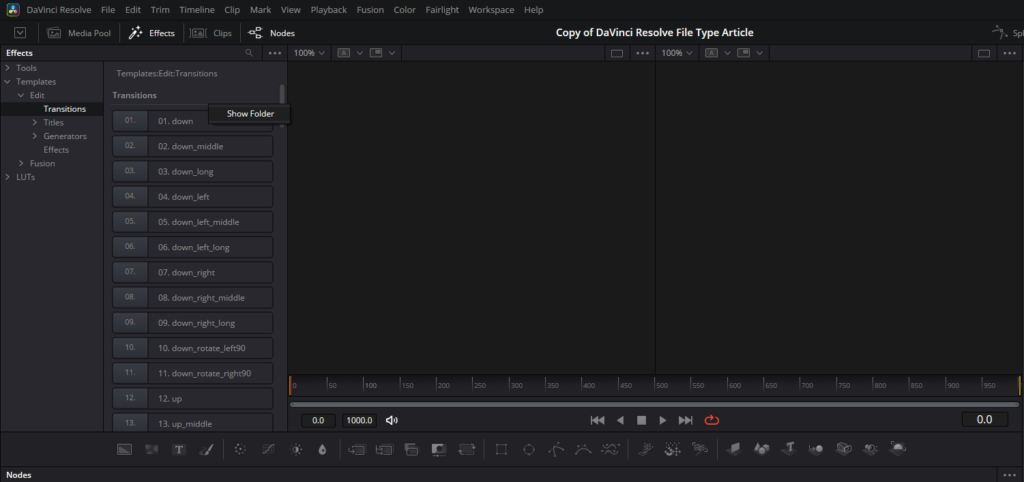
Right-click the category that matches your file (transitions, titles, etc.) and select Show Folder. Resolve will open the folder where it stores those types of files.
If this doesn’t work, try navigating to:
- C:\Users\username\AppData\Roaming\Blackmagic Design\DaVinci Resolve\Support\Fusion\Templates\Edit\Transitions (on PC), or;
- MacintoshHD/Users/username/Library/Application Support/Blackmagic Design/DaVinci Resolve/Fusion/Templates/Edit/Transitions (on Mac).
You’ll need to replace “username” in the directory with your PC’s username.
4. Add your files
Copy your .settings files into that folder by dragging and dropping.
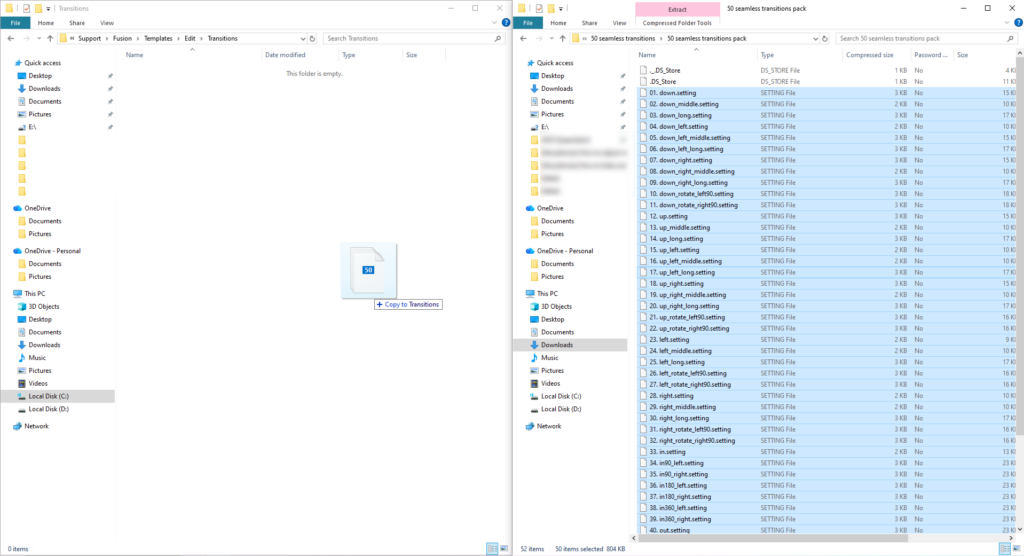
Each transition should appear in the Effects panel. If they don’t, restart Resolve and check again.
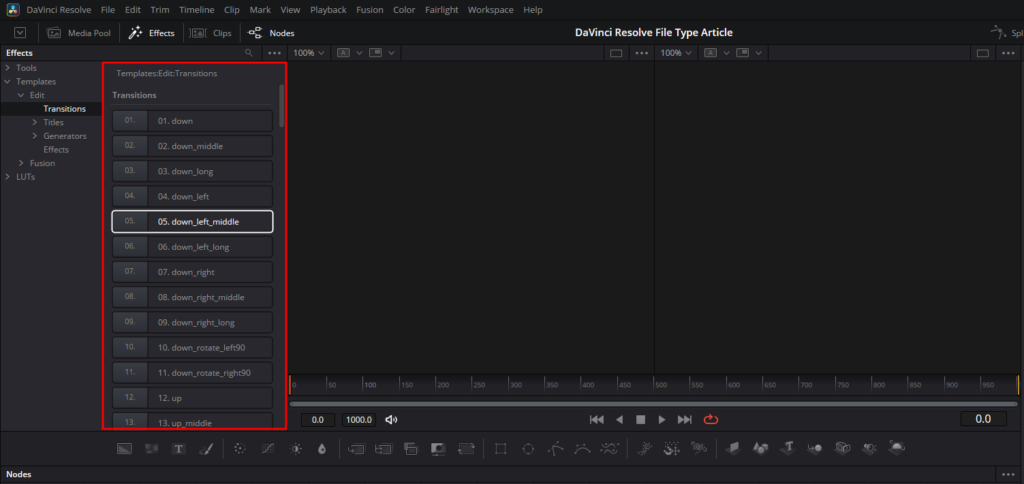
All you have to do now is drag your chosen transition onto your clips in the timeline and it’ll immediately apply the effect.
.drfx files: Unleashing the power of effects presets
Next up, we have DaVinci Resolve’s .drfx files, for packaging and distributing effects presets.
While .settings files are great for simple macros, they have a major limitation. If your effect requires external assets (like textures or fonts), you’ll need to manually route them to the right folders on your hard drive for it to work.
.drfx files solve this problem by bundling the .settings files, along with the media assets they need, into a tidy package. Everything is self-contained, and the installation process is simple.
How to open .drfx files in DaVinci Resolve
Let’s take a look at this Glitch effect from Storyblocks as an example of how to open and use a packaged .drfx file. Once you’ve downloaded and unzipped your asset, here’s what you need to do.
1. Open DaVinci Resolve and double-click your .drfx file
Before opening your .drfx file, ensure that DaVinci Resolve is running. Then, navigate to your unzipped folder and double-click the file with the .drfx extension.
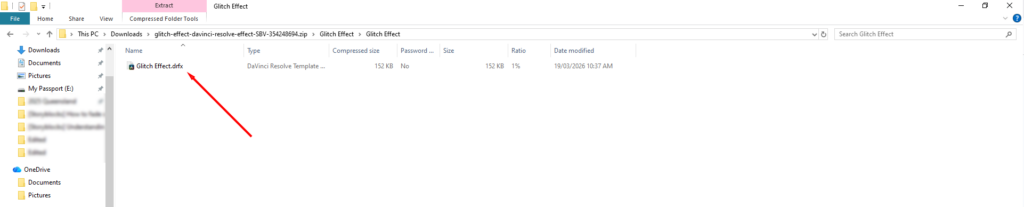
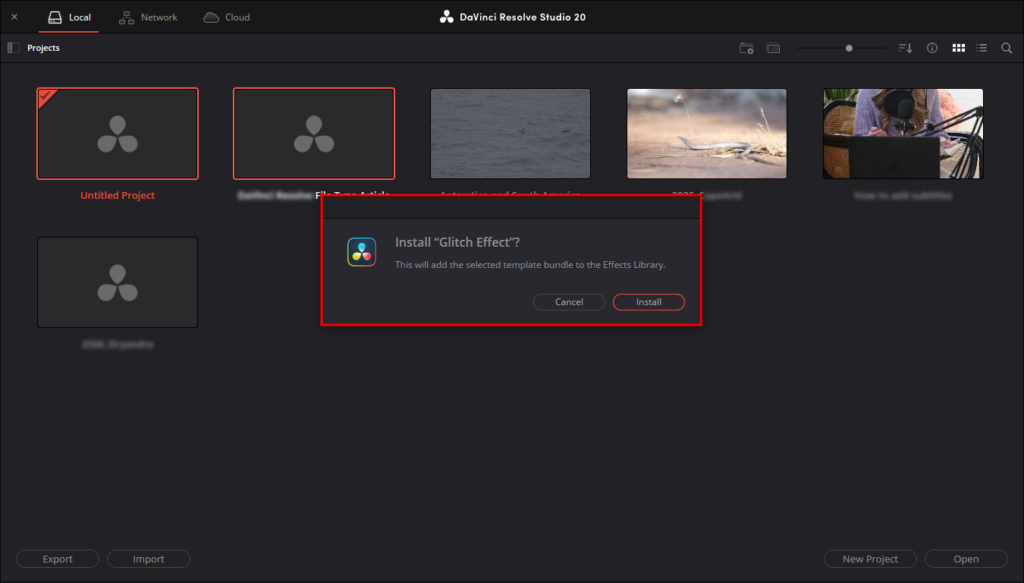
2. Confirm the installation
As soon as you double-click the .drfx file, Resolve will pop up a small dialog box and ask you if you want to install the template bundle. Click Install to confirm. Resolve will unpack the files and assets and make them visible inside the editor.
3. Locate and apply your effect
Finally, head over to the Edit page and open the Effects panel in the top-left corner. Expand the Toolbox and click Effects (or Transitions / Titles, depending on the .drfx bundle you installed).
You’ll see the effect listed. Simply drag and drop it onto your timeline to see it in action.
.dra files: Archiving your creativity
Next are .dra files, which stand for Davinci Resolve Archive files. These compress your entire project into one file, making it simple to share and create backups.
When you export a project as an archive, Resolve creates these master files that contain both your .drp project file (which we’ll explain below) alongside a “MediaFiles” folder that houses every piece of video, audio, and graphic media in your project.
Because all of the dependent media travels inside the archive with the project file, everything will automatically link up the moment you open it up on another machine.
How to open .dra files in DaVinci Resolve
Here’s how to restore an archived .dra project:
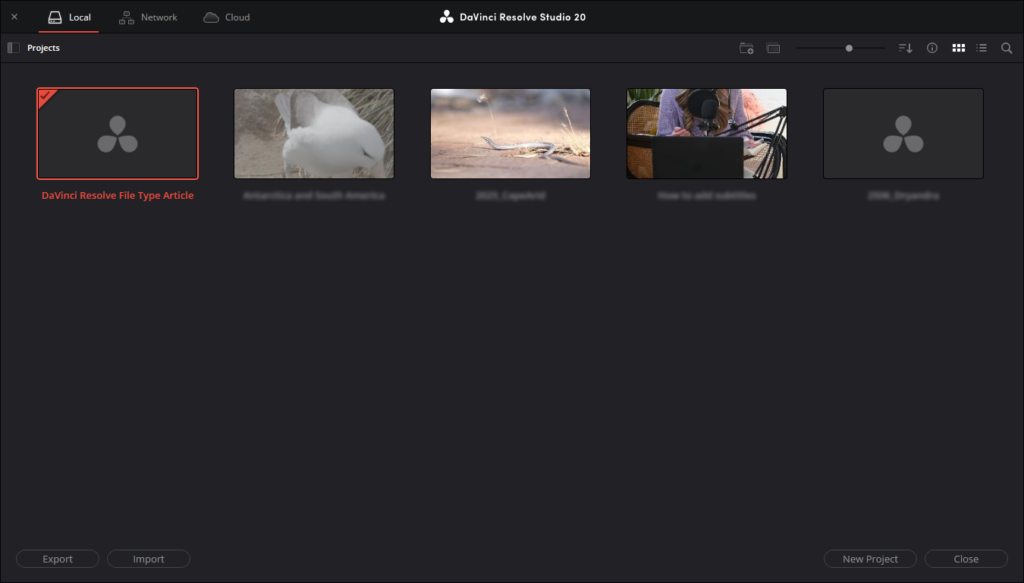
1. Open the Project Manager
Launch DaVinci Resolve, then click the Home button or press the Shift + 1 keyboard shortcut to open the Project Manager window.
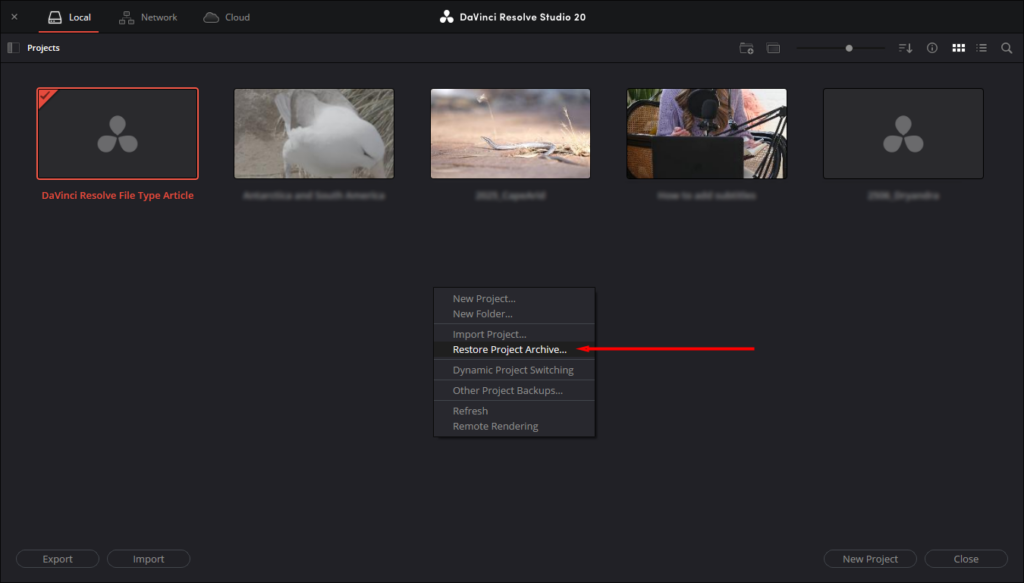
2. Select Restore Project Archive
Instead of creating a new project, right-click anywhere in the empty gray space of the Projects window. From the drop-down menu that appears, select Restore Project Archive…
3. Open your .dra folder
A file browser will open. Navigate to the location where you saved the archive, select the main folder ending in .dra, and press Open. Don’t go into the folder to select the files inside, just select the top-level .dra folder.
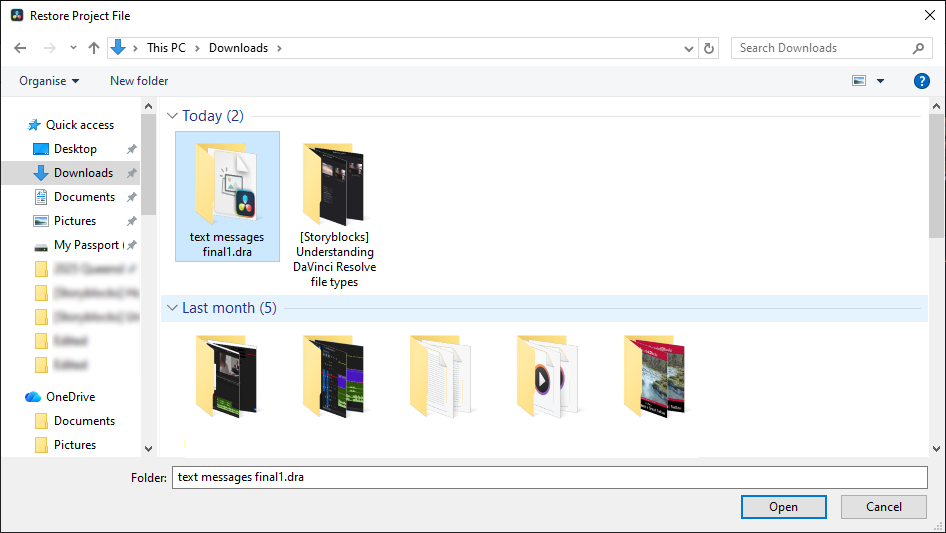
If the folder isn’t appearing, it’s probably because you haven’t unzipped it yet. Make sure to extract or unzip the .dra folder so that it’s accessible to DaVinci Resolve.
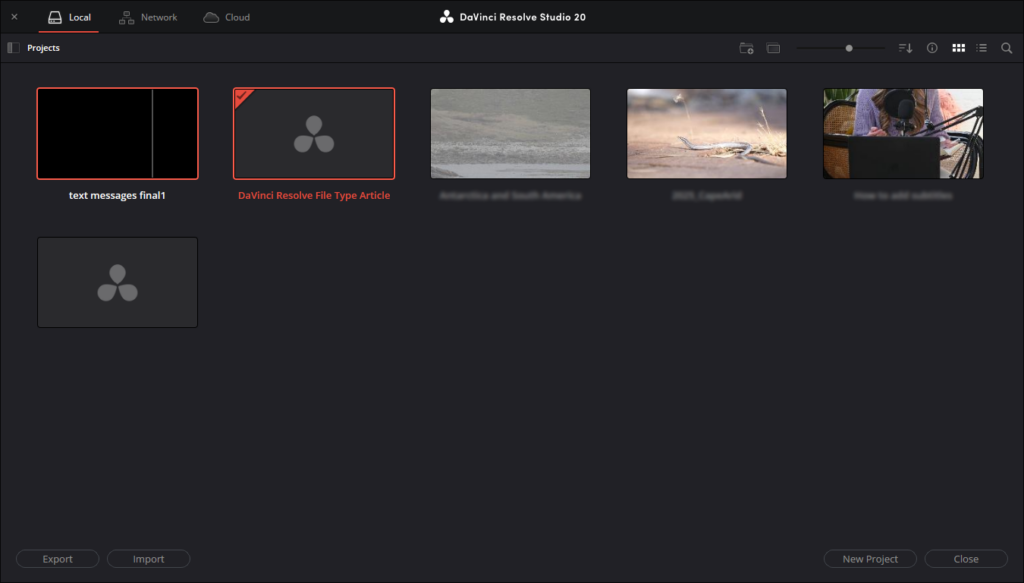
Resolve will take a moment to unpack the archive and link all of your media. Once finished, it’ll appear as a standard project icon in your Project Manager. All you have to do is double-click it to open your timeline and get to work.
Note: If you’re using a .dra file to access a DaVinci Resolve template, make sure you’ve installed the necessary fonts on your computer before you restore the project. If you don’t, Resolve will default to standard system fonts, which can break the formatting.
.drp files: The heart of your project
Last but not least, we have the .drp files—the standard Davinci Resolve Project file extension. So what is a .drp file? They contain all of the essential information about your project settings, timelines, and edits.
However, the DaVinci Resolve project file format doesn’t include any project assets themselves. If the .dra archive is a fully packed suitcase, a .drp file is simply the packing list. It keeps all of your edit decisions and tells Resolve where your media files live on the local hard drive.
This makes .drp files small, easy to share, and perfect for creating daily backups to ensure accurate version control. But if you share one with a collaborator who doesn’t have the source media, all they’ll see are red “Media Offline” warnings.
How to open .drp files in DaVinci Resolve
Here’s how to bring a .drp file into your workflow. To walk through this process, we’ll use this Text Messages template from Storyblocks.
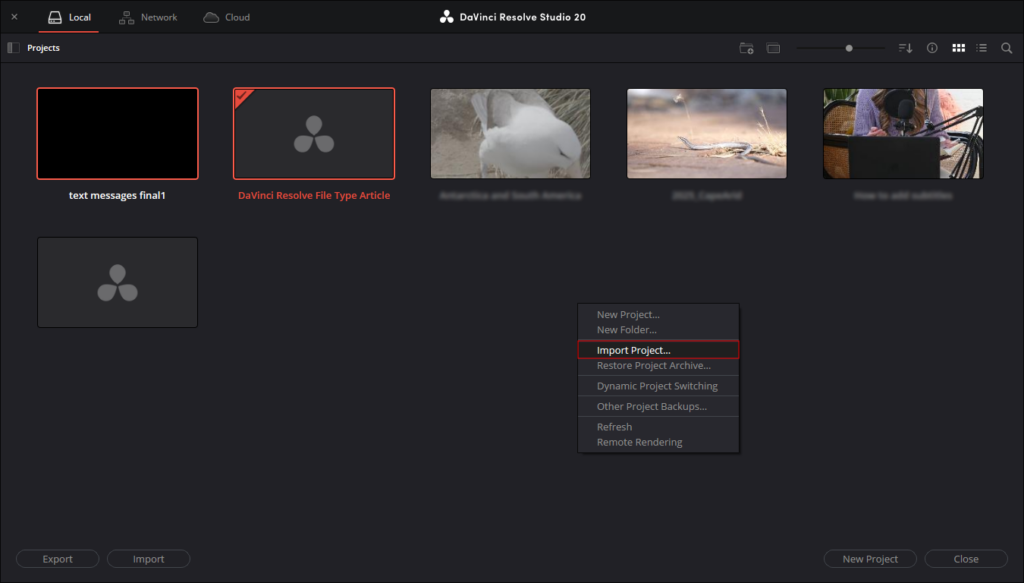
1. Open the Project Manager and import your project
First, open DaVinci Resolve. When the Project Manager appears, right-click in the empty background space and select Import Project.If you’re already inside another project, go to the top menu bar and choose File > Import Project.
2. Locate and open your .drp file
The next step is to find the folder where you unzipped the .drp template. Select the file ending in the .drp extension, and click Open.
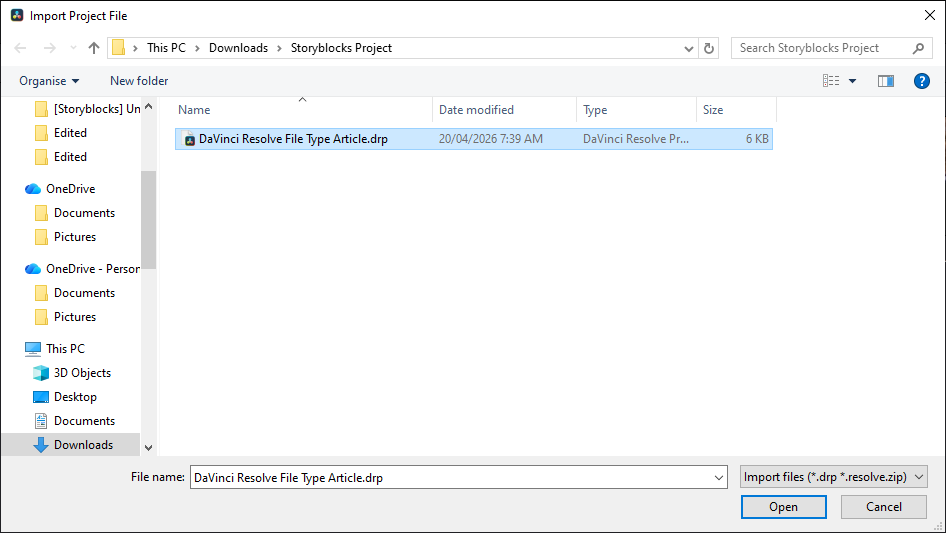
Resolve will import your new project file, and you’ll see the icon sitting inside the Project Manager. Double-click it to open the project.
3. Relink media (if necessary)
When the project opens, head to the Edit page. Because .drp files don’t carry media, any placeholder graphics or fonts will appear offline.
To fix this, go to your Media Pool and click Link Media (it looks like a broken chain link). Point Resolve to the template folder you downloaded and it’ll automatically reconnect the assets. If you’re opening a different .drp file (rather than the Text Messages template), you’ll need to manually relink each asset in this way.
Explore more of DaVinci Resolve
Understanding these DaVinci Resolve file extensions will help you master the software. It takes time to learn, but you can find even more tutorials on our blog to help you along the way. If you’re a beginner, the best place to start is with the basics of DaVinci Resolve.
If you’re looking for ways to work faster, check out our top recommended plugins for DaVinci Resolve. If you’re using DaVinci Resolve effects to speed up your projects, you’ll likely encounter these file types (and more, including .drb files, which we go over in this post).
You can find thousands of templates to practice with and learn from in Storyblocks’ stock library –sign up today to get unlimited downloads of royalty-free footage, backgrounds, music, sound effects, and more.