My first year of being a freelance video editor, I didn’t actually know what an alpha channel was, let alone how to incorporate one into my motion designs. So there was a lot of awkward cropping at the start. Thankfully, almost 16 years later, I’ve since learned all about them and incorporate them into my editing on a regular basis. But we all have to start somewhere, right?
In this tutorial, I’ll walk you through the basics of understanding and using alpha channels in video editing. Knowing what an alpha channel is and how to export one are core principles for integrating motion graphics with your videos, or even footage that’s been rotoscoped. Let’s get started.
What is an alpha channel?
Let’s start with the basics — an alpha channel is essentially a transparency map for your footage or image, meaning that you can have areas in your footage or image that have some level of transparency, or total transparency.
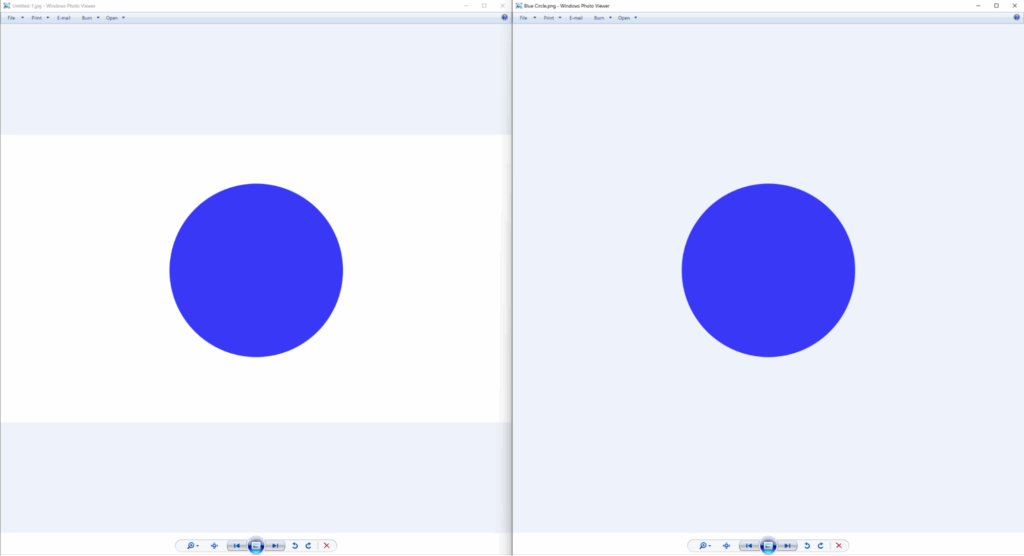
The easiest way to compare and understand how video footage saved with an alpha channel works is to use the example of saving a blue circle from Photoshop as a JPEG versus a PNG. With a JPEG, the blue circle saves with a white background. With a PNG, the blue circle adopts whatever background the interface is using.
When should you use an alpha channel?
Now the question is, when would you want to use an alpha channel? They can be quite heavy in file size, ironically, considering that there’s less information.
Alpha channels are primarily used when we need to send completed motion graphics such as lower thirds, transitions that wipe across the screen, or anything intended to sit on top of video footage. That’s when you’d want to use an alpha channel.
For example, below we have a lower third that was exported with an alpha channel. (As a side note, this still is from recent tutorial – be sure to keep up to date with our YouTube channel here.)

If the lower third were not rendered with an alpha channel, it would instead look like this.

So while the black background of the lower third doesn’t necessarily look bad, the version with the alpha channel looks a lot cleaner by comparison.
How to export an alpha channel in After Effects
Now let’s talk about rendering with an alpha channel. If we just hit “Render” on our composition in After Effects, it won’t export with a transparent background. That’s because there’s a bit of setup we need to follow.
1. Remove any background or layers
First, make sure your composition doesn’t have a background or any layers underneath the element you want to remain transparent. If you have the transparency grid toggled off, so it shows a black background, that’s fine. After Effects will still register that area as transparent.
2. Add to render queue and add output settings
Next, add your composition to the render queue. Out of all the settings, the one we need to focus on is Output Module. Click this, and this is where the magic happens.
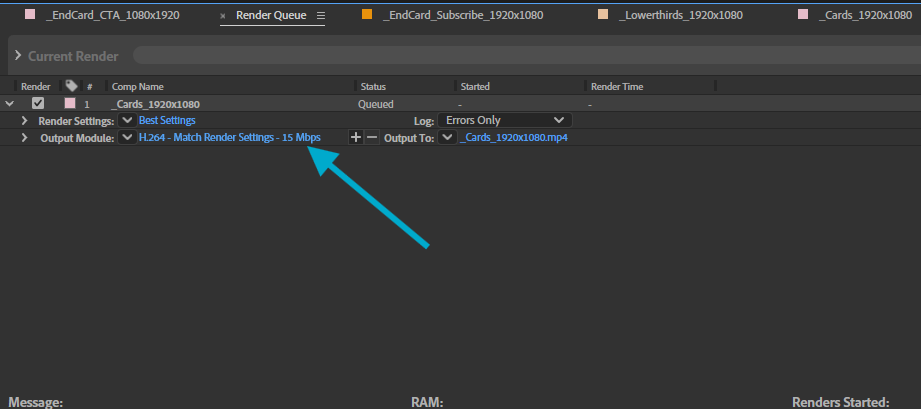
First, choose your format. Select QuickTime, not H.264, because QuickTime allows for alpha output.
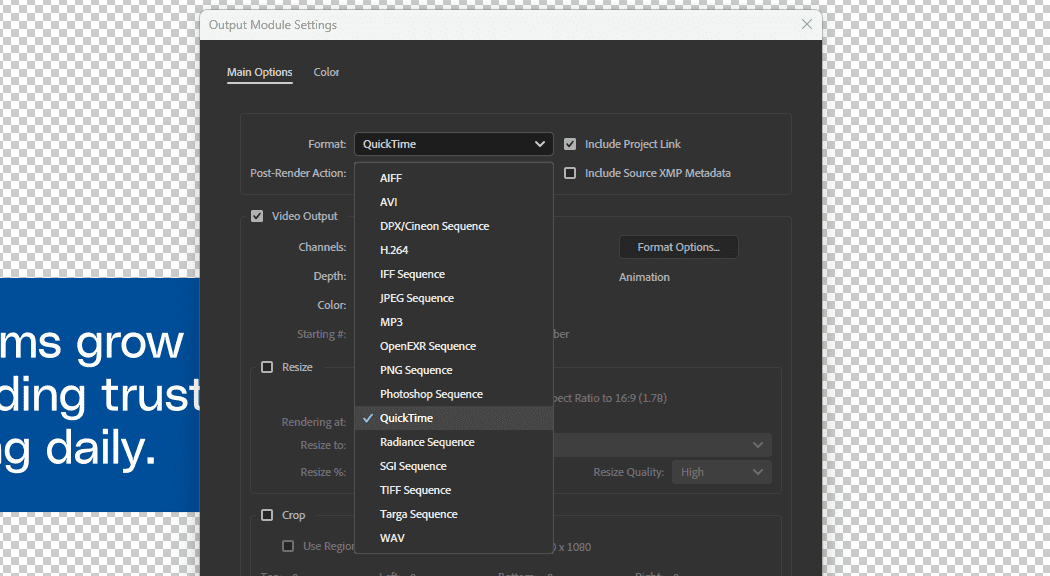
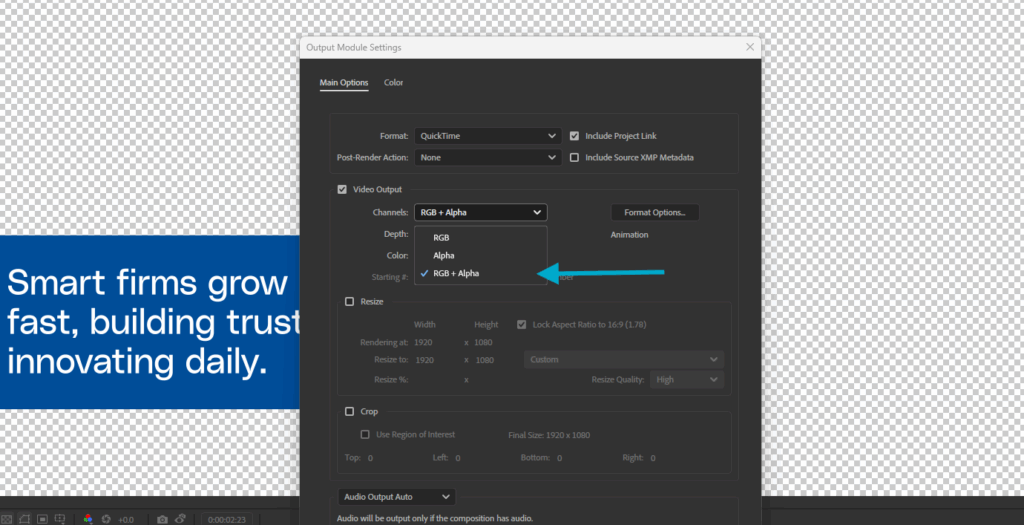
Then go to Format Options. Under Video Output, open the Channels dropdown, and you’ll see RGB, Alpha, and RGB + Alpha. We need RGB + Alpha selected to export both the composition elements and the transparency data.
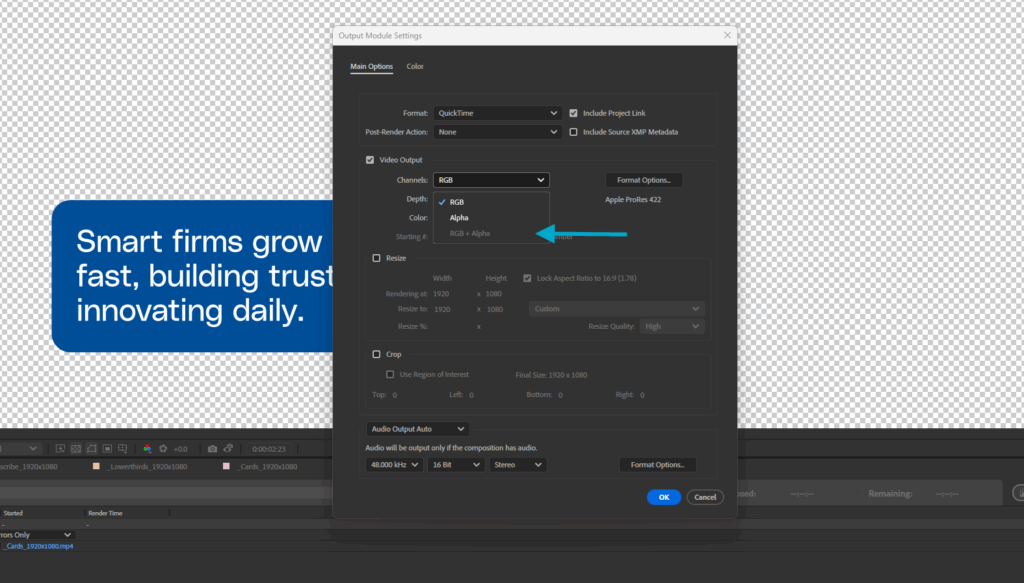
At first, this option will be grayed out, so we need to change the codec. Only a few codecs support RGB + Alpha, such as Apple ProRes 4444, GoPro CineForm, or Animation. Historically, I’ve always gone with Animation, so let’s open the codec selection (under Format Options) and select Animation.
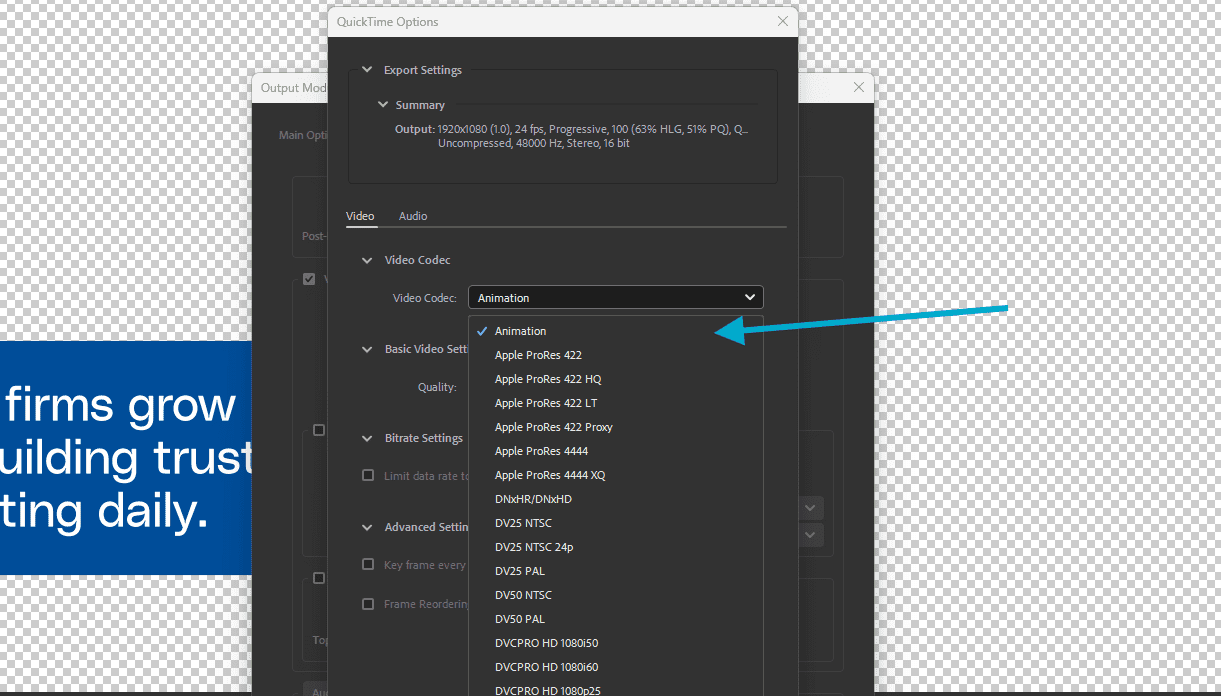
Now RGB + Alpha will appear as available, select it and hit OK.
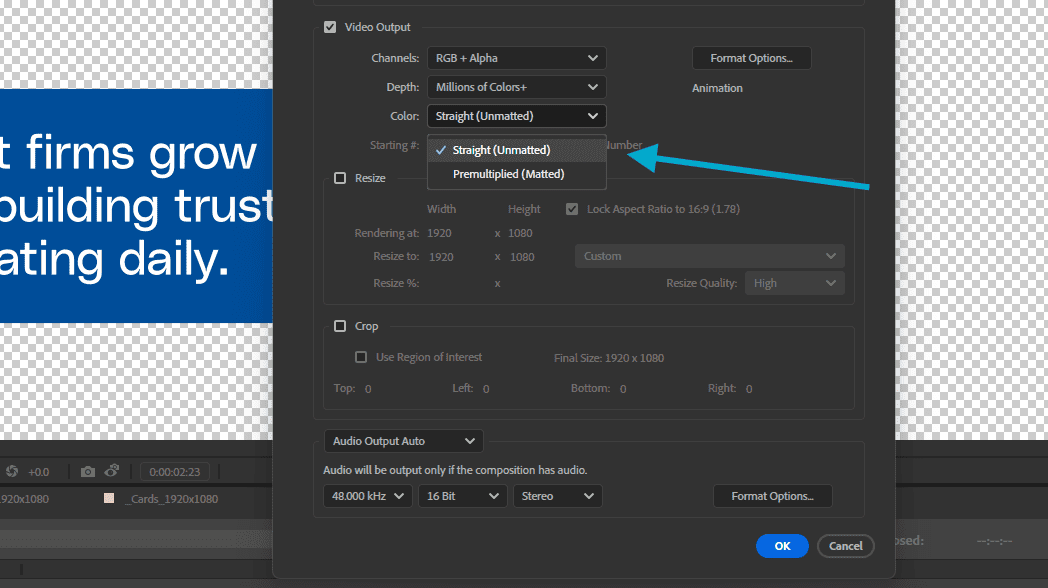
There’s one more critical option: Color. You’ll see two choices: Pre-multiplied and Straight. Make sure to select Straight. Even though Pre-multiplied is the default, it can introduce unwanted artifacts.
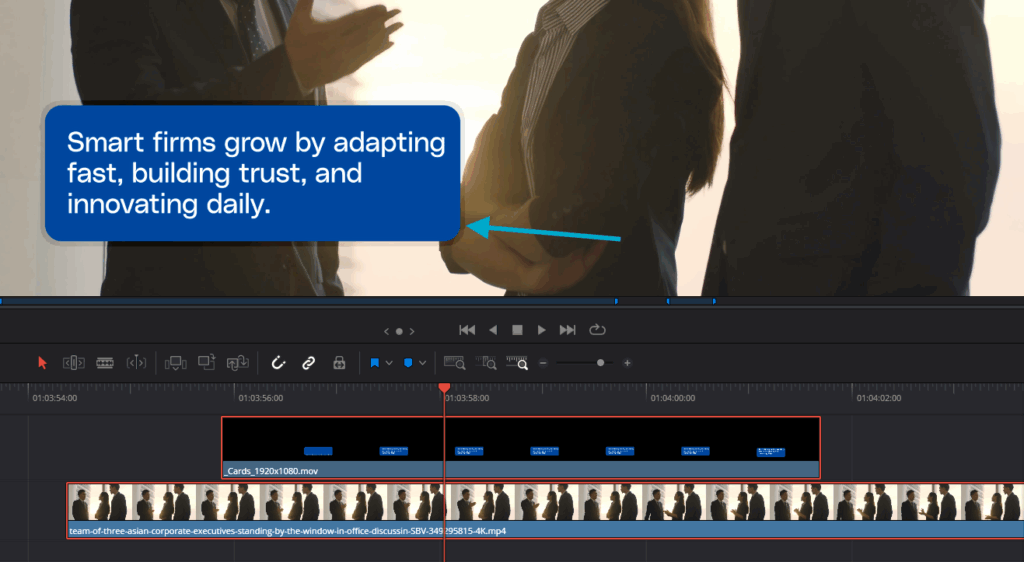
Even though the motion graphic has been rendered as an isolated asset, we are left with a halo around the box. Nine times out of ten, that’s unwanted.
If you want to know about the differences between Pre-multiplied and Straight, be sure to check out this 13-year-old video from Creative Cow. The video may be dated, but it does a good job of clearly explaining the confusion between the two formats.
Finally, select Straight, hit OK, choose your render location, and then click Render.
Importing your video with an alpha channel into Premiere Pro
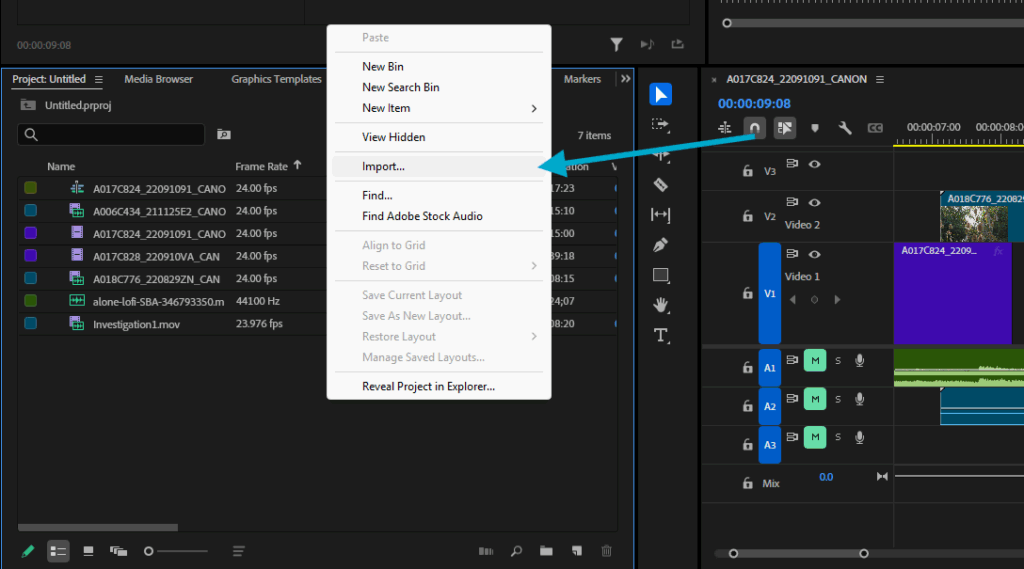
There’s no magic to importing your rendered asset with an alpha channel into Premiere Pro or even DaVinci Resolve. Simply head to the project panel, right-click, choose Import, and bring in your rendered footage.
From here, you now need to place your rendered alpha channel asset on top of the video file.
If you encounter an issue, verify that you rendered with the Pre-multiplied (Matted) option selected, rather than Straight (Unmatted).
Exporting your video from Premiere Pro
In most cases, files with alpha channels will be used for motion graphic titles or for visual effects work. These are usually created with a visual effects program like After Effects. However, if there comes a time when you’d like to export one using Premiere Pro, here’s how.
1. Go to export settings and select a format that allows alpha channels
Go to the Export Settings in Premiere Pro, and select a format that allows for an alpha channel, such as QuickTime.
2. Select your video codec
Choose a Video Codec such as Animation, Apple ProRes 4444, or GoPro CineForm. These will show the options in the next step.
In the example shown in the video tutorial, Will selected GoPro CineForm and then scrolled down to reveal the section for Depth, which is similar to what we did in After Effects earlier in the previous steps. The second option will allow an alpha channel to be exported with the video.
3. Export your work
With the alpha channel option selected, simply press Export. And that’s it!
Explore pre-made templates with alpha channels
At first, working with alpha channels can be a bit confusing, but with a little practice, they’ll open you up to a new skill set and make you a stronger video editor. To start working with them right away, check out the Storyblocks library for their customizable After Effects templates and Premiere Pro templates. With a Storyblocks subscription, you’ll get access to over 20,000 pre-made video templates, plus unlimited downloads of over 10 million royalty free stock media assets.