Figuring out the technical specs for every platform can feel like a chore, but it’s one of the most important habits you can build. Getting it right is the difference between a video that stops the scroll and one that gets swiped away.
In this guide, we’ll break down a useful workflow for cropping and formatting your videos so they always make an impact.
Table of contents
Why using the right video specs matters for engagement
Ignoring video specs is a mistake that costs creators views. We’ve all seen it. When you don’t pay attention, you risk running into common pitfalls that scream “amateur” to your audience:
- Awkward aspect ratios: Your beautiful widescreen video is squished into a tiny box with distracting black bars.
- Blurry resolution: The platform compresses your incorrectly sized video, leaving it pixelated and unprofessional.
- Hidden visuals: The main subject is pushed to the edge of the frame, or worse, completely cropped out of the shot.
- Cut-off captions: Subtitles sliced in half by the platform’s user interface.
When you get it right, the platforms reward you. Your video fills the screen, looks more professional, and gets a better shot at being pushed by the algorithm.
Your complete guide to social media video dimensions for 2026
To make things easy, we’ve created the only cheat sheet you’ll ever need. This downloadable resource from our Ultimate Video Marketing Toolkit has all the up-to-date video specs for every platform that matters.
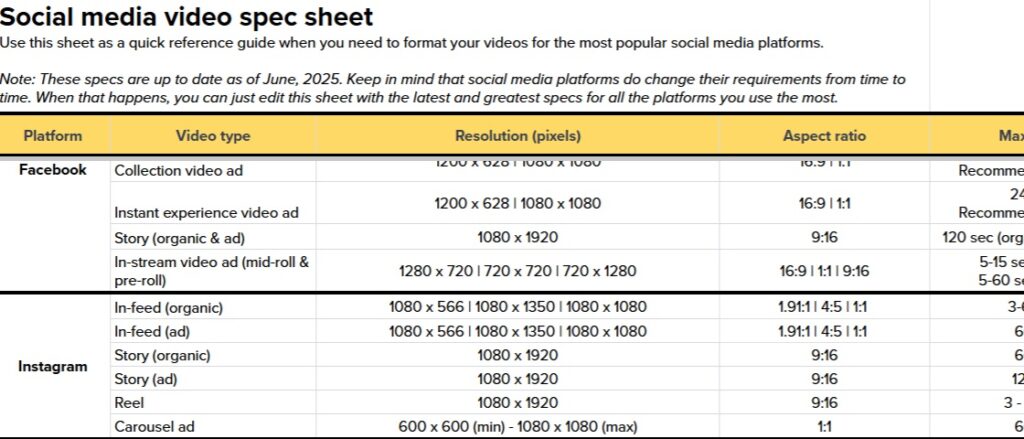
Our social media video spec sheet covers:
- Platforms: Instagram video dimensions (Reels, Stories, Feed) and the best video size for Facebook, Reddit, TikTok, YouTube (Shorts, Standard), LinkedIn, and more.
- Formats: Aspect ratios, resolutions, social media ad sizes, and file types for each placement.
- Key Info: Max file sizes, video length limits, and other crucial details.
How to crop and resize videos like a pro
Before you open your editor, you need to know what shape your final video should be. Here are the most common aspect ratios:
- 9:16 (Vertical): The king of mobile video is vertical video. Use this to crop video for Instagram Reels, TikTok, YouTube Shorts, and Stories. This aspect ratio fills the entire screen on mobile devices.
- 1:1 (Square): A classic for feed posts and resizing video for Instagram and Facebook. It’s a safe, versatile choice that performs well on both mobile and desktop.
- 4:5 (Portrait): A slightly taller social media video dimension for Instagram and Facebook feed posts. It takes up more screen real estate than 1:1 without being fully vertical.
- 16:9 (Horizontal): The standard widescreen social media video size, perfect for YouTube and embedded videos on websites like LinkedIn.
Next, you need to actually crop your footage. Here’s a quick guide on how to crop and resize in today’s most popular video editors for beginners.
How to crop video in Premiere Pro
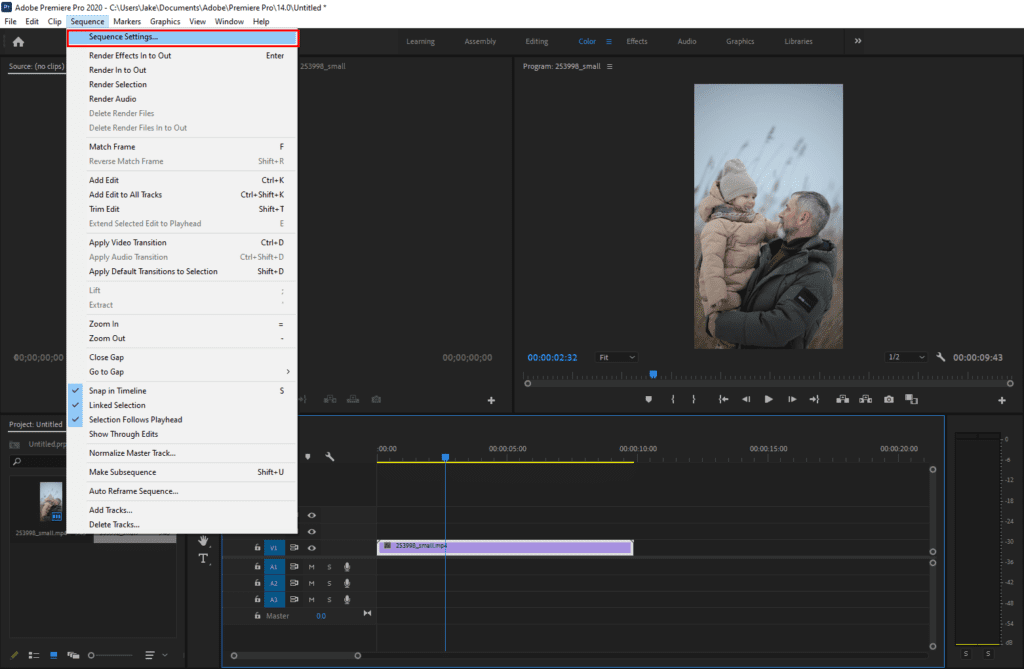
Premiere Pro is a powerful tool for professional results. To crop your footage, select Sequence and choose Sequence Settings.
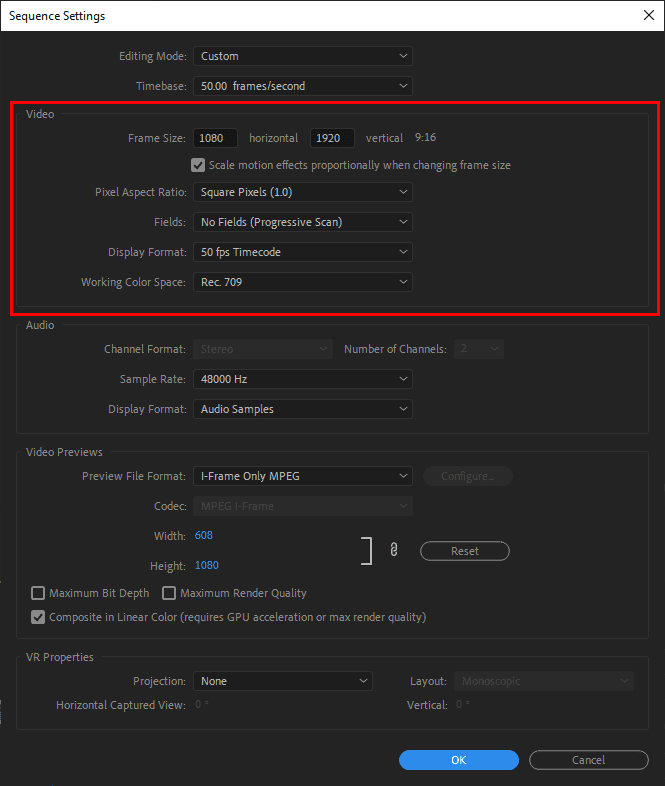
Press the drop-down menu for Editing Mode and select Custom, then set the Frame Size to the crop you’d like.
To crop your video to fit the new dimensions, open Effect Controls, select your clip, and use the Scale and Position tools under the Motion tab to find a perfect crop. Watch the video all the way through to ensure the framing still works with any subject and camera movement.
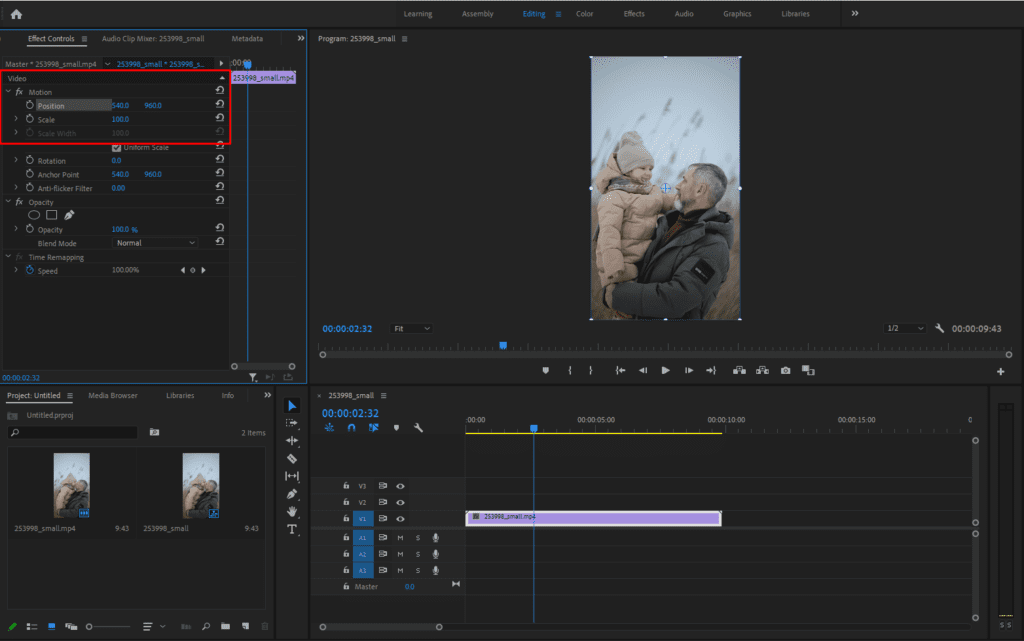
You can also use its Auto Reframe feature to automatically analyze and reframe your footage for different aspect ratios, while keeping the main subject in the shot. We cover this more in-depth in our tutorial on how to make horizontal video vertical in Premiere.
For a deep dive, check out our full tutorial of how to crop video in Premiere Pro.
How to crop video in DaVinci Resolve
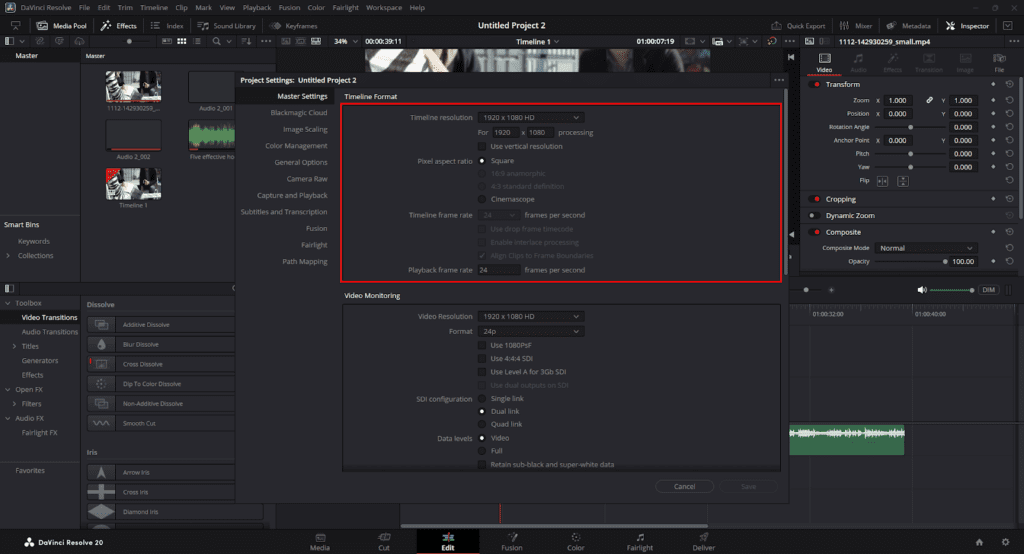
To crop video in DaVinci Resolve, set your timeline to the correct aspect ratio by going to File > Project Settings and entering your Timeline Resolution. Then, you can reframe your clips.
Select your clip, open the Inspector in the top-right, and use Zoom and Position to adjust your framing. For a faster approach, you can click the Transform icon under the preview window. You’ll get a bounding box on your footage which you can click and drag to resize.
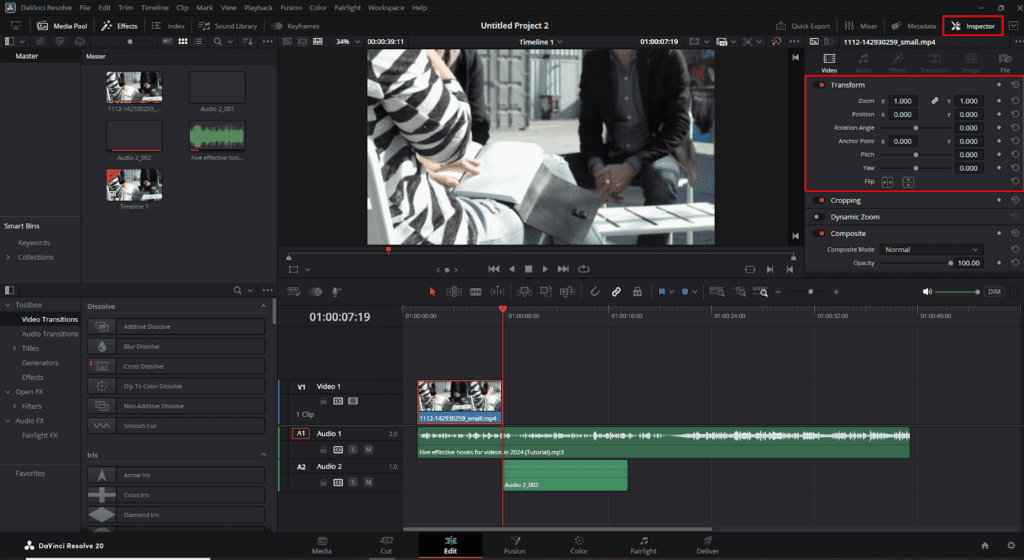
If you’re new to this powerful editor, learn the basics of how to use DaVinci Resolve.
How to crop video in Maker (Storyblocks editor)
Maker is Storyblocks’ editor, designed to remove technical guesswork and get you creating faster. It’s a web-based editor that uses templates, making it the most streamlined option for social content.
You can choose a format or aspect ratio for your project right from the start. Alternatively, you can select a ready-to-use template and filter for the right ratio for your project using the drop-down selector.
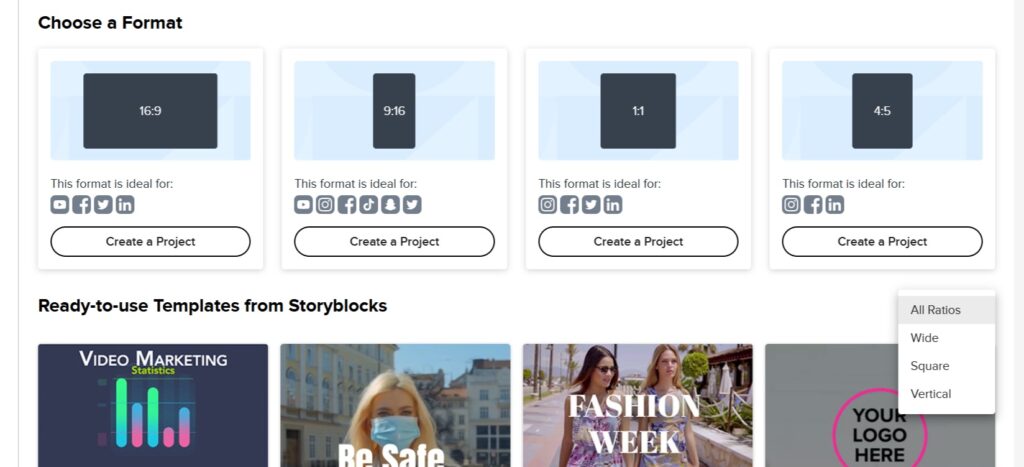
Once you’ve created your project, you can easily import your own clips or search and add assets directly from the Storyblocks library. From there, you can easily click and drag to position and scale your footage within the pre-set frame.
How to crop video in CapCut (or other mobile editors)
When you need to get an idea out fast, nothing beats editing on your phone. CapCut is the go-to for many TikTok and Reels creators because it makes mobile editing dead simple.
Import your video clip into a new project. Then tap the Edit button in the lower left corner. Hold and scroll through the tool bar to the right until you find the Transform option, then tap the Resize button. CapCut provides icons for all the major aspect ratios (9:16, 4:5, 1:1, etc.).
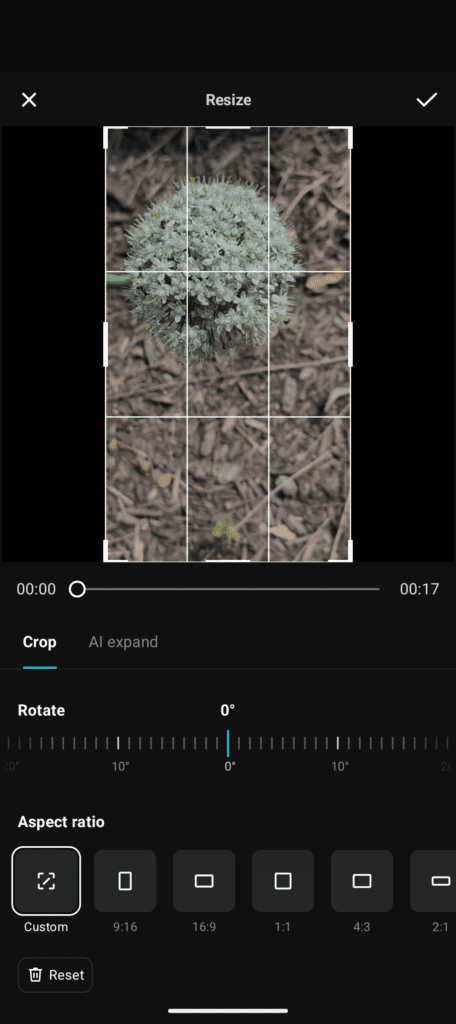
Tap the one you need, and the canvas will instantly resize. Then, use two fingers to pinch-to-zoom and drag your video to frame it perfectly within the new aspect ratio.
Here’s a more detailed guide on how to get the most out of CapCut.
4 pro tips for optimizing every single video
Cropping to the right size is half the battle. To truly stand out, you need to think like a platform-native creator.
1. Frame for thumbs, not just for eyes
Most people watch videos while holding their phones, thumbs hovering over the screen. Frame your key subjects (faces, products) centrally, leaving plenty of buffer room. If you’re filming a tutorial, check that your crop doesn’t cut off the very hand gestures you’re trying to show.

2. Don’t fight the UI, design around it
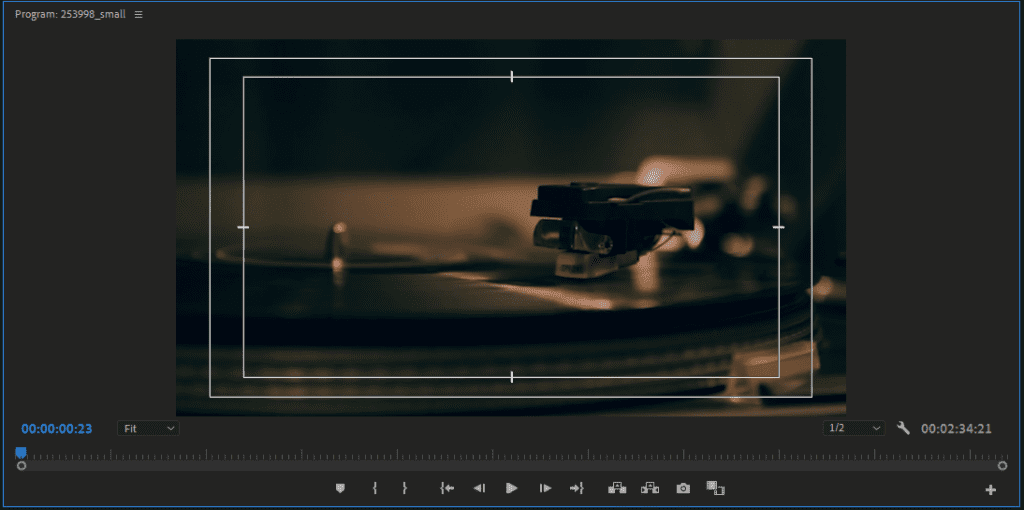
Every platform has buttons, usernames, and captions that cover parts of the screen. That “Follow” button is non-negotiable real estate. YouTube Shorts often crop thumbnails awkwardly. Use your editor’s safe zone guides (like Premiere’s “Safe Margins”) to visualize these areas and keep your important visuals out of the way.
3. Show subtitles and on-screen text
Assume your video will be viewed on mute first. This makes your on-screen text and subtitles absolutely crucial. Use bold, clear fonts and place them thoughtfully. The bottom third is standard, but you might need to adjust to avoid UI elements. Here are tutorials for adding subtitles in DaVinci Resolve and Premiere Pro, if you don’t already know how.
3. Add branding and visual consistency
Consistency and a signature visual style help build an audience. Once you find a look that works, create templates for each platform. Using the same text styles, intro lengths, and formatting makes your content instantly recognizable in a sea of lookalikes.
Download your spec sheet for easy reference
This might seem like a lot to remember, but it quickly becomes second nature. Getting your formatting right is a small investment of time that pays massive dividends in reach and engagement, especially once you figure out your unique editing style. It’s the final layer of polish that separates professional content from the rest.
To make sure you never have to guess again, keep your cheat sheet handy. Download the 2026 Social Media Video Spec Sheet, or get access to the full Ultimate Video Marketing Toolkit.
No matter what platform you make videos for, Storyblocks has over 10 million royalty free, professional stock assets created by our global network of artists to help you speed up your production timeline. With unlimited downloads of 4K footage, music, images, sound effects, templates, and more, you’ll save valuable time while leveling up your content. Sign up today to start downloading right away!