When music overpowers dialogue, it pulls viewers out of the story. Learning how to adjust audio in Premiere Pro and getting the balance right between your music and voice tracks is a fundamental editing skill you need to get the most out of your scenes.
Below, we’ll walk through two methods for balancing music and voice in Premiere Pro. The first is keyframes, which give you precise manual control over volume at any point in your timeline. The second is audio ducking, which automatically lowers your music whenever a voice track is present across your entire sequence in under a minute.
All of the footage and music used in this tutorial can be found on Storyblocks.
Before we dive in: this tutorial covers mixing, not cleaning. If your recordings have background noise or quality issues, check out our guide on cleaning your audio in Premiere Pro first.
Let’s get started!
Inside this tutorial
How to lower background music in Premiere Pro
The golden rule of audio mixing is that voice comes first. Everything else in your mix, especially your Premiere Pro background music, should support the dialogue rather than compete with it.
In practice, this means thinking in terms of relative loudness rather than absolute levels. A good starting point is to aim for dialogue sitting around -12 to -6 dB, with background music sitting considerably lower, typically around -18 to -24 dB.
The exact levels will depend on your project, but that gap between voice and music is what keeps dialogue clear and intelligible.
Method 1: Adjust audio using the Pen tool
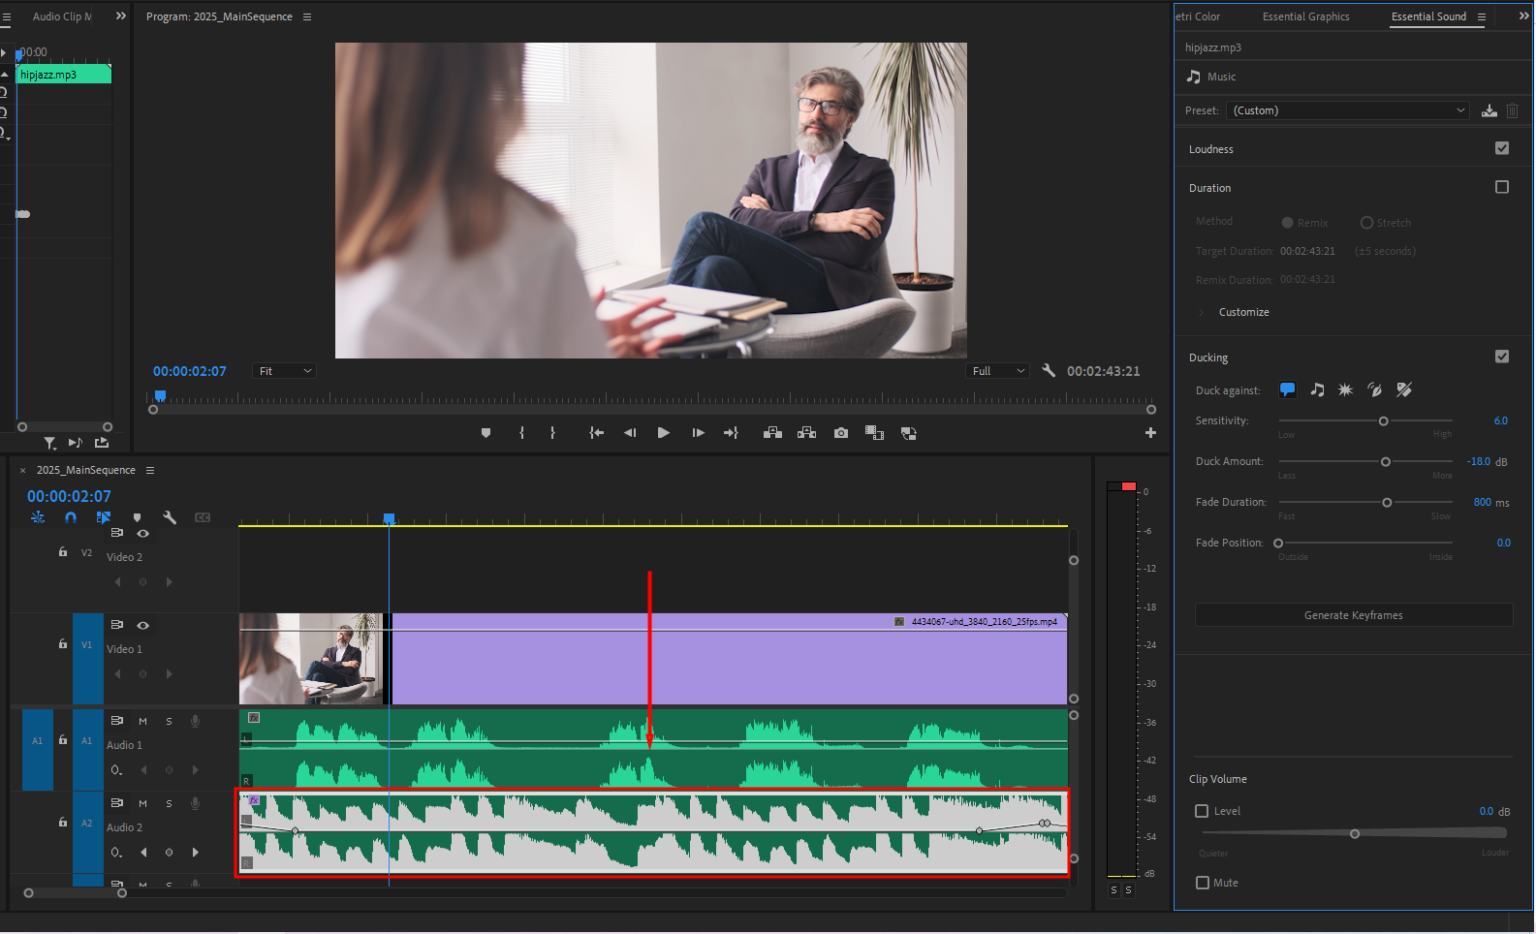
If you have only a few points where music and voice overlap, placing keyframes with the Pen tool is the quickest option. In this example, the sequence has a music track, a voiceover, and a video clip. Without any adjustments, the voiceover is difficult to hear because the music is too loud.
Here’s how to lower the volume on an audio track in Premiere Pro using the Pen tool:
1. Add keyframes with the Pen tool
To manually adjust the volume of the music track, select the Pen tool in the Tools panel window or press ‘p’ on your keyboard.
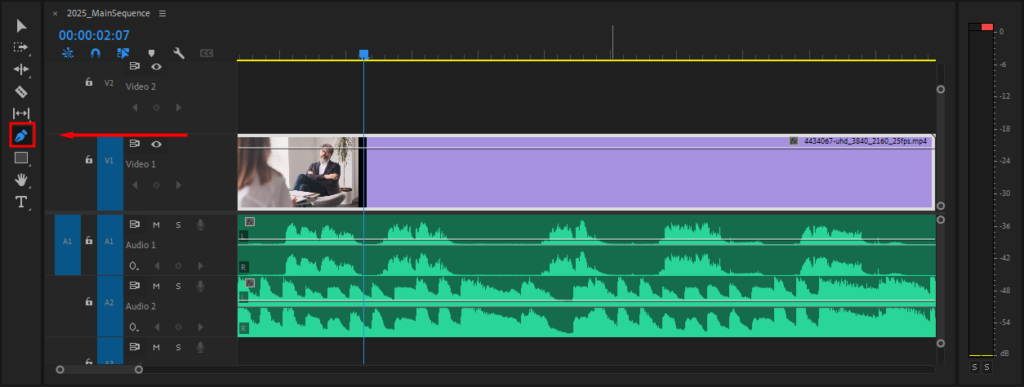
Then, on the music track (top layer), create 2 keyframes on the sides where the voiceover audio starts and ends, and do the same for the second layer.
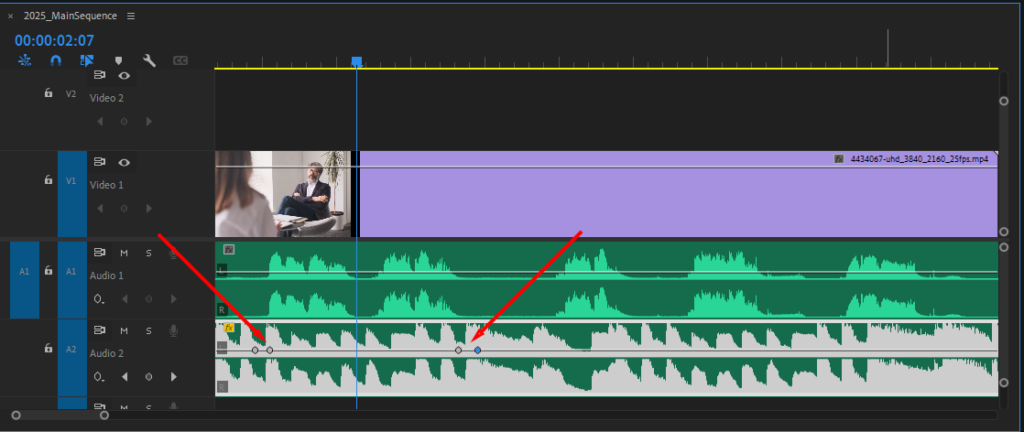
2. Use the Selection tool to reduce the volume
Next, switch back to the main Selection tool. On the top layer of the music track, click and drag the area between the keyframes to lower the volume.
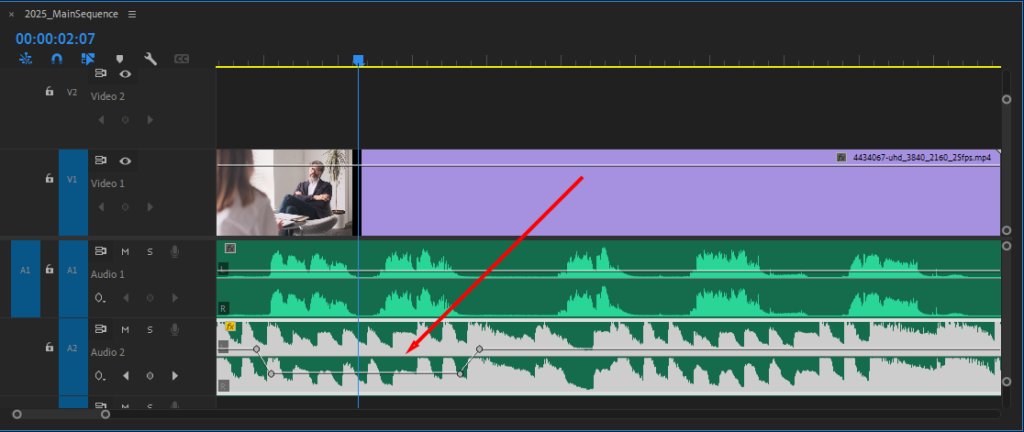
The amount you reduce the volume depends on how loud the music and voiceover tracks are. In my example, lowering the music volume between the keyframes to -18.5 is enough to easily hear the voiceover track.
Here are two quick tips to make things easier:
- To move multiple keyframes at once, select one, hold Shift and click the others, then drag the whole selection together.
- To add keyframes without switching to the Pen tool, hover over the volume line with the Selection tool and hold Ctrl (PC) or Cmd (Mac). The cursor will show a + symbol, and clicking will place a keyframe.
Method 2: Adjust audio using the automatic audio ducking feature
Now that you know how to lower music volume in Premiere Pro manually, let’s move on to the automated way, using Premiere Pro’s audio ducking tool.
This feature does the same job we just did, but without any tedious manual edits. Premiere Pro analyzes your tracks and generates keyframes across the whole sequence in a few seconds.
Here’s how to reduce background music in Premiere Pro using the auto-ducking feature.
1. Open the Essential Sound panel
First, navigate to Window, then open the Essential Sound panel window.
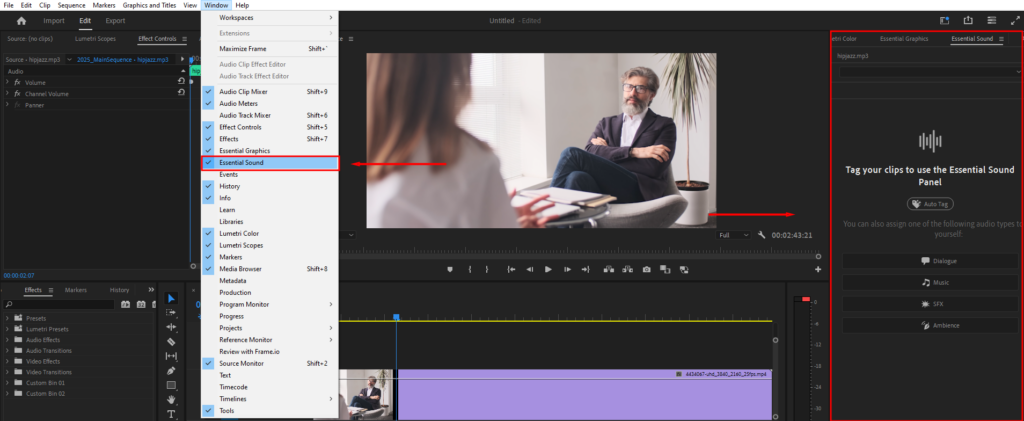
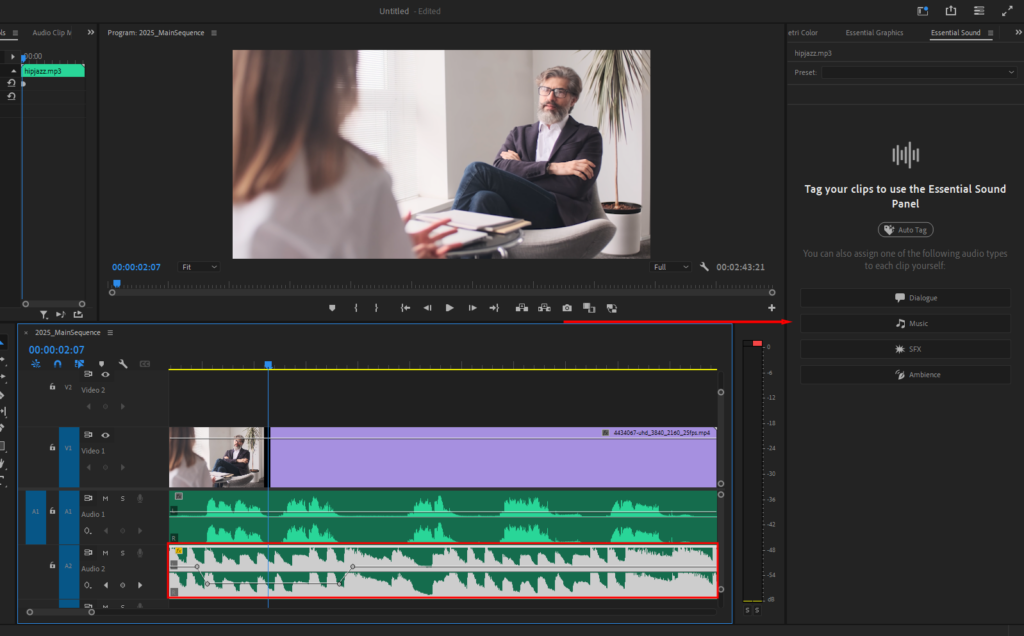
2. Tag your audio clips
To automatically adjust the volume of an audio track using the Essential Sound panel, we need to tell Premiere Pro which audio clips are music and which are voiceovers. Start by selecting the voiceover track within the sequence.Select your voiceover clip in the sequence, then click Dialogue in the Essential Sound panel.
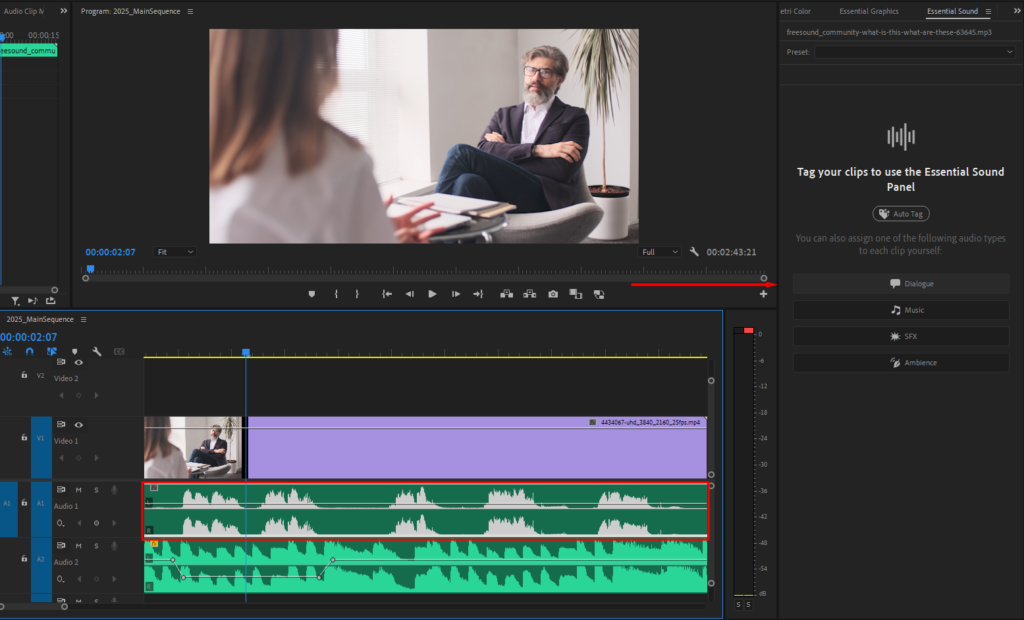
Next, select your music track and click Music.
3. Enable ducking and set your levels
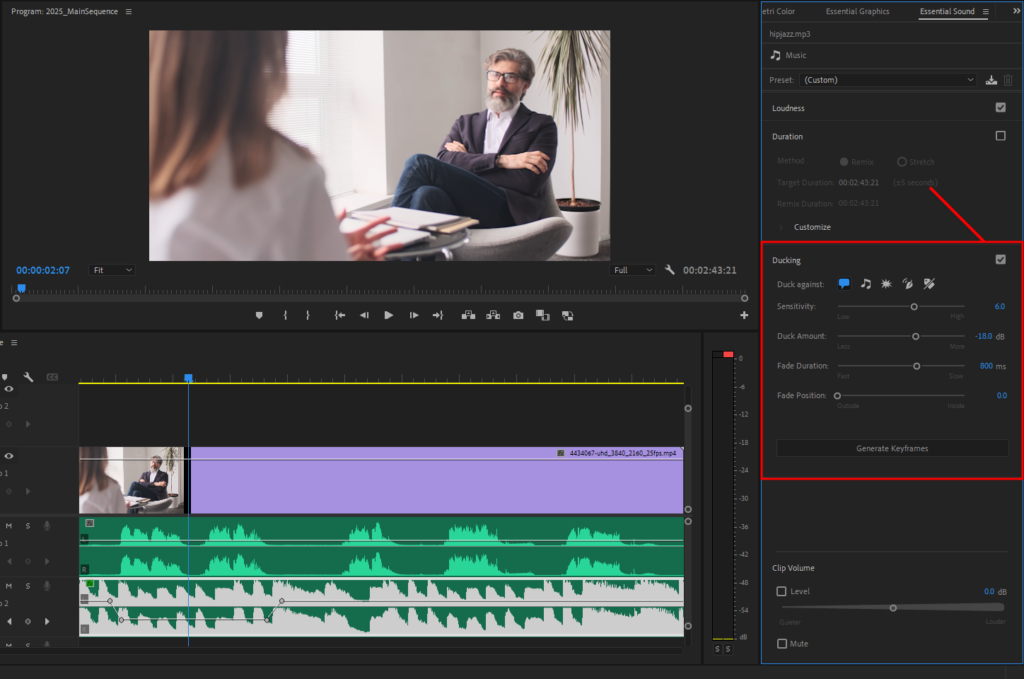
With the music track still selected, turn on Ducking in the Essential Sound panel by checking the box.
You’ll see three parameters to adjust:
- Sensitivity controls how readily Premiere detects dialogue. I find that a setting of around 6 works well as a starting point.
- Duck Amount is how much the music volume drops when dialogue is present. Aim for -15 to -24 dB, depending on your tracks, which should give the voice enough room to sit clearly on top.
Fade controls how quickly the music ramps up and down around the dialogue. The default of 800 ms is a natural-sounding transition for most projects, but you can tighten or extend it depending on the pacing of your edit.
4. Tell Premiere Pro to generate your keyframes
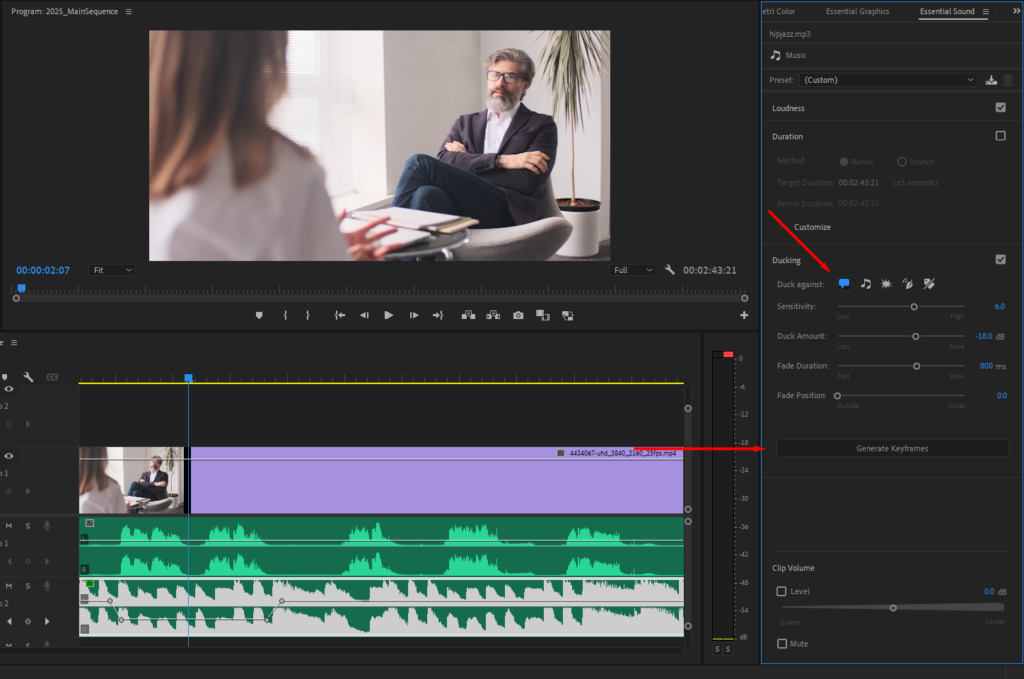
With the music track still selected in the sequence, make sure to check the “Duck against Dialogue Clips” button.
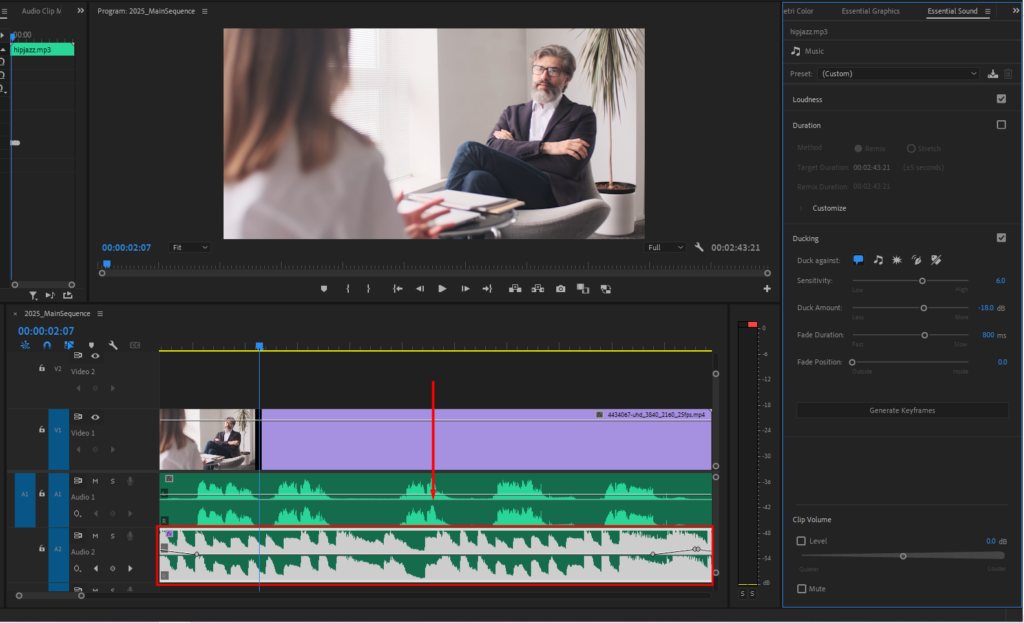
Finally, hit Generate Keyframes. Premiere will analyze the audio files and automatically create the keyframes needed to successfully reduce the volume of the music track and “duck” it behind the voiceover track.
If you have three or four voiceovers in a long timeline, the Essential Sound panel handles all of them in one pass, something that would take a ton of time to do manually with the Pen tool. It’s by far the easiest way to learn how to lower music in Premiere Pro.
A note on voiceover tracks
Audio ducking can do a lot, but it works best when your source recordings are clean to begin with. If you’re working with a dialogue track that has too much background noise or inconsistent levels to save through audio editing, it may be worth replacing it entirely.
Storyblocks’ AI Voiceover tool, powered by ElevenLabs technology, generates professional-sounding voiceovers from a script. It can even clone an existing voice to match the original speaker. It’s a practical option when you can’t salvage a track or when you’re up against a deadline and need a voiceover as soon as possible.
4 common audio mixing mistakes and how to avoid them
Now you know how to separate voice from music in Premiere Pro. But before you wrap up your mix, here are a few mistakes that beginners make that are worth keeping in mind.
1. Mixing with your eyes instead of your ears
Waveforms and dB meters are useful, but they don’t tell the whole story. I’ve gone back to sequences that looked balanced and found they sounded completely off on playback. The numbers are a guide, not a guarantee.
Watch your levels, but make decisions with your ears. Play the sequence back from the beginning, at normal volume, the way a viewer would actually watch it.
2. Pulling the music down too far
When you’re just learning how to make background music quieter in Premiere Pro, it’s easy to over-duck, especially when you’re focused on making the dialogue clear. But silence under a voiceover is just as distracting as music that’s too loud. The music is there to support the mood of the scene, so it should still have some presence.
A good test is to close your eyes and focus on the dialogue. If you can follow every word without effort and the music still registers in the background, you’re in the right place.
3. Not sorting your levels before you start
If one track is recorded at -6 dB and another at -30 dB, no mixing method will feel consistent. Right-click any clip in Premiere and use Audio Gain to normalize your tracks to a consistent level before you start. Most editors aim to get dialogue peaks sitting around -12 dB at this stage, which gives you enough headroom to work with when you start mixing.
4. Only listening in one environment
Your mix might sound great on studio headphones and fall apart on a phone speaker or laptop. Most viewers aren’t watching on a professional setup, so before you export, check your mix on at least two different playback devices. Phone audio in particular has a way of exposing balance issues that headphones tend to mask.
Find the right music for your next project on Storyblocks
Figuring out how to lower background music in Premiere Pro so that the dialogue is easy to understand is one of those skills that’s hard to notice when it’s done well, but impossible to ignore when it isn’t. The two methods above should give you a solid starting point to nail this balance in your next project.
And if you need Adobe Premiere Pro background music to work with, sign up to Storyblocks for an unlimited library of royalty-free tracks, sound effects, and footage – all professionally recorded and cleared for commercial use. You can search by mood, genre, or instrumentation to find something that fits your edit quickly.
Remember: if a dialogue track isn’t worth saving, our AI Voiceover tool can turn a script into a clean voiceover in minutes.