Good audio matters as much as good visuals—sometimes more. If your video looks great but the audio’s full of noise, reverb, or rough volume changes, people won’t stick around. The good news? Adobe Premiere Pro has built-in tools that do a solid job of cleaning things up.
In this guide, you’ll learn how to clean up audio in Adobe Premiere Pro. We’ll walk through removing background noise, reducing echo, fixing static or pitch issues, and enhancing voice clarity.
Table of contents
How to remove background noise
Even in quiet rooms, you’ll still hear things like fans or traffic sneaking into your audio—it’s a common issue, especially if you’re not recording in a sound-treated space. Here’s how to remove background noise from audio.
1. Select your clip and open the Essential Sound panel
First, click on your audio clip in the timeline. Then, go to Window > Essential Sound and bring up the audio controls.
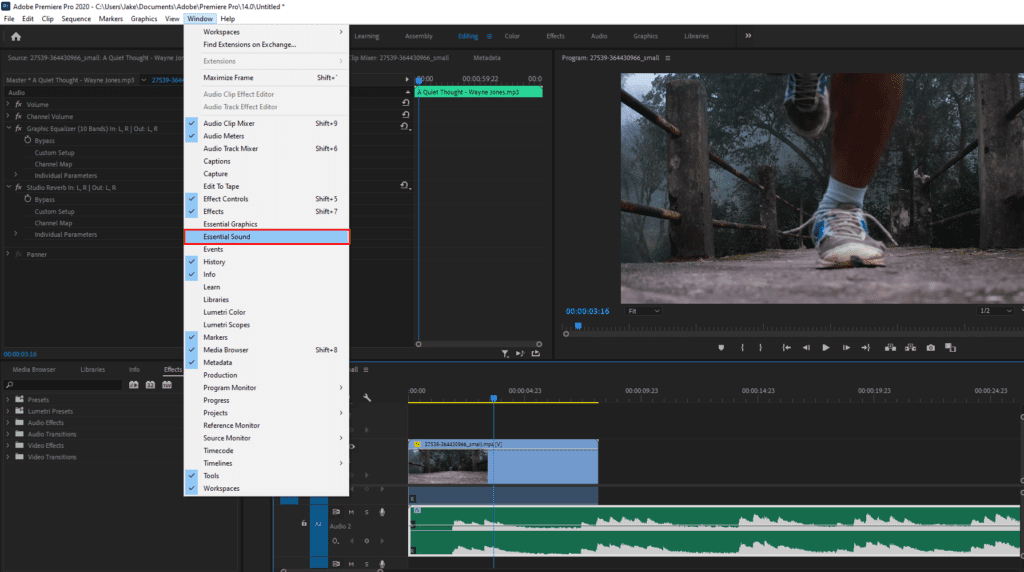
2. Set the audio type and reduce background noise
In the Essential Sound panel, choose the right category for your clip. For voice, click Dialogue. For other sound types, pick the closest match between music, sound effects, or ambiance.

If you choose Dialogue, scroll to the Repair section and turn on Reduce Noise. Increase the slider slowly until the noise fades.
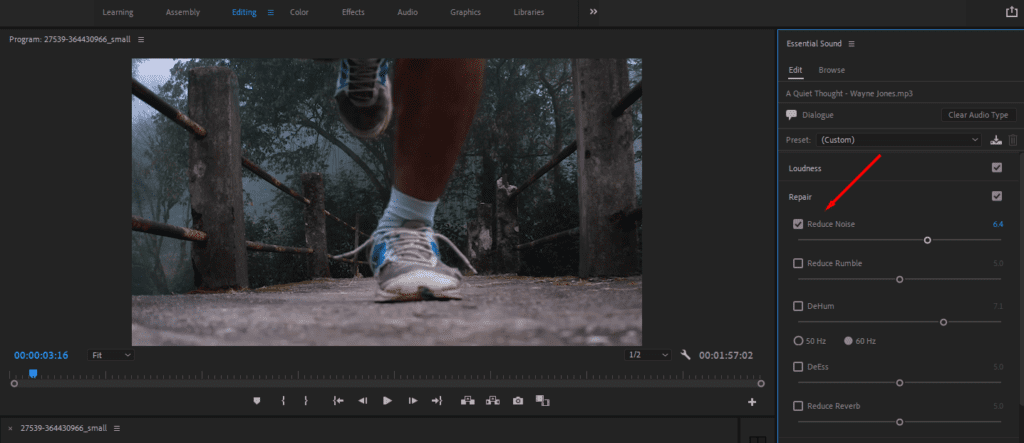
3. (Optional) Apply the DeNoise effect for more control
If you’re working with music, ambience, or effects, you’ll need to apply the DeNoise effect from the Effects panel.
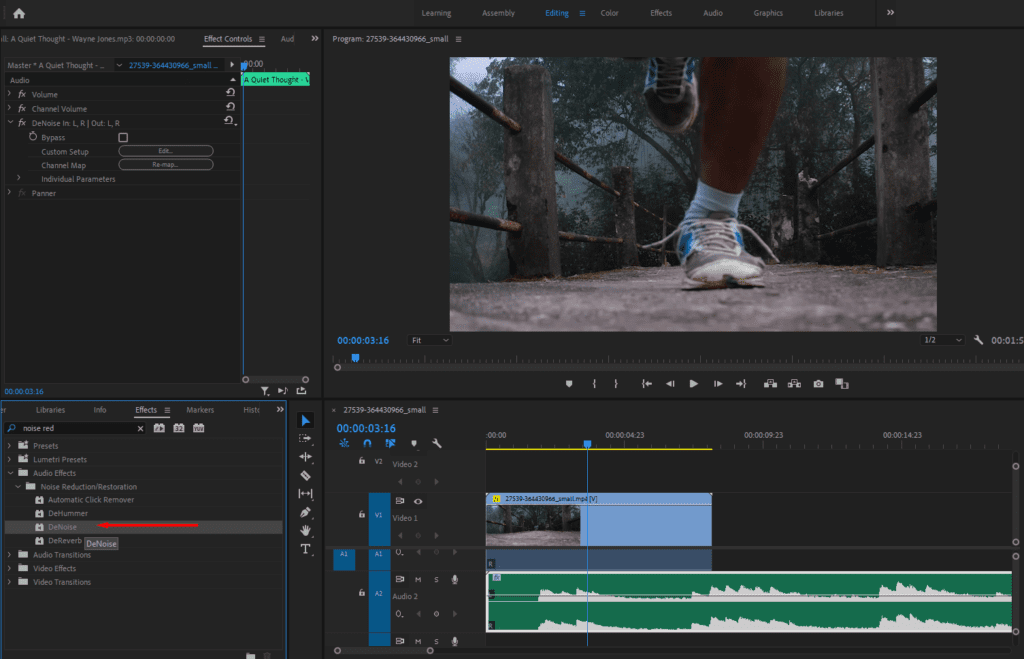
Click Edit and start with Reduction around 20–30%. Make small changes and test the result.
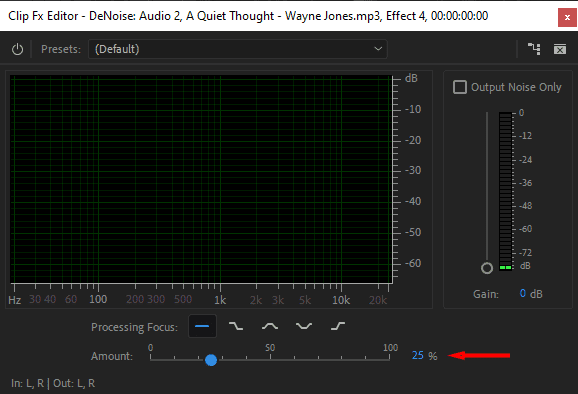
You can also apply a different Processing Focus, which lets you target specific frequencies in the sound file. If you hover over each section, you’ll see what it targets. The settings include:
- Focus on all frequencies: The default. Use this when the noise spans the entire frequency range—like a consistent hiss or ambient room tone.
- Focus on lower frequencies: Targets rumbles and low-end noise, like a HVAC hum or distant traffic.
- Focus on mid frequencies: Best when noise overlaps with speech, but use it sparingly – too much reduction here can make voices sound unnatural.
- Focus on lower and higher frequencies: Skips the midrange (where speech lives) and reduces noise at the extremes (like when you have a rumble and a hiss).
- Focus on higher frequencies: Targets hisses and high-pitched buzzes, like computer fan noise.
Pro tip: Avoid recording near loud appliances or open windows. If you can, record in short bursts and listen back between takes to catch any background noise early.
How to enhance voices
Now, let’s talk about enhancing voices in Premiere. When voices sound muddy or flat, it’s harder for people to stay engaged. Luckily, a few quick adjustments can add clarity and bring the voice forward in your mix.
1. Select your clip and open the Essential Sound panel
Click your audio clip, then go to Window > Essential Sound.
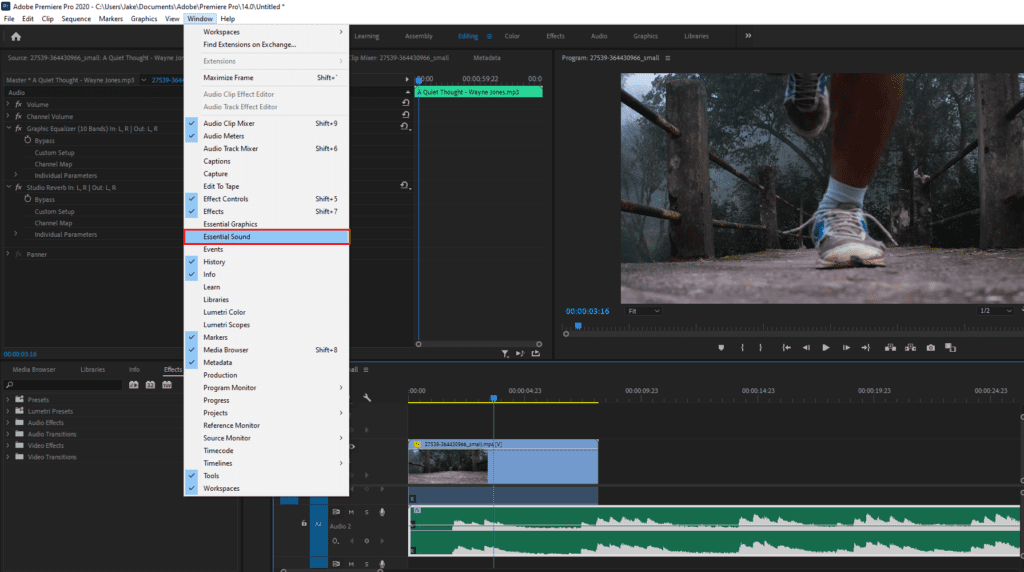
2. Set the audio type
Click Dialogue to enable voice-specific controls.

3. Add clarity with EQ
Scroll to the Clarity section and turn on EQ. Choose a preset like Vocal Presence or Podcast Voice. These raise key midrange frequencies to help the voice cut through.
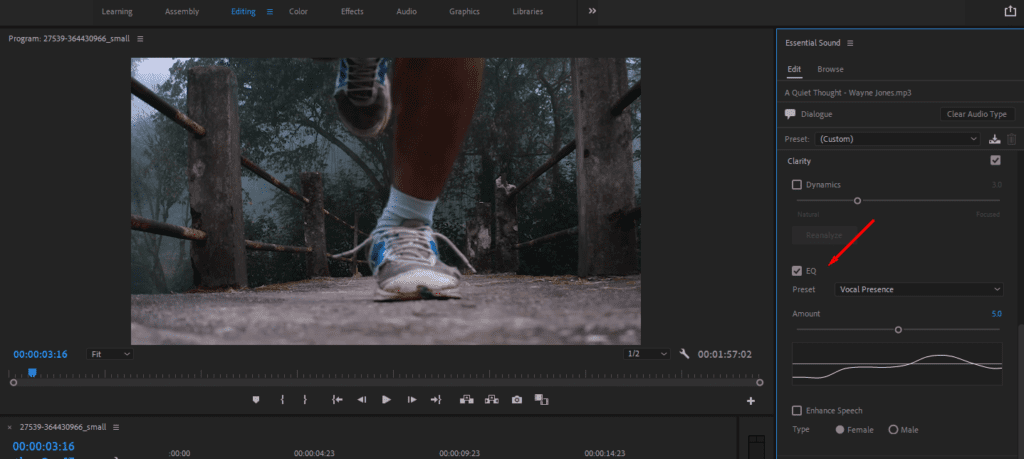
If the voice sounds too sibilant or sharp, try adjusting the Amount down a little. If it persists, you could apply the DeEsser effect from the Effects panel. It specifically targets harsh “S” sounds without affecting the whole EQ curve.
4. Add compression for consistency
Next, turn on Dynamics. Premiere Pro will analyze your clip—all you have to do is increase or decrease the dynamics until your audio sounds better.
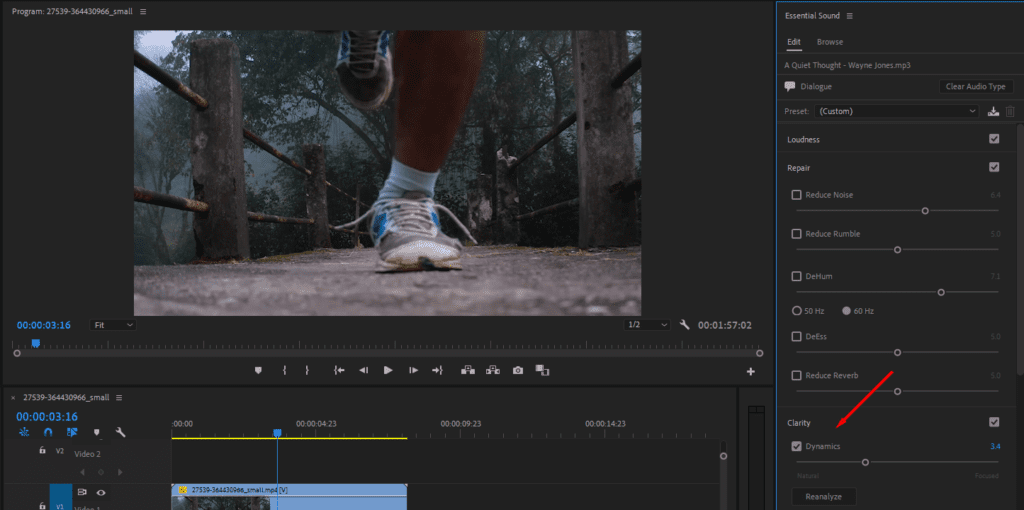
For more control, apply the Dynamics effect from the Effects panel. In the Effect Controls panel, click Edit to adjust the compression settings individually.
Keep in mind that if you’re mixing voice with background music, you might need to lower the music enough to keep the dialogue clear.
Pro tip: Use a pop filter and record sounds slightly off-axis to reduce harshness before editing.
How to remove static or pitchiness
Static in your audio usually comes from bad cables or interference. Pitchiness happens when audio clips, distorts, or gets over-compressed. Both can ruin clarity, but you can clean them up with a few steps.
Here’s how to make the audio clearer in Premiere Pro by removing static.
1. Open the Essential Sound panel
Select your audio clip, then go to Window > Essential Sound. Then, select the audio type that matches your clip.
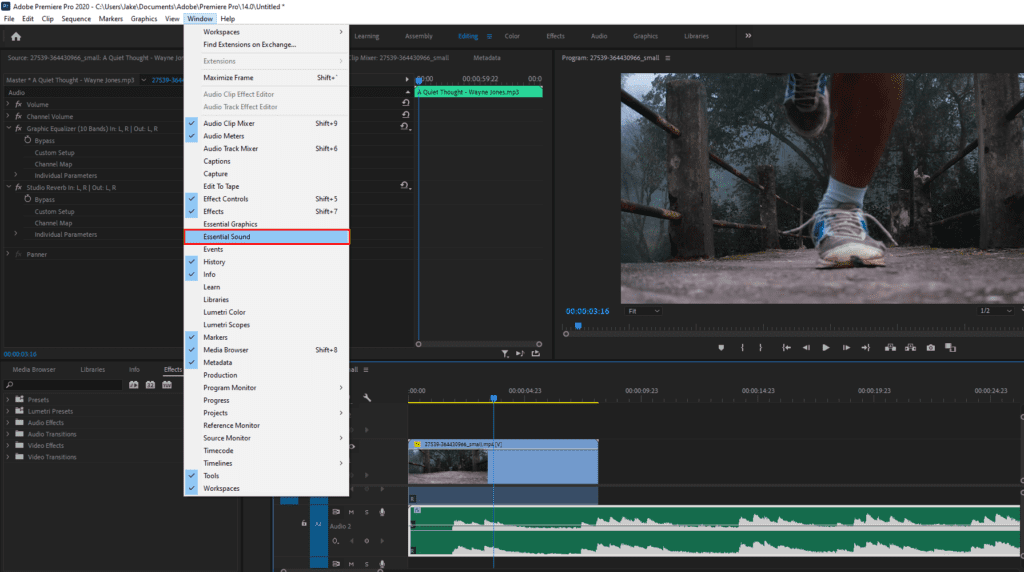
2. Reduce noise and reverb
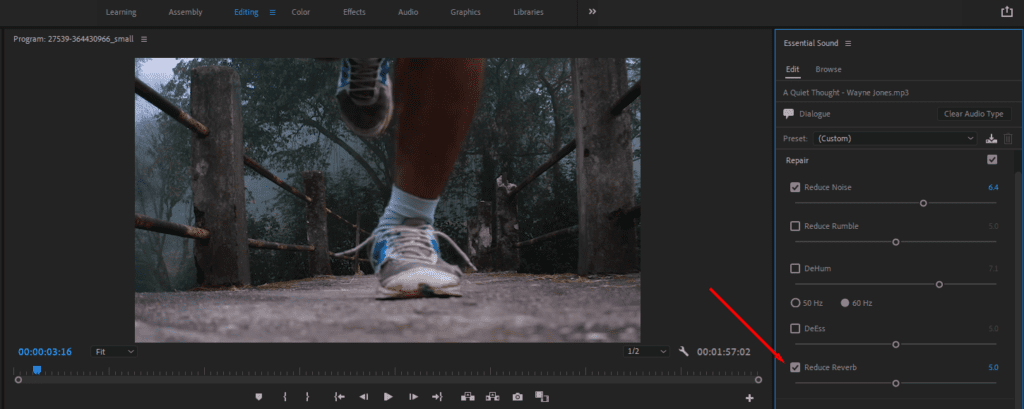
In the Repair section, turn on both Reduce Noise and Reduce Reverb. Adjust each until the audio sounds tighter and cleaner.
3. Add the DeEsser effect to control sharp frequencies
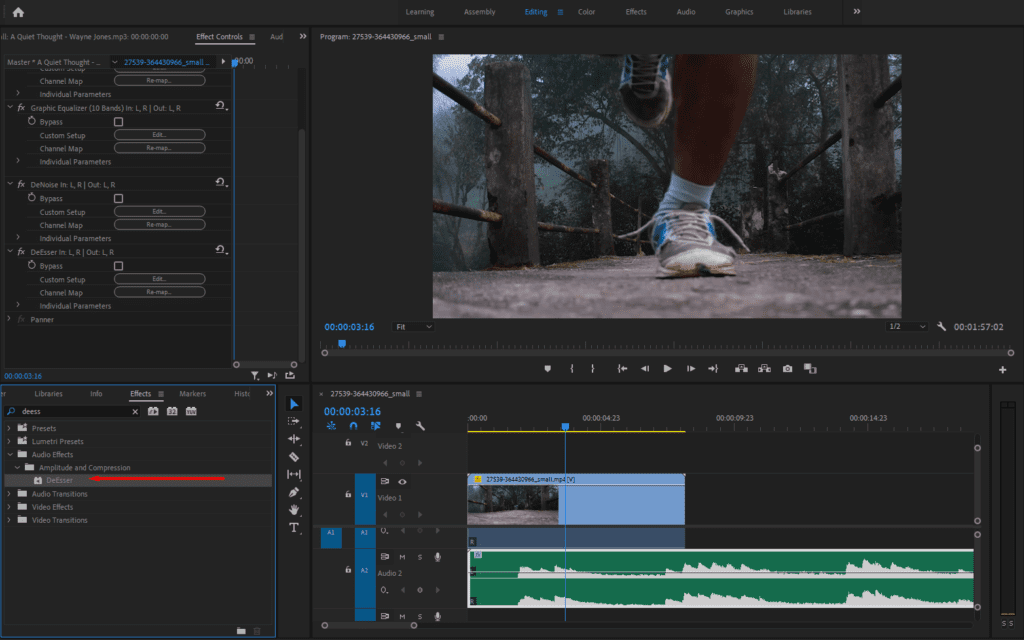
Next, navigate to the Effects panel and search for DeEsser, then drag it onto your clip.
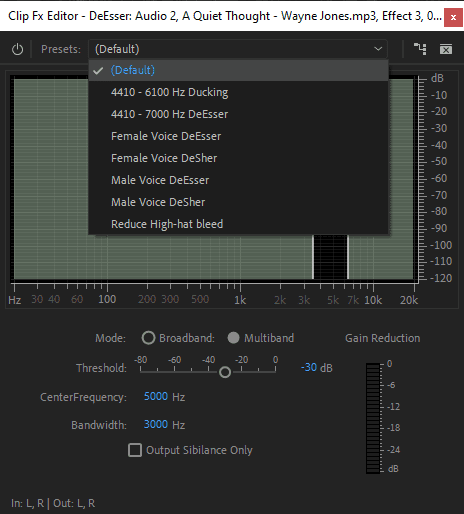
In the Effect Controls panel, choose the Preset that makes sense for your audio.
4. Smooth out pitch issues using Dynamics
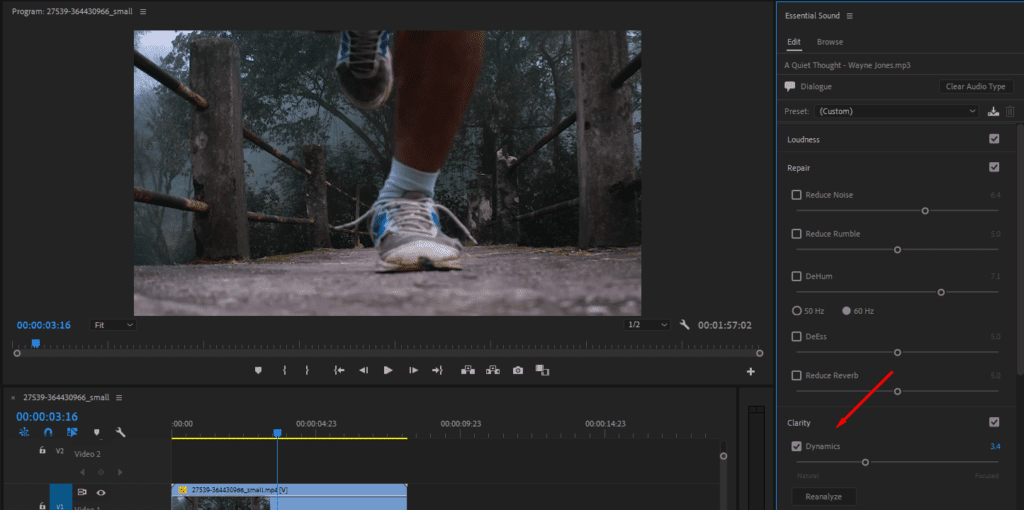
Back in the Essential Sound panel, turn on Dynamics and move the slider until you get the pitch back under control.
Pro tip: Avoid recording with gain set too high. If the input clips during capture, no amount of post-processing will fully fix it.
How to remove echo and reverb
Reverb can make your audio sound like you recorded it in a gym, causing echoes. Here’s how to clean audio in Premiere Pro and bring the sound closer to your listener.
1. Open the Essential Sound panel
Click the clip in your timeline, then go to Window > Essential Sound. Pick the audio type that matches your clip.
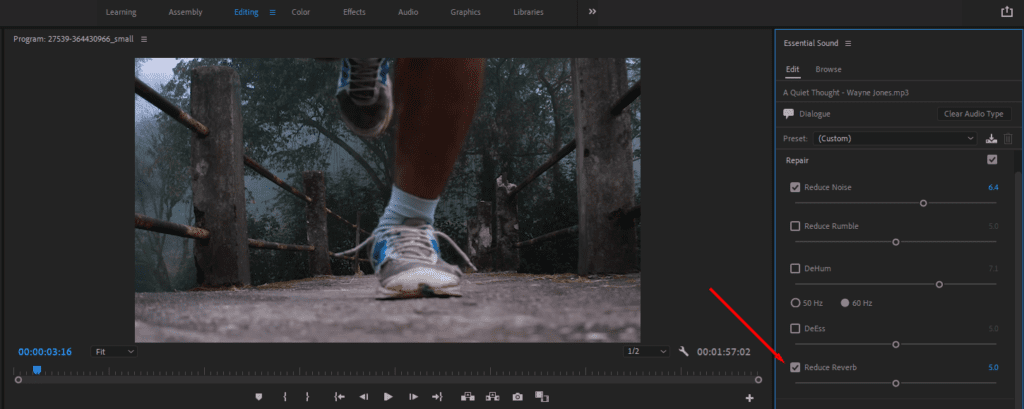
2. Reduce the reverb
In the Repair section, turn on Reduce Reverb and fine-tune while listening. If it starts sounding hollow, back off the slider.
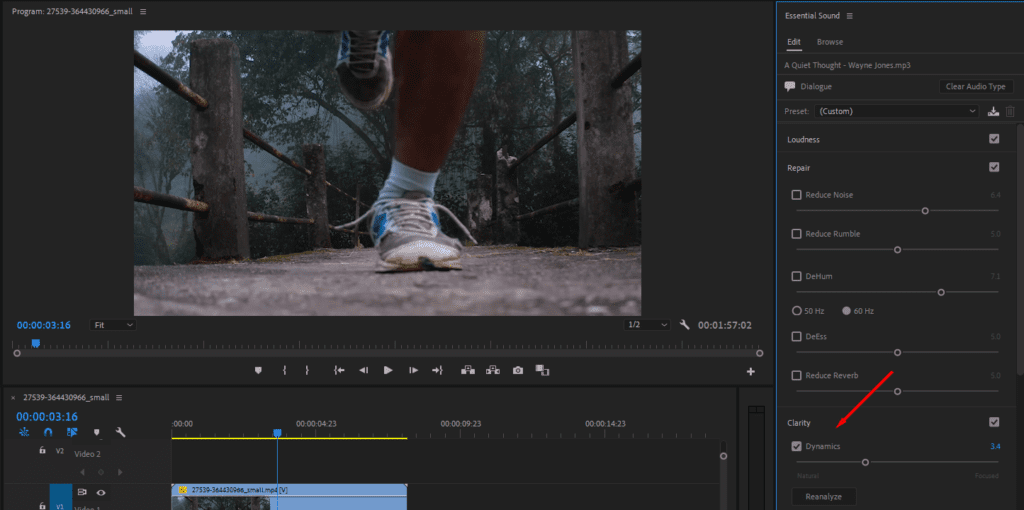
3. Use Dynamics to tighten the sound
Enable Dynamics and move the slider to make the sound feel closer.
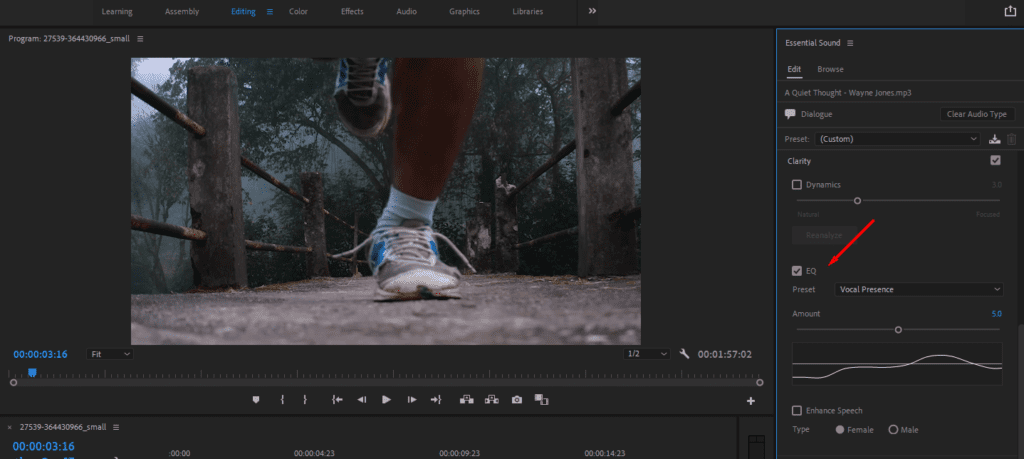
4. Use EQ to clean up lingering room tone
In the EQ section of the Essential Sound panel, turn on EQ and choose a preset that best fits your audio. If the sound still needs fine-tuning, swap presets until it feels right.
5. (Optional) Make manual adjustments to EQ
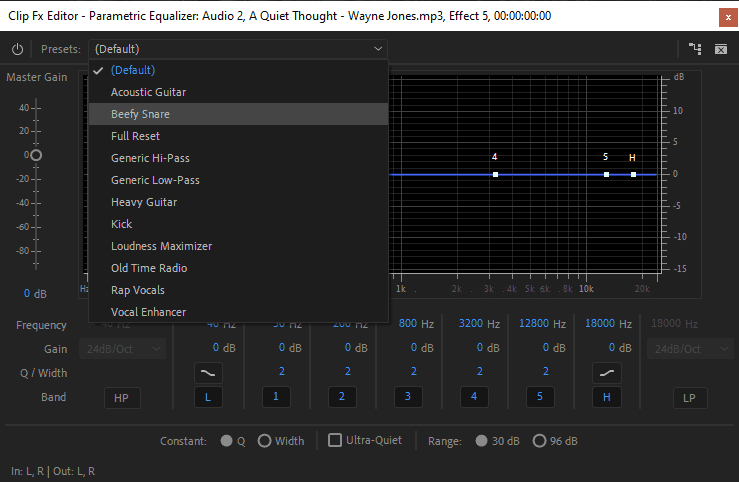
To make manual adjustments, go to the Effects panel and search for Parametric Equalizer or Graphic Equalizer. Drag one onto your clip.
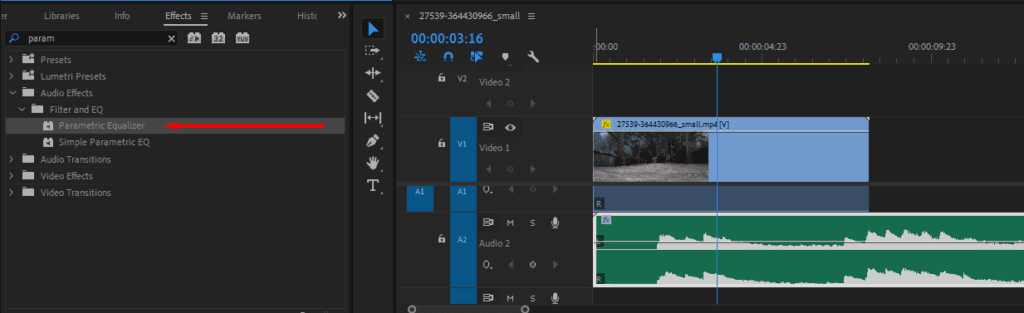
Then open the Effect Controls panel, click Edit, and find the best Preset from the dropdown menu.
Pro tip: Avoid large, reflective rooms when recording. If you can, use blankets, rugs, and furniture to deaden the space.
How to export audio for best quality
Once you’ve cleaned and mixed your audio in Premiere, export it with settings that preserve the quality. Low export settings can undo all your hard work you put into making your audio sound clean and crisp.
1. Open the Export settings
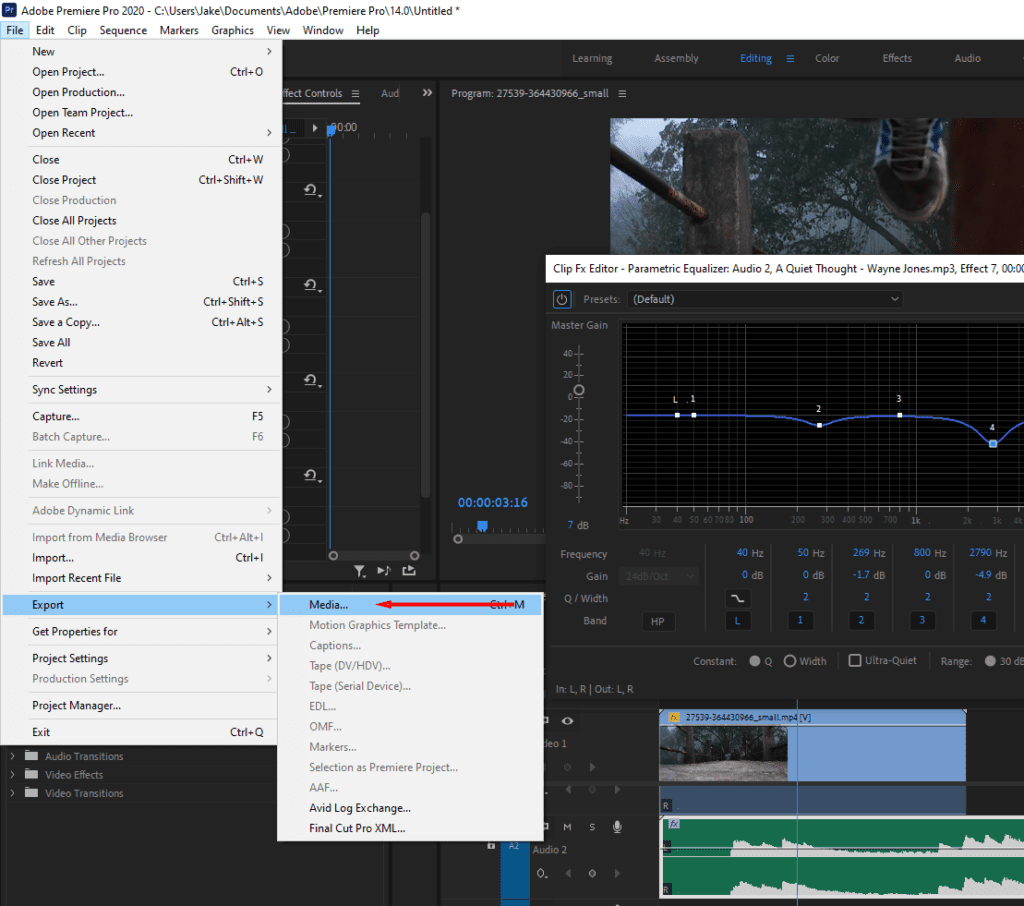
First, click inside your timeline, then go to File > Export > Media or press the keyboard shortcut Cmd/Ctrl + M.
2. Set the audio export options
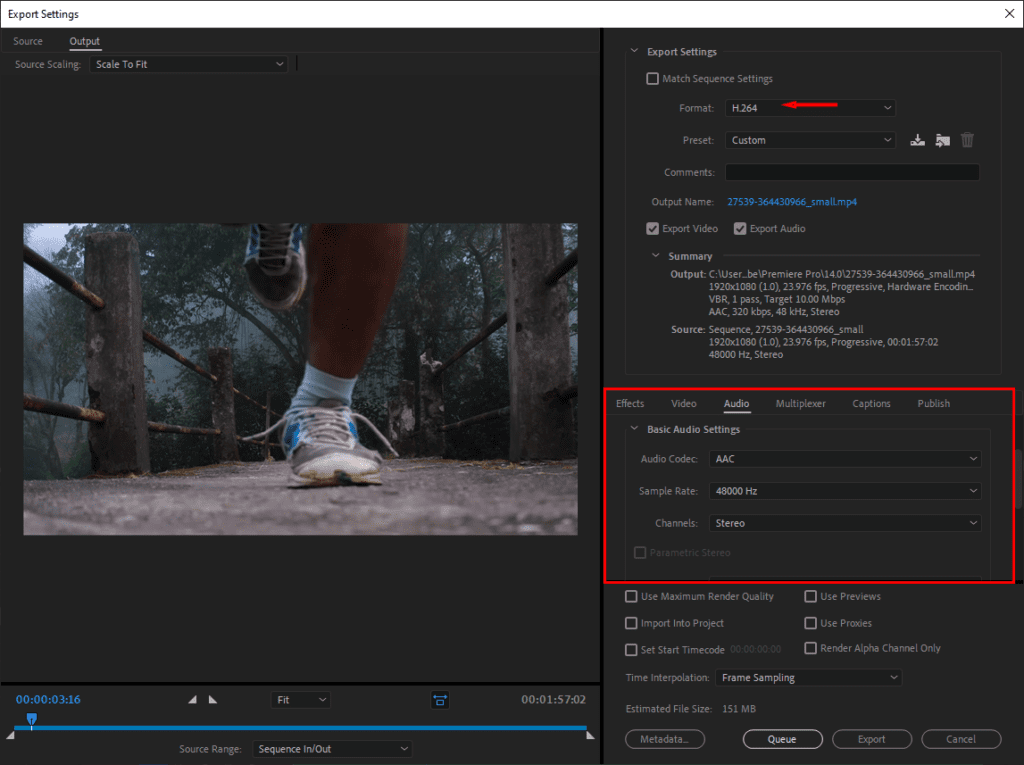
Switch to the Audio tab in the export window. Then, set the Audio Codec—lossless audio formats (like WAV or AIFF) preserve all the original audio data. They’re larger in file size, but help you get the cleanest audio.
Then adjust the settings as follows:
- Sample Rate: Set to 48000 Hz for video (this matches YouTube’s standard).
- Channels: Use Stereo (rather than mono) unless your mix uses surround sound.
- Audio Quality: Set to High.
- Bitrate: Set to 320 kbps for the best balance of quality and compatibility.
Finally, click Export, or choose Send to Media Encoder if you want to render later.
Pro tip: If your audio cuts off too abruptly at the end of your video, you can add a simple audio fade-out to smooth the transition.
5 tips for getting professional-grade audio
You can fix a lot in post, but the best audio starts with smart recording choices. Here’s how to get cleaner, more professional sound before you hit record.
- Control the environment. Turn off fans, air conditioners, and anything else that hums. Use a pop filter, record short takes to easily check for any issues, and keep an eye on your input levels.
- Use a quality microphone. An entry-level shotgun or lav mic will outperform built-in camera audio. Don’t rely on onboard mics for anything important.
- Monitor with good headphones, not speakers or earbuds. Use closed-back headphones when editing. They reveal subtle tones that you won’t catch on built-in speakers or casual earbuds.
- Know when to bring in third-party software. Premiere’s Essential Sound panel works great for basic cleanup. But if the audio is badly damaged, you might need third-party plugins for Premiere Pro like iZotope R.
- Record room tone—it saves you later. Capture a few seconds of silence in your recording space before or after your main take. You can use it to build a custom noise profile if you need to remove unwanted hums later.
Explore the Storyblocks audio library for high-quality music and sound effects
Knowing how to make audio sound clearer in Premiere Pro helps you make better videos. And whether you’re fixing recordings or adding polish, Premiere Pro gives you the tools to do it. If your audio is out of sync with your video or you want to edit it directly, you can also split your audio to edit it.
But when you need clean music and sound effects that just work, check out the Storyblocks audio library. Every track is 100% exclusive and professionally recorded—ready for your next video, podcast, or project.
Need more tips? Check out the best practices for optimizing video.