
Getting your audio levels right is one of those things that separates a good video from a great one. You can have beautiful footage and a strong script, but if your music cuts out abruptly or your sound levels are all over the place, viewers will notice.
One technique every editor needs in their toolkit is knowing how to fade audio in and out at the right moments.
In this tutorial, we’ll walk through how to fade out audio in Premiere Pro, from importing your files to choosing the right type of transition for the job.
What are the steps for fading out audio in Premiere Pro?
If you’re like most video editors, at some point you’ve probably found yourself wishing there was an easier way to figure out how to make audio fade out in Premiere Pro.
Fortunately, the process has gotten a lot simpler over Adobe’s last few software updates, thanks to the addition of visual fade handles. You can get started in just a few simple steps by following the tutorial below, or you can watch our video tutorial.
Step 1: Import audio
First, you’ll want to import your audio files into Premiere Pro. If you have the Storyblocks Plugin for Adobe Premiere Pro, you can save a bunch of time by finding high-quality music and sound effects right in Premiere Pro.
Otherwise, you can import them manually by firing up the program and either double-clicking or right-clicking in your project window and selecting Import from the pop-up menu that appears.
Then, navigate through your file system to the first audio file you’d like to import. Alternatively, you can drag-and-drop audio files directly into your project from a separate window.
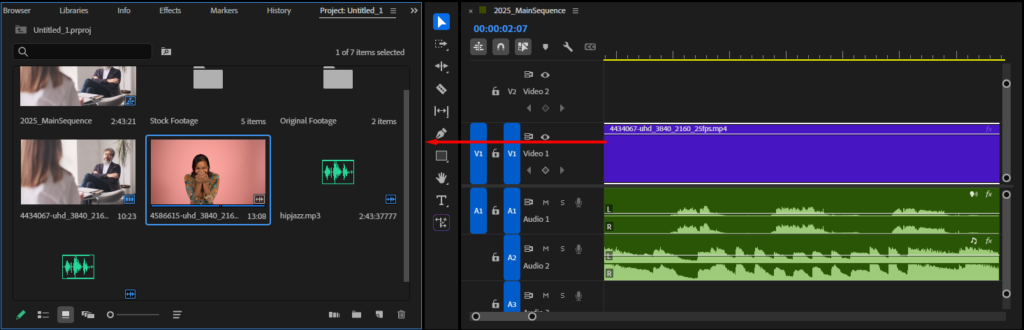
Note: If you’re unsure about the best file formats to use, check out our guide on lossy vs. lossless audio.
Step 2: Place audio on timeline
Once you’ve chosen your audio clip, drag it over to the timeline to add it to your sequence. Premiere Pro will automatically assign it to the audio track in your project. If you haven’t created a sequence yet, the software will do it for you once you’ve added the clip to the timeline.
Before you add in your transition, be sure to clean up your audio so it sounds crisp and clear.
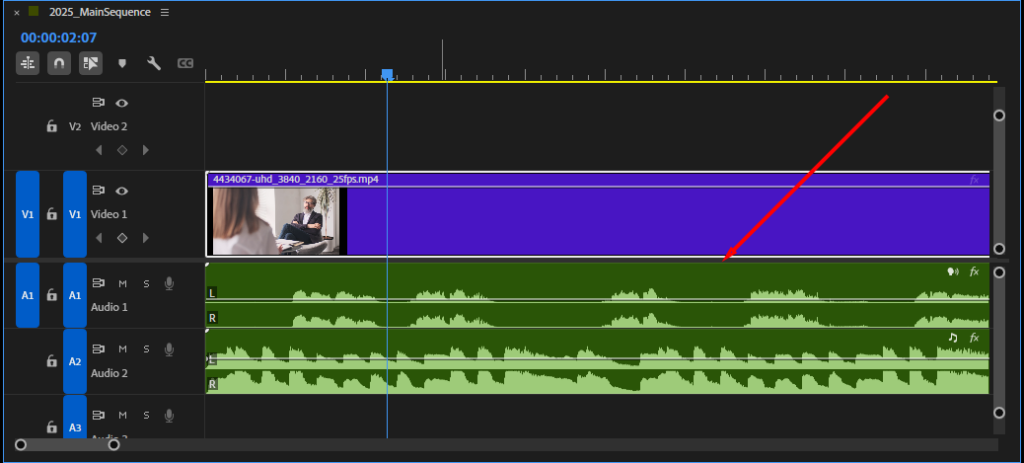
Step 3: Select and apply your transition
Now that your clip is in place, you’re ready to add transition effects that allow you to fade in and out your audio. There are two ways to do this.
Method A: How to fade audio in Premiere using visual fade handles (the fastest way)
It’s now easy to add audio fade outs in Premiere Pro without digging through menus. Simply hover your mouse over your audio clip in the timeline and you’ll see small square icons (face handles) appear at the top left and top right corners of the audio clip.
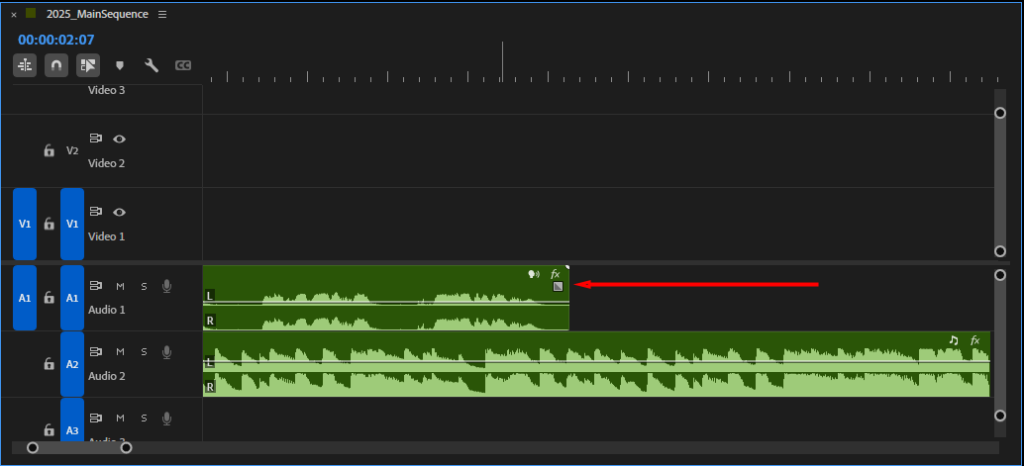
Click and drag the top-right handle inward to the left to create a fade-out. The further you drag, the longer the fade will be. (To create a fade-in, click and drag the top-left handle inward).
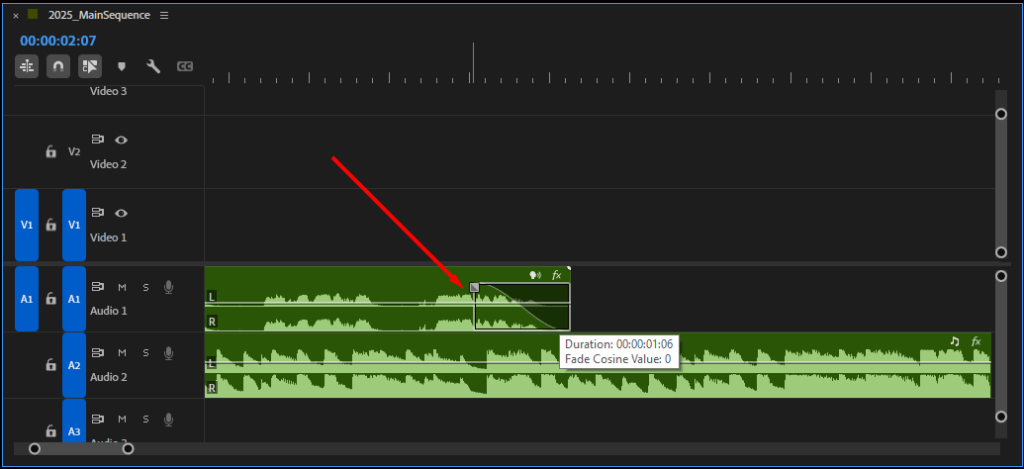
Method B: How to make music fade out in Premiere Pro with Effects
The second Premiere Pro fade out audio method is to use the built-in audio transitions. It isn’t quite as fast as using the audio handles, but you can get the sound exactly how you want it and create shortcuts to speed up future projects – more on that later.
If you don’t see the Effects panel, navigate the menu to Window > Effects to enable it. Within the Effects panel, you’ll see a dropdown menu for Audio Transitions. Select the Crossfade folder and you’ll see the three default transitions included in Premiere Pro.
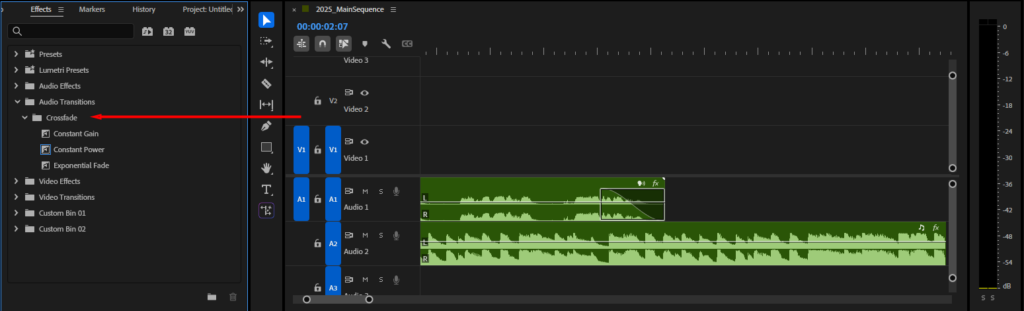
The first is Constant gain. With constant gain crossfade, audio increases or decreases at a consistent rate as you transition between clips. Transitions using constant gain tend to sound a bit more abrupt, so it’s generally wise to use it sparingly.
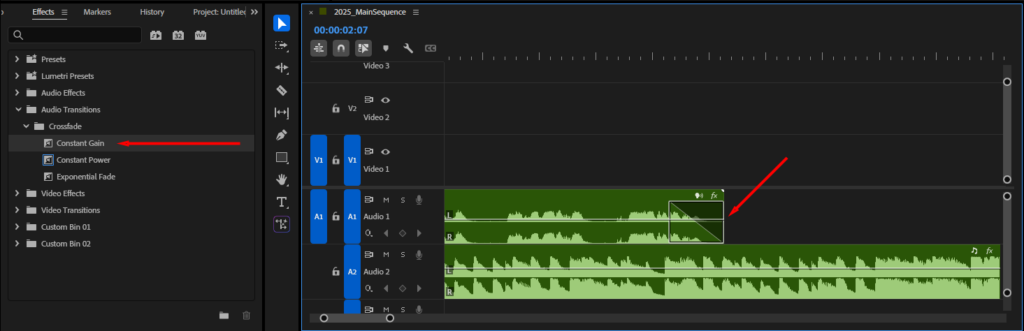
Next up: Constant power. This creates a less jarring volume transition between clips than you’ll find with constant gain, making for smoother, more gradual fades.
With this type of transition, audio decreases slowly at first, but then it fades more quickly toward the end of the clip. At the start of the next clip, the volume of the audio track ramps up quickly initially, but slows down toward the end of the transition.
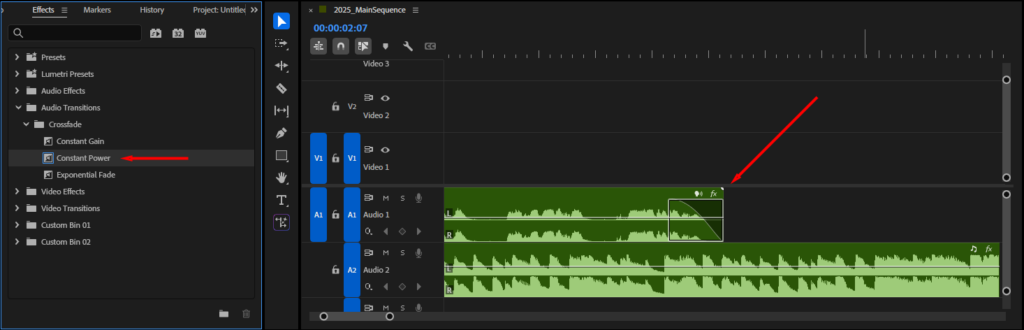
Finally, we have Exponential fade. Exponential crossfade is useful for sequences with a lot of dialogue, or to denote a sharp tonal shift between scenes.
It begins by adjusting a clip’s volume slowly up or down, increasing in speed at a set rate until the end. Its shorter, more gradual fade-out makes exponential fade particularly useful at the end of audio clips.
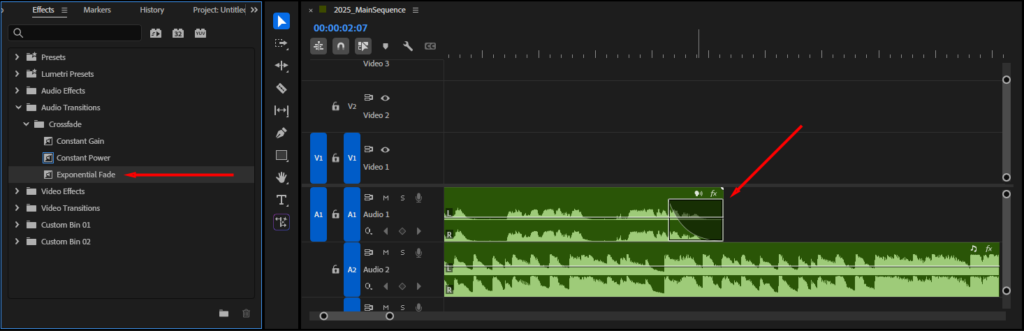
Select the transition you’d like to use, and drag it onto the beginning or end of the clip where you want your audio to fade in or out.
To change how long the transition fades the audio out is, click directly on the Constant Power icon on your timeline and drag the edges to adjust. You can also double-click on the effect to change the transition duration.
Make fading out easier with keyboard shortcuts and defaults
You can use the following keyboard shortcut for adding in a transition: Shift + D + CMD/Ctrl.
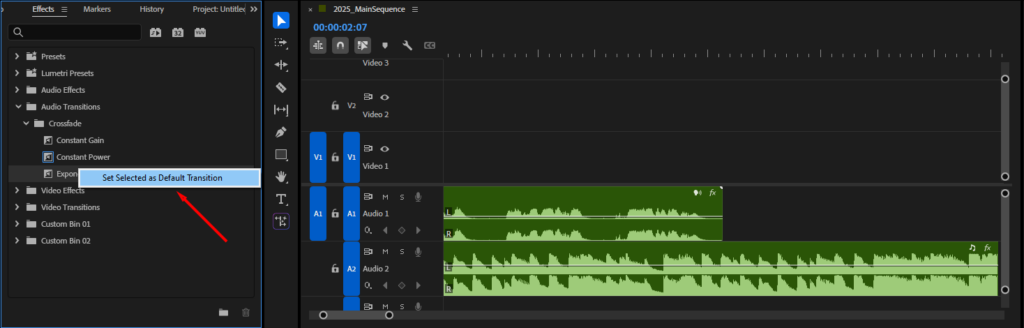
This will add in the default transition you have set in Premiere Pro. To change your default audio transition, navigate to the Effects panel, Audio Transitions > Crossfades. Then, right-click on a transition and select Set Selected as Default Transition.
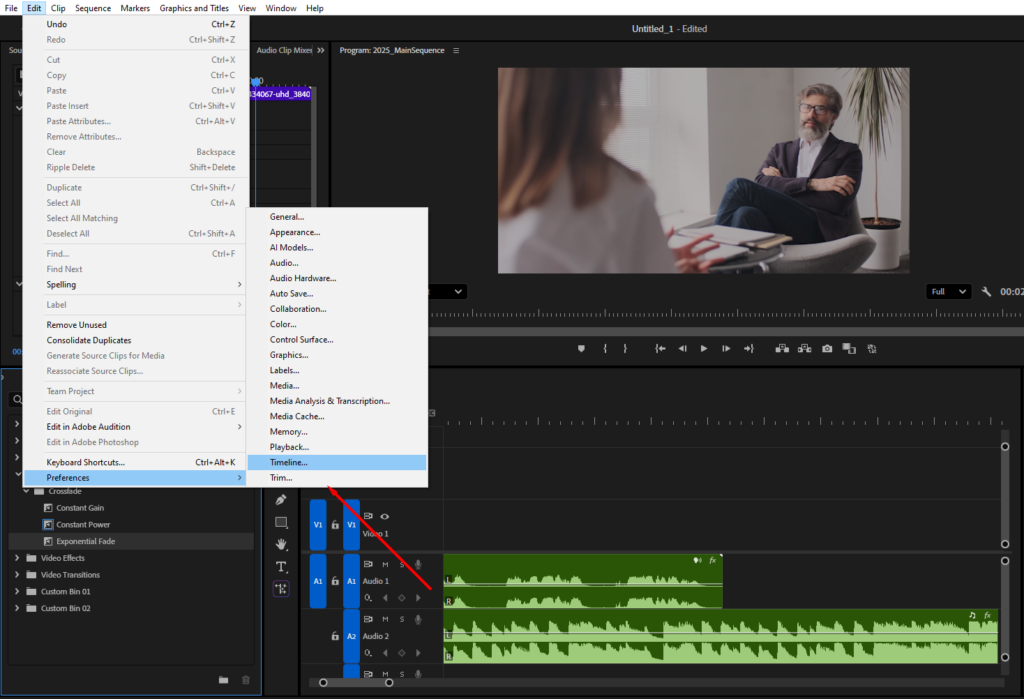
To set a default transition duration that will be applied whenever you use an audio transition, navigate to Edit > Preferences > Timeline.
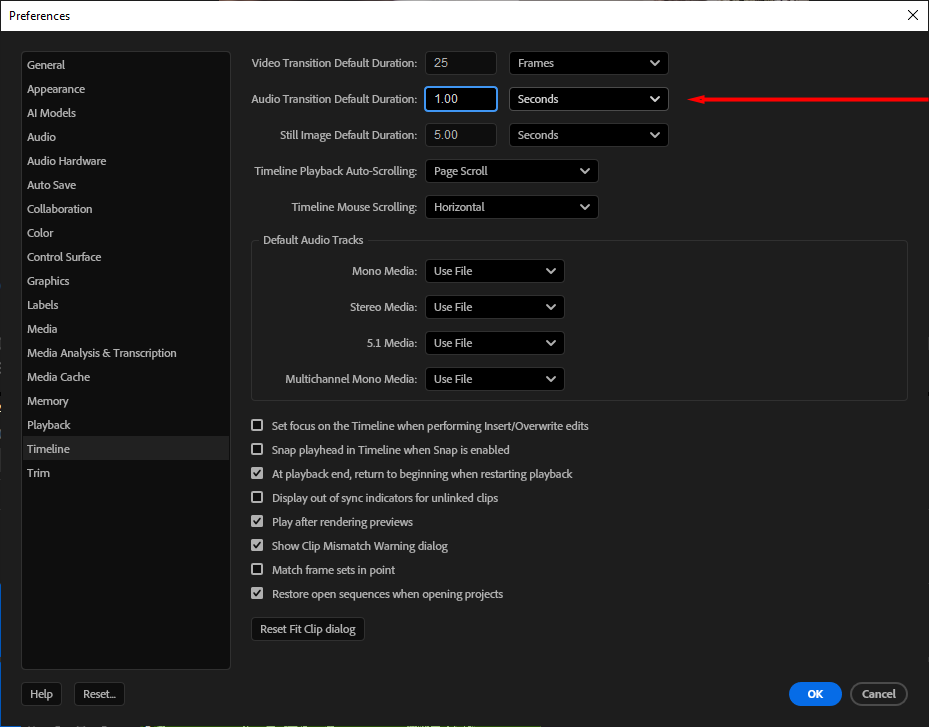
Then go to Audio Transition Default Duration and enter in either your frames or seconds preferences for the duration. Click OK to save.
Congratulations, you’re now officially ready to start fading audio tracks in Premiere Pro! You can learn more about how each of these three audio transitions work in the next section.
What’s the difference between fade in and fade out in Premiere Pro?
The ability to fade audio in and out is one of Premiere Pro’s most essential functions. When working with multiple audio tracks, you can increase (fade in) or decrease (fade out) the volume of each track as needed to balance the audio.
- Fade in: Audio gradually increases in volume from silence to full level at the start of a scene.
- Fade out: Audio gradually decreases in volume until it’s silent, typically at the end of a scene or video.
This is especially useful when combining dialogue with music tracks, or when transitioning between scenes with different audio environments.
When would you use a fade out audio effect in a video?
The most obvious place to use a fade out is at the end of a video or scene. Instead of music or ambient sound cutting off abruptly, a fade brings things to a natural close. It’s a common editing mistake beginners make, but a quick stop to audio is surprisingly noticeable to viewers.
Fades are also useful when you’re cutting between scenes with different sound environments. If scene one has upbeat background music and scene two is a quiet indoor conversation, a hard cut between the two will feel jarring. Learning how to fade out music in Premiere Pro will smooth it over.
Another good time is when someone walks away from the camera. Gradually lowering the audio as they move further from the frame helps sell the illusion of distance.
Beyond those three, fades come up constantly in the day-to-day of audio editing, like hiding a rough edit, covering a mic pop at the start of a take, or just cleaning up the overall mix. But if you’re still getting comfortable with audio in Premiere Pro, check out our resources on building out your audio workflow and mixing dialogue with music tracks.
Use Storyblocks music and sound transitions for your next project
As you can see, it isn’t complicated to fade out audio in Premiere Pro. But taking some time to master the process can make a big difference for the overall presentation of your next video project.
Whether you’re a YouTube creator, a podcaster, or a video production pro, Storyblocks has a diverse array of high-quality transition music and sounds to elevate your next project.
Storyblocks’ audio transition effects run the gamut, from a gradually decaying “Power Down” effect to a dramatic, slow-rising strings transition perfect for movie trailers — and everything in between. To streamline your creative process even further, Storyblocks has a dizzying array of Premiere Pro Templates you can use to add title cards, lower thirds, and other effects, without building them yourself from scratch.
No matter what kind of mood you’re looking to set for your video, let Storyblocks’ library of transitions and fades spark your creativity as you develop your project’s soundscape. Check out our individual and business plans to get started today.