Gradients are the easiest way to save a flat and uninteresting shot. They let you add style and depth to your footage in post, so you don’t need complex lighting setups on set.
In this article, you’ll learn how to make a gradient in Premiere Pro. We’ll look at how to create two-tone and four-tone gradients. We’ll also cover two advanced techniques and four straightforward templates that’ll make the hard work disappear.
How to make a gradient in Premiere Pro
You have two main options for building color overlays in Premiere Pro. These are the ramp effect (a two color gradient) and the 4-Color Gradient effect. Both let you manipulate the overall color cast of your shot, without using LUTs or complicated color grading workflows. Let’s take a closer look at how to add a gradient overlay in Premiere Pro.
Method 1: The ramp effect (best for overlays)
When you need a basic fade from one color to another, use the Ramp effect to add a gradient in Premiere Pro.
This tool works best for correcting lighting issues, like darkening a bright sky, or adding a colored vignette to focus the viewer’s eye to a key location on screen. It’s the quickest way to add and edit gradient overlays in Premiere Pro timelines.
1. Apply the Ramp effect
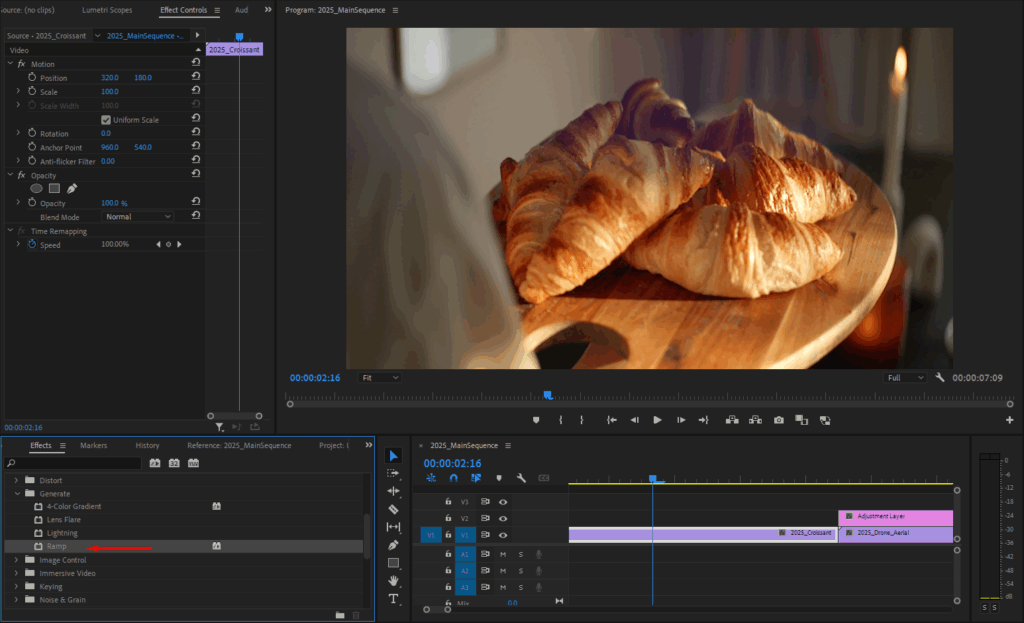
Start by selecting your clip in Premiere Pro’s timeline. Then, go to the Effects panel and find the Ramp effect under Video Effects > Generate. Drag this effect onto your footage. Change the Blend With Original value until you can see the original footage underneath.
2. Pick your colors
Next, open the Effect Controls panel. The default setting will create a black and white gradient. To change this, click the color swatches next to Start Color and End Color and swap them out for the hues you need.
Adjust the Blend with Original value until it looks clean.
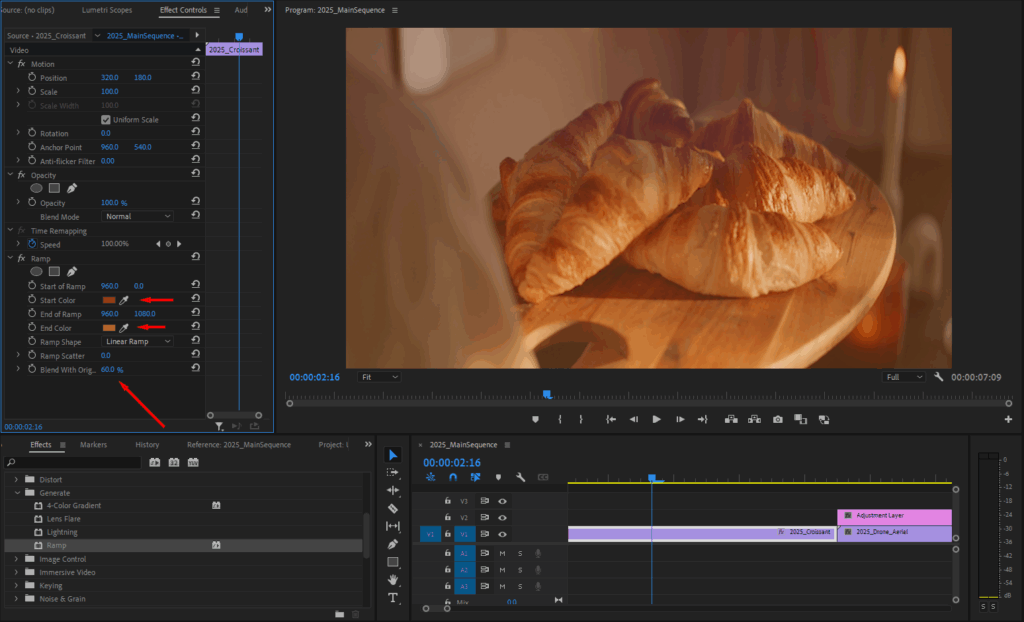
To blend the gradient naturally, use the eyedropper tool to sample a color from your video frame.
If you’re fixing a blown-out sky, sample a dark blue from the existing clouds to match the lighting. If you’re working with strict brand guidelines, you can paste Hex codes into the picker.
In the example above, I used two orange tones to match the overall color palette of the shot.
3. Fix the position
You’ll probably notice the default start and end points rarely line up with your footage. You can use the Start of Ramp and End of Ramp values to move the gradient where you need it.
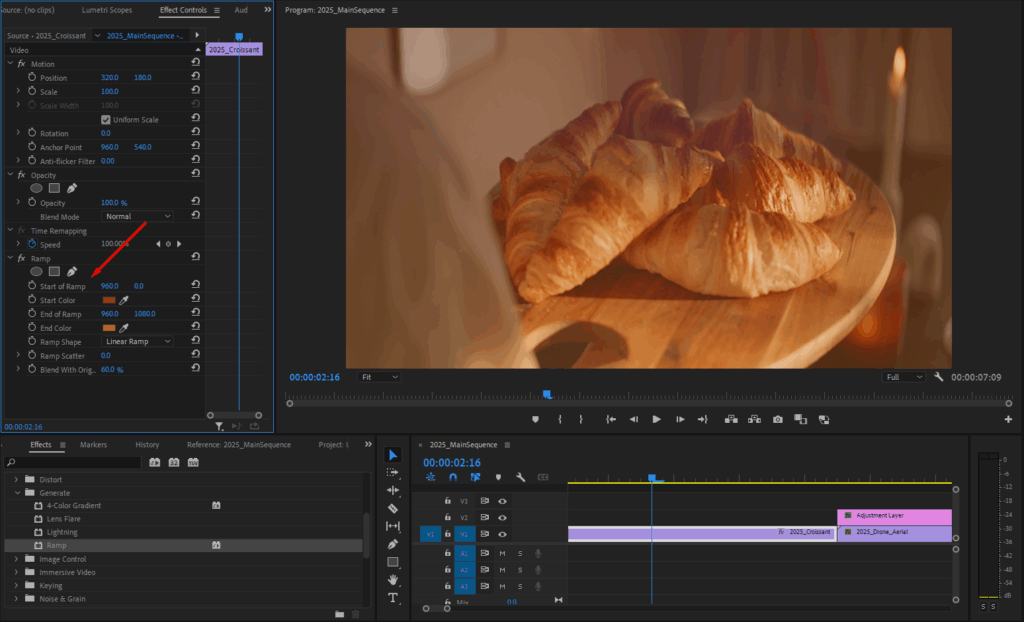
To speed this up, click the small target icon next to the numbers. This lets you click and drag the start and end points directly in the Program Monitor rather than guessing with coordinates.
4. Change the shape
You might want to change the shape of the gradient depending on what your shot needs. Your two options are:
- Linear: This creates a straight line transition for sky replacements, horizon lines, or darkening the lower third of the frame to make subtitles pop.
- Radial: This creates a circular gradient if you’re creating a vignette or a spotlight effect. It draws the eye to a specific point, usually the center, while darkening or tinting the edges.
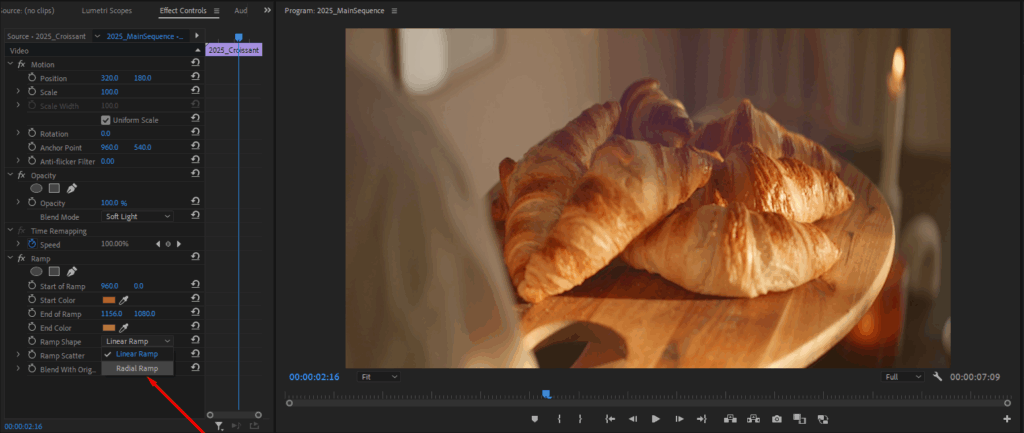
Note: Blend Modes can make your gradient mesh more smoothly with your footage. For the best result, go to the Opacity settings of the clip itself, and change the Blend Mode to Overlay or Soft Light. It’ll preserve the highlights and shadows of your footage while still applying the color tint.
Method 2: Create a multi-color gradient (best for backgrounds)
If you need a background for social content or a music video, two colors often look too simple. You’ll want to use a 4-Color Gradient effect, which blends hues for a richer look.
1. Apply the 4-Color Gradient effect
Premiere Pro has a built-in 4-Color Gradient effect. Search for “4-Color Gradient” in the Effects panel, then drag and drop it onto your clip.
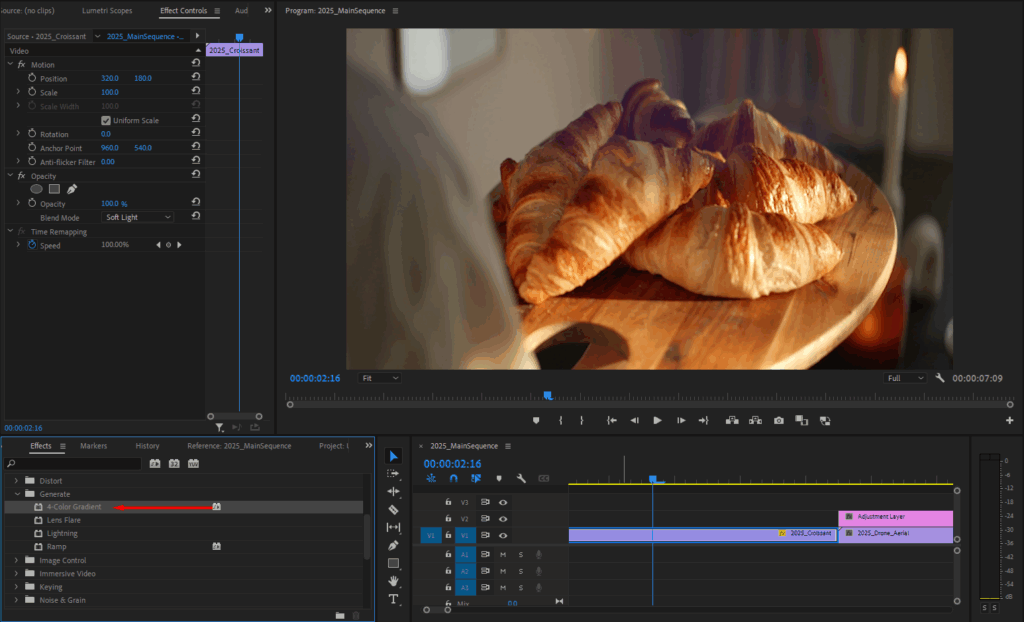
2. Choose your colors and move the points
In the Effect Controls panel, you get four color pickers and position controls for each. Choose the colors you want, then move the points around until they match the subject in your frame.
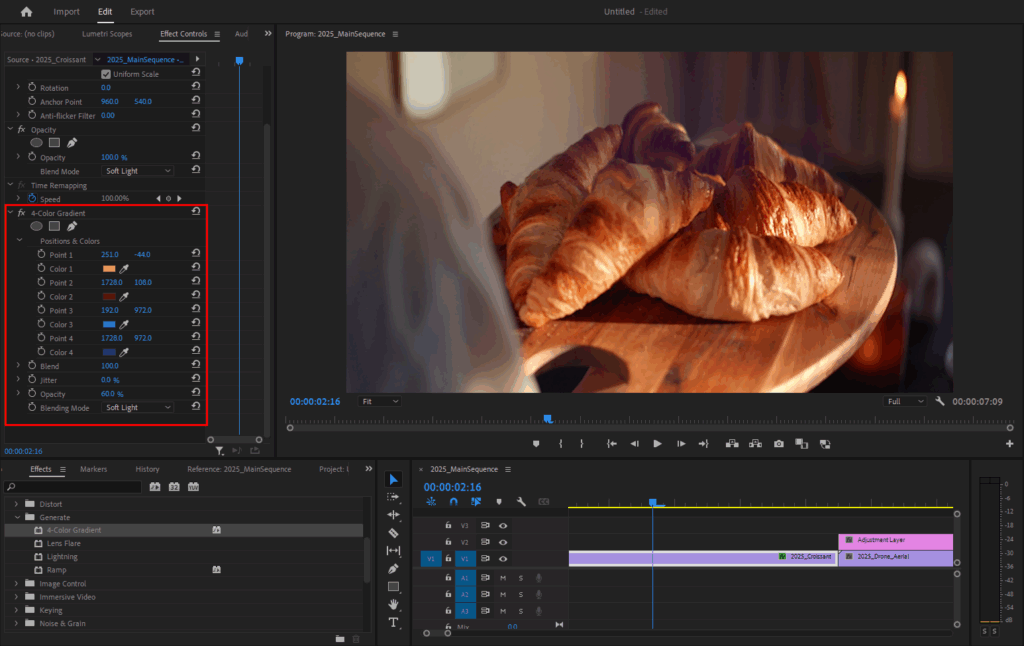
When choosing colors, you generally want to avoid clashing opposites. For example, if you set points 1–4 as deep purple, magenta, soft pink, and peach, you’ll get a sunset vibe that looks pretty good behind white text. For a moodier look, mix teals, dark blues, and greens.
Two advanced customizations for gradients
Now that you know the basics, here are two extra ways to take these Premiere Pro gradient masks to the next level.
1. Use adjustment layers for flexible edits
Instead of applying gradient effects to your clips, try adding adjustment layers. It’ll keep your original footage untouched and make it easier to copy the effect to other shots.
Create an Adjustment Layer in your project bin and drag it over your entire sequence. Apply your Ramp or 4-Color Gradient here.

The treatment will stay consistent across every cut, and if you want to make a change, you only need to do it once. This is the smartest way to learn how to add a gradient in Premiere Pro for full scenes.
2. Use gradients on text layers
Rather than using solid colors on titles and text elements in your project, why not use a gradient?
First, add a text layer and type the words you want to appear. Then, apply either the ramp effect (for a two-tone look) or the 4-Color Gradient effect to your text layer. Finally, adjust the position and color of each point to give your title a little more pizzazz.
Here’s an example of what this can look like:
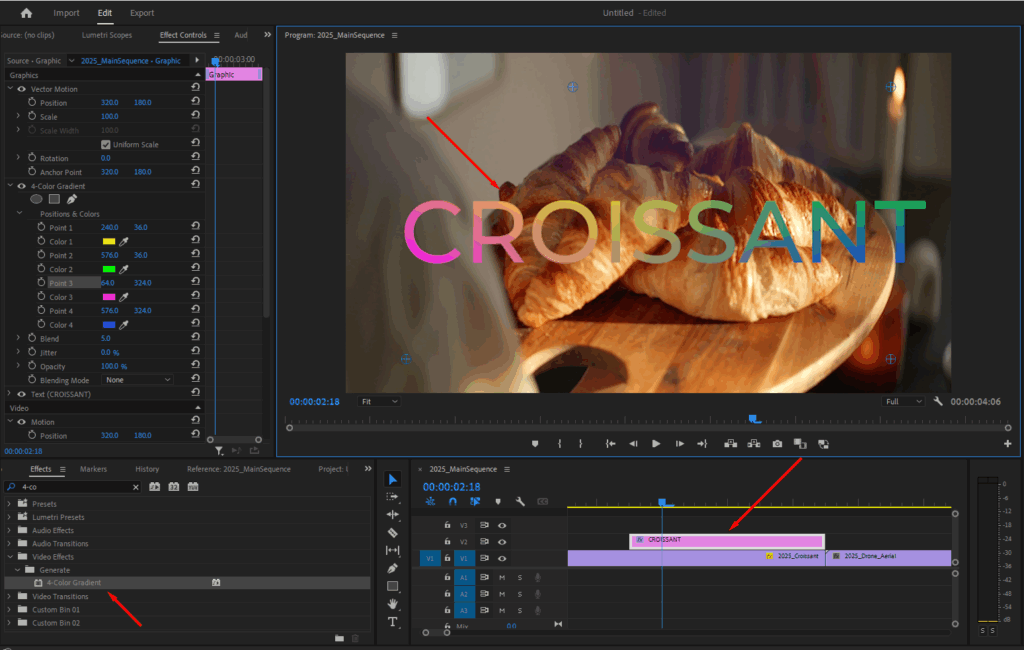
With a little bit of experimentation, you can achieve some interesting looks with very minimal effort.
Gradients made easy with pre-made templates
Building gradients from scratch takes time, especially if you want them to move. You can speed this up by using a template. Storyblocks has a massive library of assets that handle all of the heavy lifting, like these four pre-made gradients, which you can easily customize.
1. Parallax Gradient Overlay
Standard gradient overlays can look like a flat sticker pasted on top of your lens. The Parallax Gradient Overlay Premiere Pro template fixes that by moving the color layers at different speeds across your footage, simulating 3D depth.
It creates a sense of depth that works well on wide drone shots or landscapes, making the color grading feel like it exists within the environment rather than sitting on top of the lens.
2. Gradient Title Cutouts
The Gradient Title Cutouts template handles masking for you when you want to add a gradient to a text layer. It keeps the background transparent, so you can drop it straight onto your timeline.
Use this for main titles where you need the text to match your brand colors without blocking the footage behind it.
3. Grainy Gradient Waves
The Grainy Gradient Waves template combines soft colors with a film texture and wave motion effect. It provides a lo-fi aesthetic that works well for background loops, lyric videos, or content where you need a mood-setter that doesn’t demand too much attention.
4. Retro Vintage Grain and Gradient Map
For a complete overhaul of your project’s look, use the Retro Vintage Grain and Gradient Map Premiere Pro template. It remaps the brightness values of your footage to a more vintage color palette, rather than just adding an overlay. It also adds a grain layer, replicating the effect of old film stock or camcorders.
It’s perfect for flashback sequences where you need a nostalgic look.
Explore more Premiere Pro gradient templates
Adding manual gradients gives you control, but deadlines require speed. The Storyblocks library puts over 11,000 professional Premiere Pro templates in your toolkit, so you can drag and drop any look you like without building them from scratch.
Whether you need gradients, dynamic transitions, or full motion graphics packages, you can find an asset that fits the brief.
Join Storyblocks today to get unlimited downloads across our entire marketplace. Your subscription covers over 6 million royalty-free files, including stock footage, music, and sound effects, so you never have to worry about pay-per-clip pricing.