Adobe Premiere Pro is an industry-standard video editor that professionals use to create everything from social media content to feature films. While it’s definitely powerful, it can be a bit overwhelming when you first get started.
In this guide, you’ll learn the essential workflows and techniques you need to start editing confidently in Premiere Pro. You’ll discover how to set up projects correctly, organize your media, edit efficiently, and export professional results. Let’s dive in.
What is the best way to learn Adobe Premiere Pro?
Start with Adobe’s official resources. Their website offers comprehensive video tutorials organized by skill level, covering everything from the basics to advanced techniques like color grading and motion graphics.
Beyond Adobe’s guides, check out the Storyblocks website for in-depth tutorials. You’ll find step-by-step explainers on topics like:
- How to stabilize video
- How to clean up audio
- How to add sound effects
- How to make Premiere Pro run faster
Both Storyblocks and Adobe also have extensive YouTube libraries full of free tutorials. For hands-on practice, work through real projects as you learn. Repetition builds muscle memory faster than just passively watching.
Getting started with Premiere Pro
To get started with Adobe’s editing software, you need to first learn how Premiere’s interface works, what settings are most crucial, and how to create your first project.
Understanding the Premiere Pro interface
Premiere Pro organizes its interface into five main workspaces – Assembly, Editing, Color, Effects, and Audio.
These are customizable panel arrangements that you use for specific tasks (e.g., editing in one workspace, color correction in another). You can also create your own workspace, once you’ve got a better idea of how things work.
Within these workspaces, there’s a stack of different panels with specific uses. The key panels you’ll need to learn include:
- Project panel: Your media library. All imported footage, audio, graphics, and sequences live here. Think of it as your filing cabinet and keep it organized with bins (folders) so you can find assets quickly.
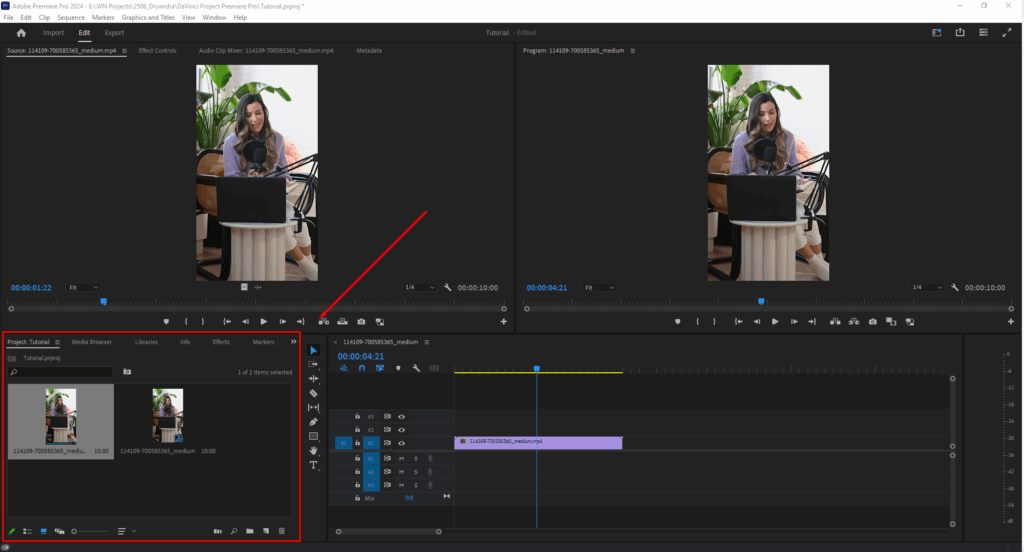
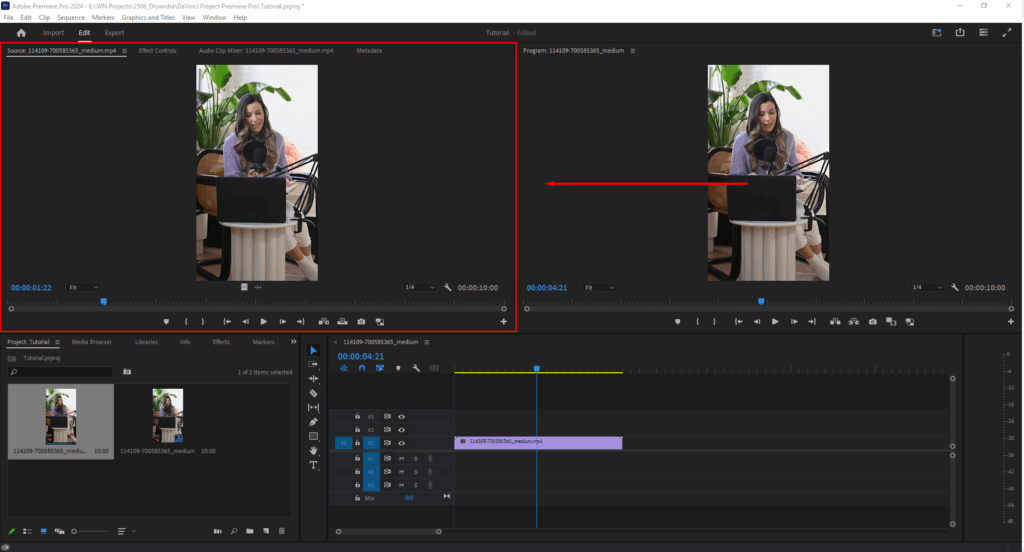
- Source monitor: Preview and mark in/out points on clips before adding them to your timeline. Use this to select only the portions of footage you need.
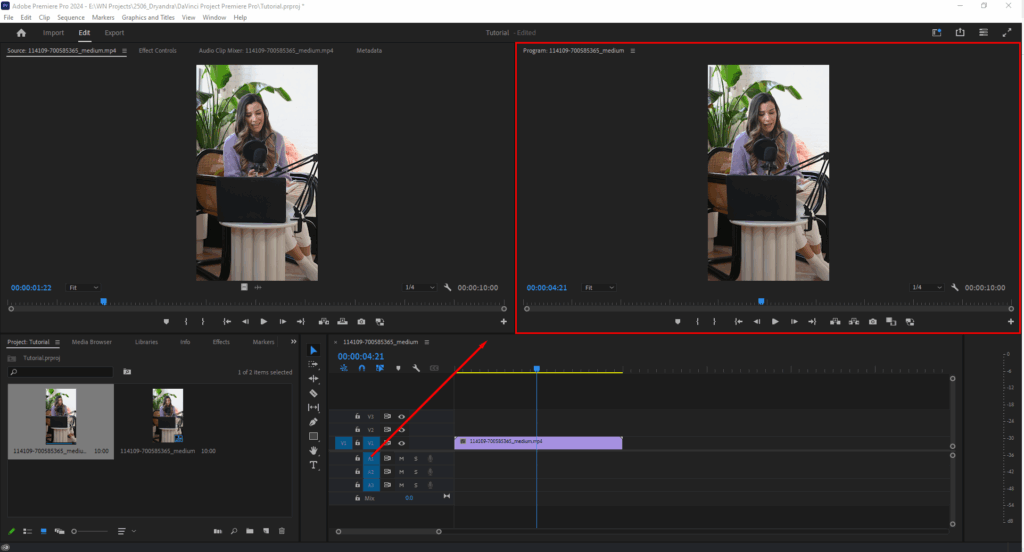
- Program monitor: Shows your edited sequence as you build it. This is what your final video will look like.
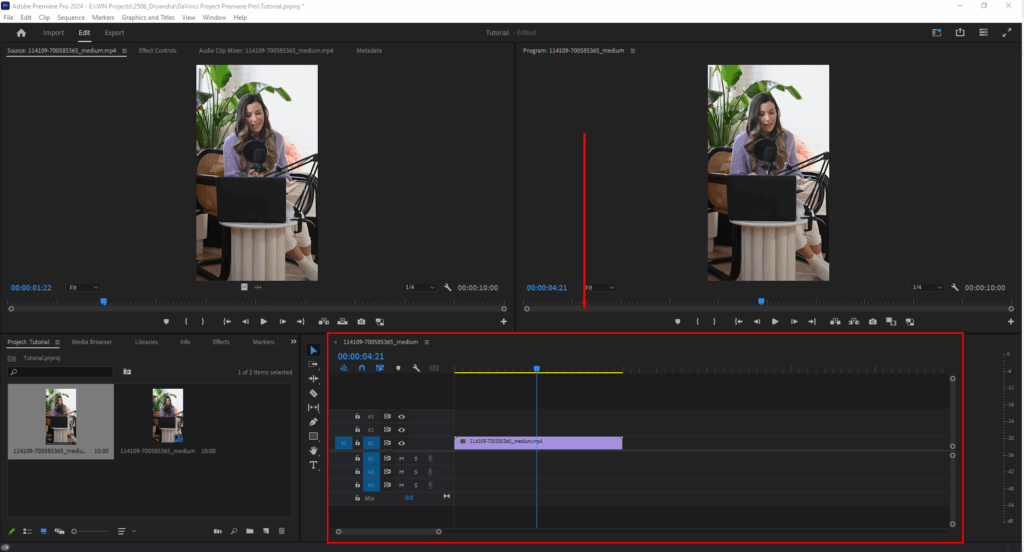
- Timeline: Where editing happens. You’ll arrange clips, trim footage, add transitions, and layer audio and video tracks here. This is your primary workspace.
You can rearrange panels by dragging their tabs, and save custom workspaces via Window > Workspaces > Save as New Workspace.
Premiere’s Project settings explained
The project settings determine what your audio and video project’s properties are. For instance, they determine the format, source, aspect ratio, time frame, and bit depth, among other aspects of your project.
When you begin a new project, Adobe Premiere applies a project preset. Choose the wrong settings, and you’ll deal with rendering issues, quality loss, or export problems.
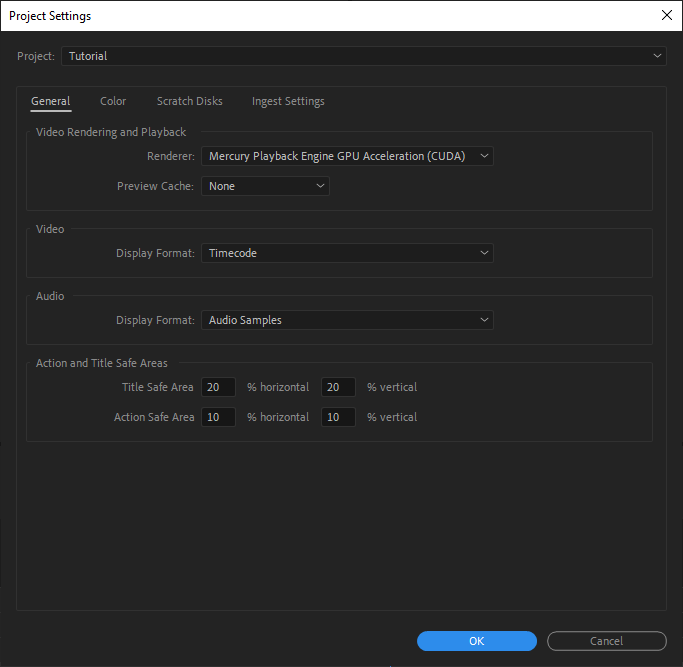
Critical project settings include:
- Frame rate: Must match your source footage (e.g., 23.976 fps for film look, 60fps for slow motion). Mixing frame rates causes stuttering.
- Resolution and aspect ratio: Common formats include 1920×1080 (HD), 3840×2160 (4K), and 1080×1080 (square for social media). Match your intended delivery platform.
- Video format: H.264 for most web content, ProRes for professional workflows, DNxHD for broadcast.
- Audio settings: Sample rate (48kHz is standard) and bit depth (16-bit or 24-bit).
You cannot change these settings after creating a project, so it’s crucial to verify your footage specifications before starting.
How to create a new project
1. Launch Premiere Pro and click New Project
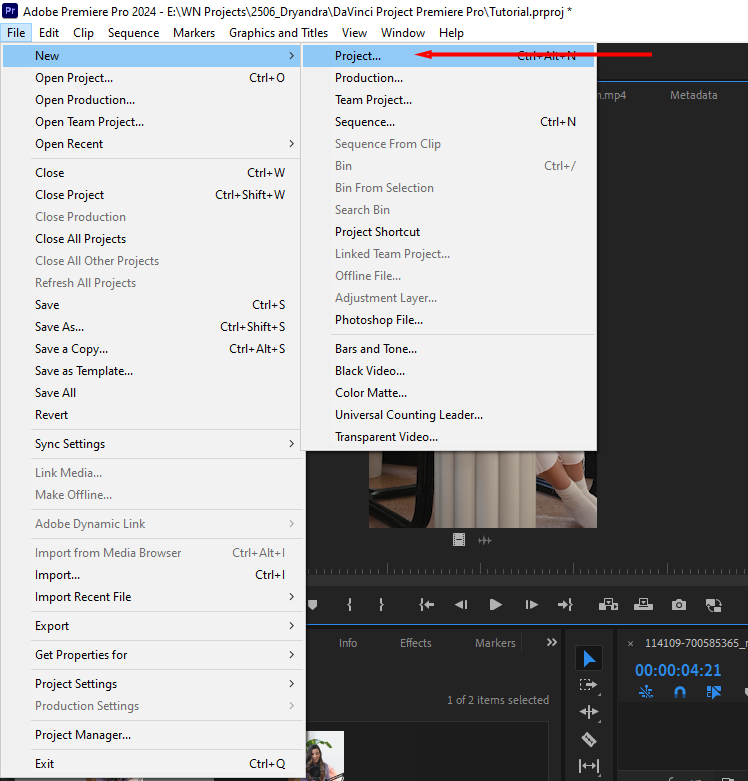
When you launch Premiere Pro, select New Project from the home screen. If you’re already in Premiere, go to File > New > Project.
2. Name your project and choose a location
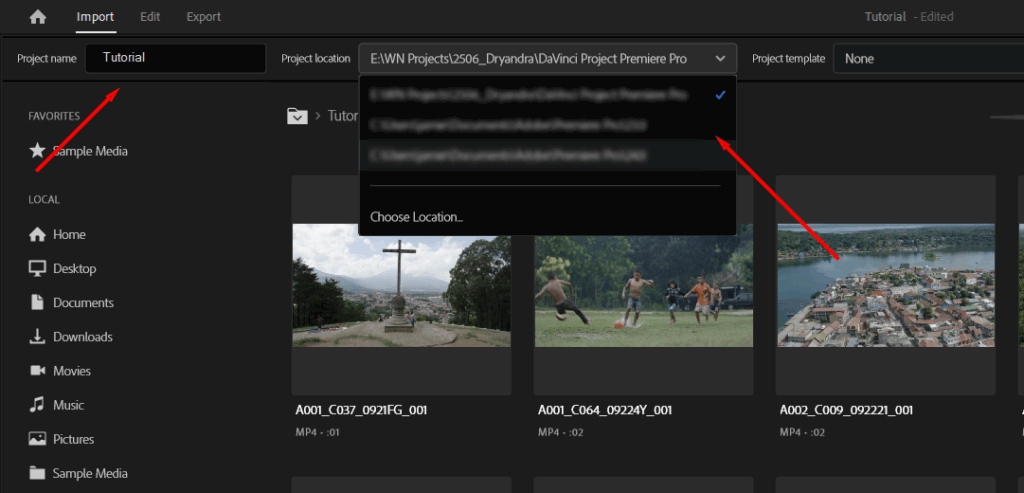
In the Project name dialog, enter a project name. Click the Project location drop-down menu to select where you’ll save the project file. Ideally, you’ll save it on a fast drive with plenty of space. Press Create.
3. Configure your scratch disks
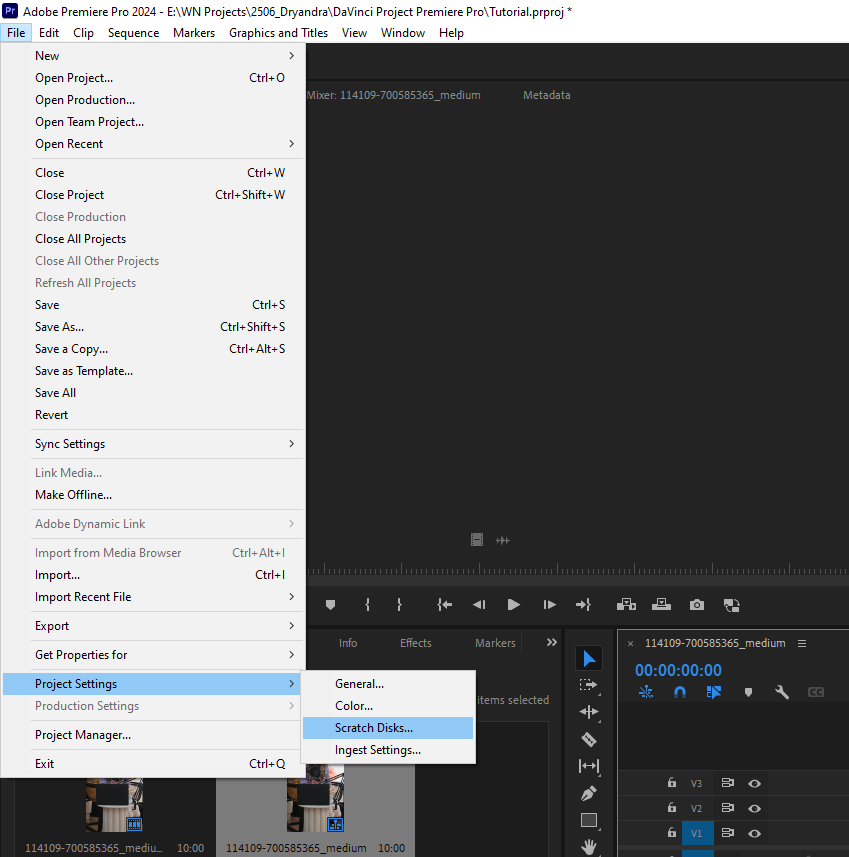
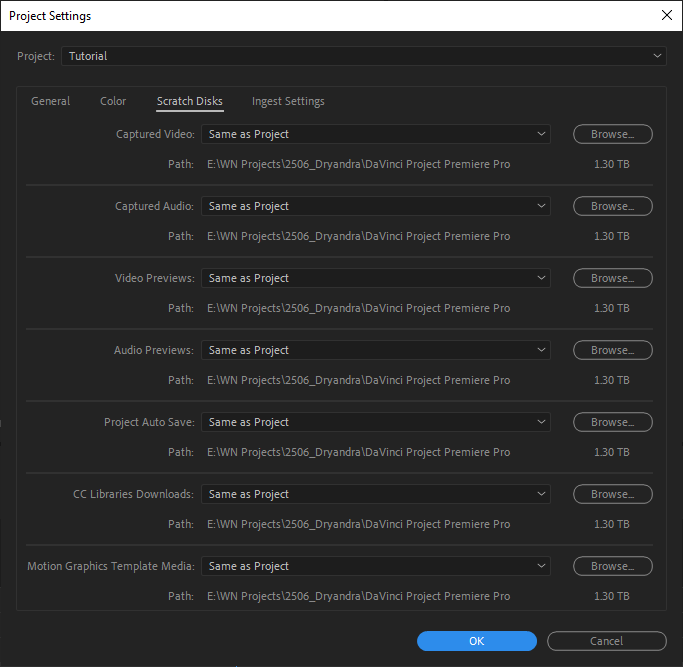
Scratch disks are folders that let Premiere create temporary files while editing and rendering. To set these up, go to File > Project Settings > Scratch Disks. Set all dropdown menus to Same as Project to keep everything organized.
If you have an external or secondary drive, use it for scratch disks. This separates cache files, previews, and autosaves from your main drive, improving performance during rendering and exporting.
How to import media into Premiere Pro
Before you can start editing, you need to bring your video and audio files into the Project panel. The Media Browser is the most reliable method to use:
First, open the Media Browser panel. If it isn’t visible, go to the main menu and select Window > Media Browser.
With the Media Browser open, navigate to your files. Use the folder tree to find the folder containing your video or audio files.
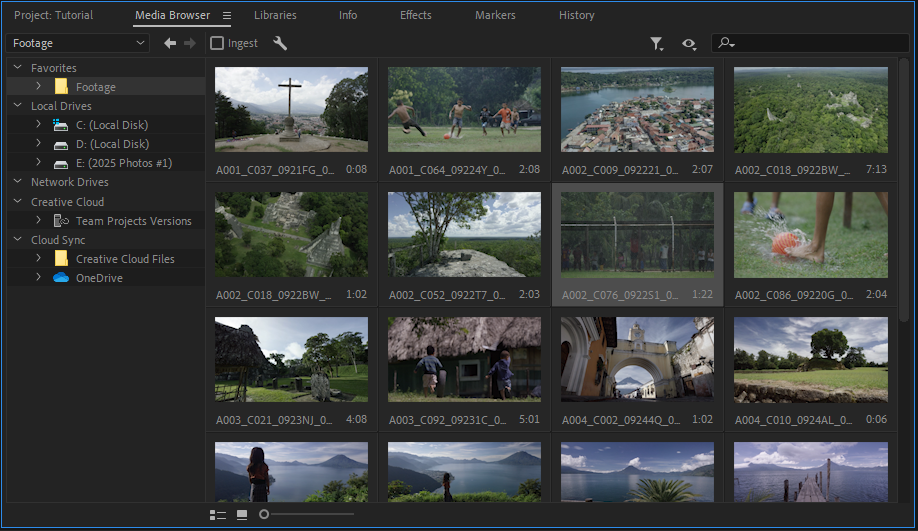
Finally, import your media. Select the files you want to use, then right-click and choose Import. The clips will now appear in your Project panel.
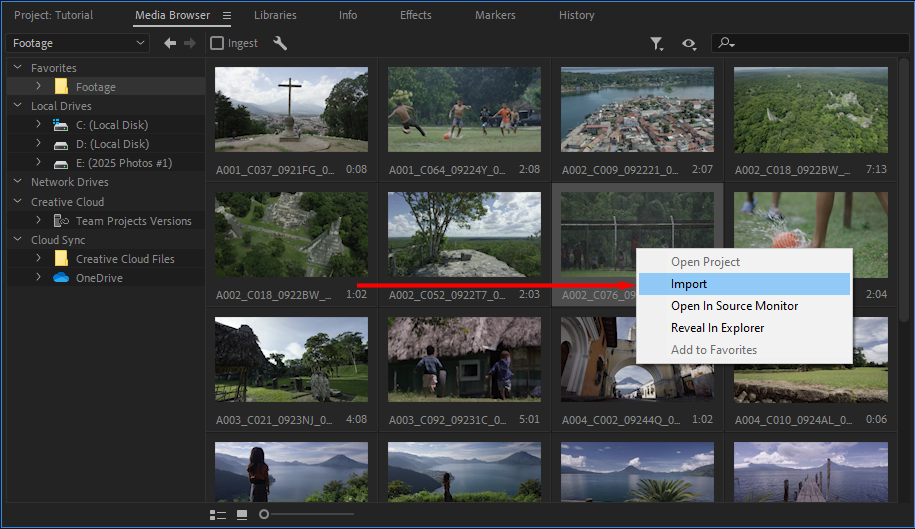
Alternatively, you can drag and drop files directly from a folder on your computer into the Project panel.
Creating timelines and sequences in Premiere Pro
A sequence is your working project. It’s where you arrange clips, layer audio and video, and build your final edit. The timeline, on the other hand, is the visual representation of your sequence where you’ll see all your tracks and clips laid out chronologically.
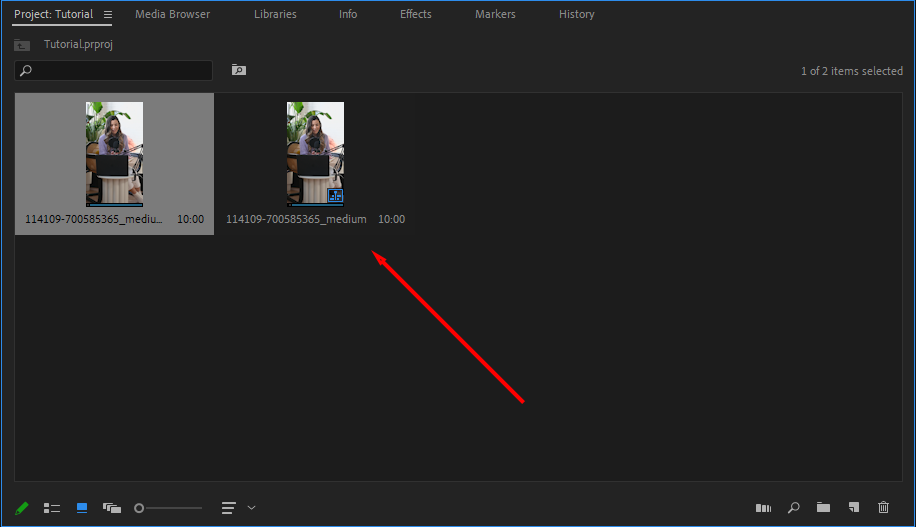
Think of a sequence as a container with specific settings (frame rate, resolution, audio channels), and the timeline as the interface where you can change what’s inside that container.
How to create a sequence in Premiere Pro
To create a new sequence in Premiere Pro, you can either drag the footage straight onto the timeline, or use the context menu to create a new one. Here’s what to do.
Drag footage onto the timeline (recommended for beginners)
From the Project panel, drag a video clip onto the timeline icon at the bottom of the panel, or drag it directly into the empty timeline area.
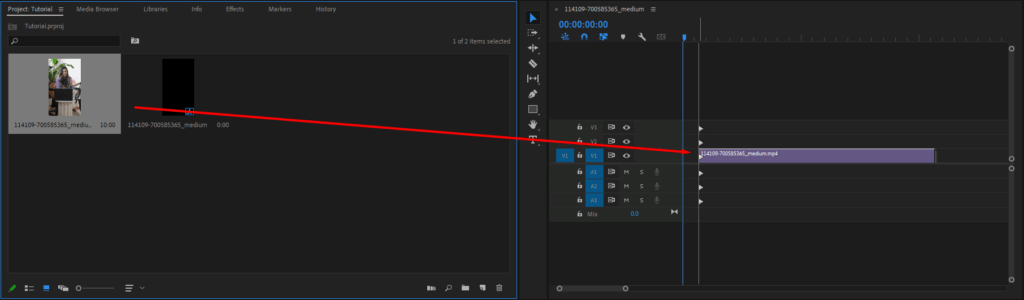
Premiere Pro will create a sequence that matches your clip’s frame rate, resolution, and codec settings automatically.
Create a sequence manually
If you need to create a specific type of sequence, go to File > New > Sequence.
Browse the preset categories (Digital SLR, ARRI, etc.) and choose one that matches your camera and footage specs. If unsure, look for presets that match your camera model or the resolution and frame rate you’re working with.
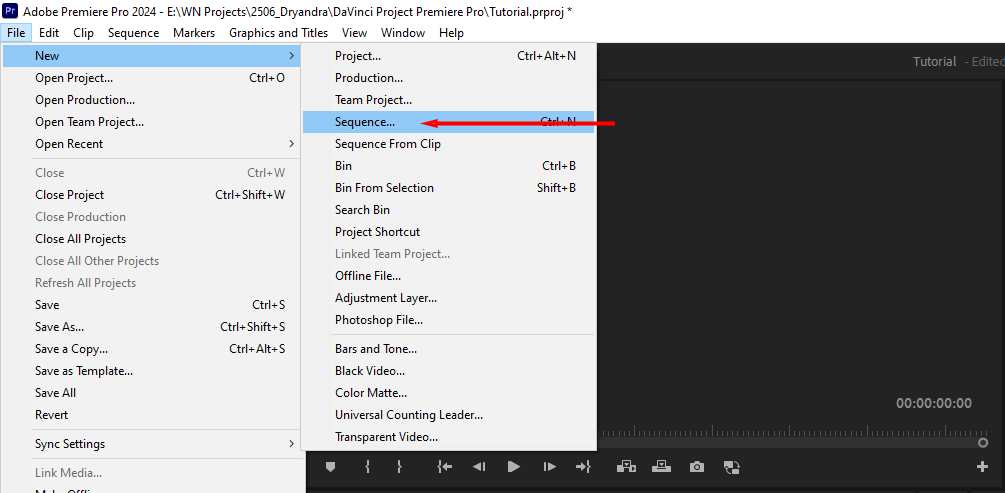
Enter a descriptive sequence name and click OK. Your new sequence will appear in both the Project panel and open in the timeline.
Syncing audio to your timeline
If you capture footage with audio, Premiere Pro will automatically sync them together in the timeline. If you need to manually sync your audio with the video, you can align the clips manually by dragging them into place.
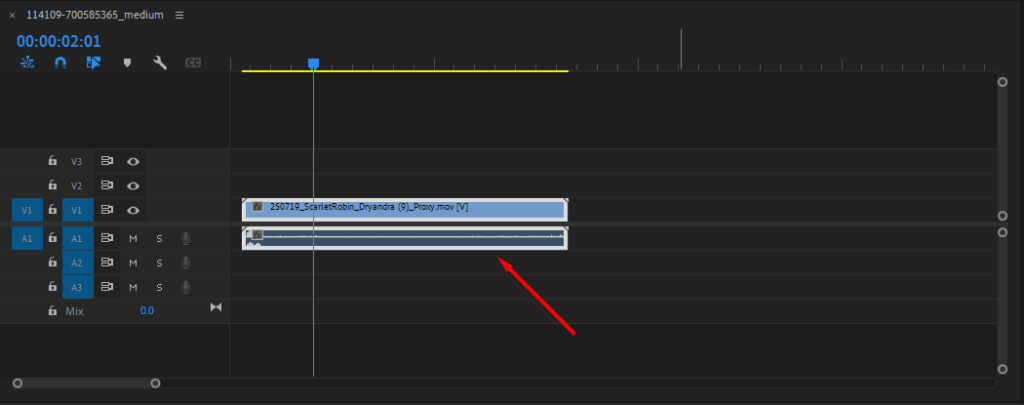
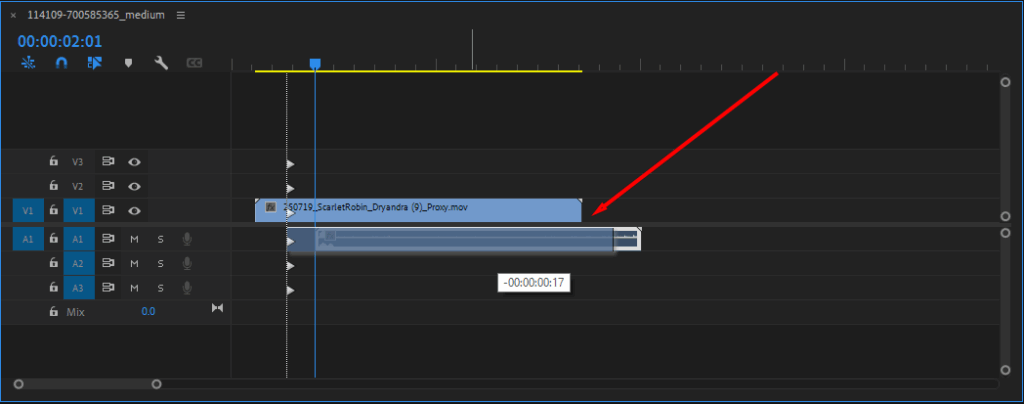
Look for a distinct audio marker to find where it lines up with the video, then drag the audio clip until the audio sounds synchronized.
If that doesn’t work, use Premiere’s audio synchronization feature to do the work for you. First, hold Shift and choose both the video clip and audio clip to select them both at once. Right-click one of your clips and choose Synchronize from the menu.
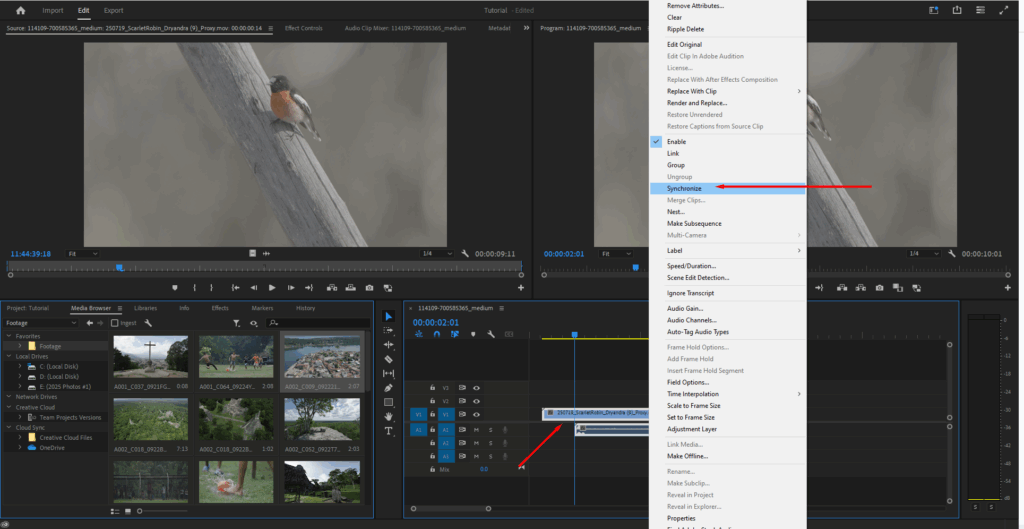
Then, in the Synchronize Clips dialog box, select the Clip Start option and press OK.
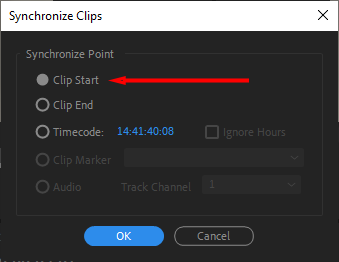
Once the clips snap into alignment, check the playback to confirm that it worked properly.
How to edit videos in Premiere Pro
Once your footage is in the timeline, you can start cutting, arranging, and refining your edit.
Basic editing with the razor and selection tools
Here’s a basic editing workflow to cut and arrange your clips on the timeline:
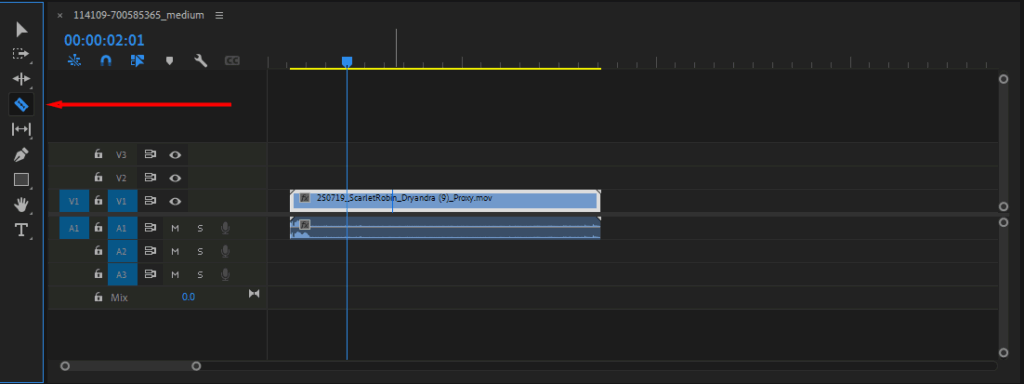
1. Select the Razor Tool
First, select the Razor Tool. As its name suggests, this tool lets you split clips wherever you like. Press C on your keyboard or click the Razor Tool in the toolbar. Your cursor should become a blade icon.
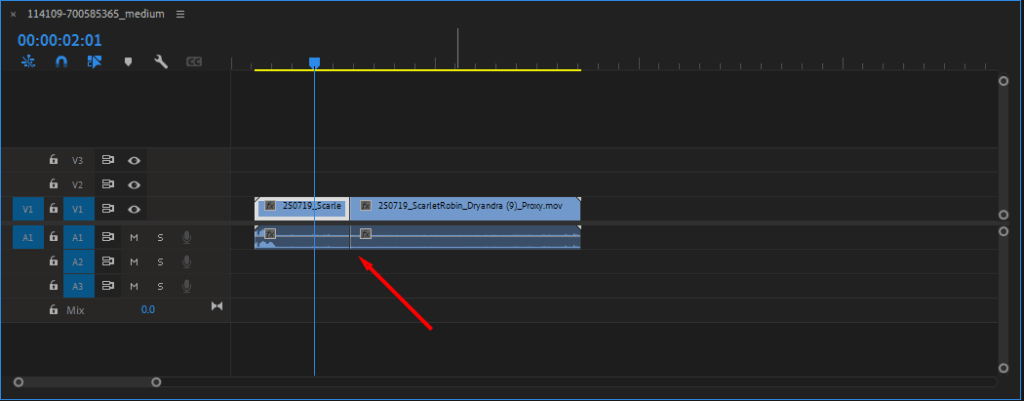
2. Cut your clip
Click anywhere on a clip in the timeline to split it at that point. You can make multiple cuts by clicking at different positions.
3. Switch back to the Selection Tool
Press V to return to the Selection Tool. Now you can click and drag the clip segments you just created.
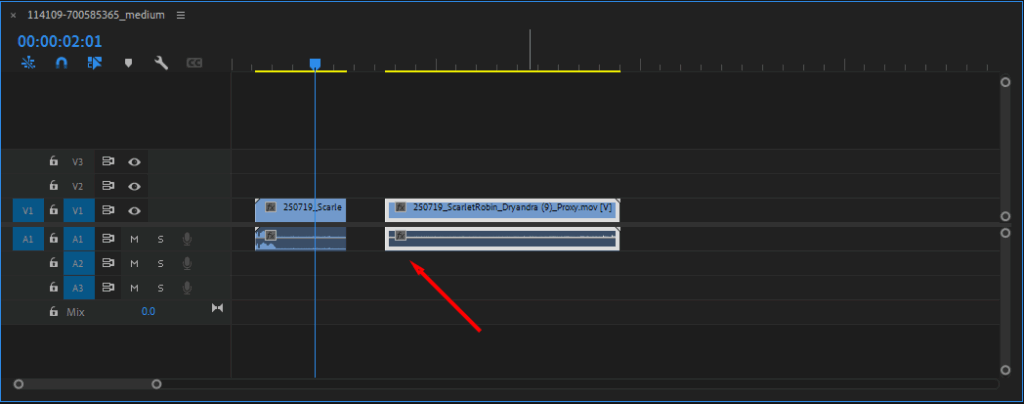
4. Delete unwanted sections
Select a clip segment you want to remove and press Delete (or Backspace). To close the gap automatically, use Ripple Delete instead: select the segment and press Shift + Delete.
How to add titles, transitions, and effects in Adobe Premiere Pro
Titles, transitions, and effects are what transform raw footage into the type of video that a professional would create.
Premiere Pro includes a few built-in options, and you can access even more through Storyblocks’ Premiere Pro templates and integrated plugin.
Here’s a quick overview to get you started:
- Titles: Press T to activate the Type Tool, then click in the Program Monitor and start typing. Customize fonts, colors, size, and position in the Essential Graphics panel (Window > Essential Graphics).

- Effects: Open the Effects panel (Window > Effects), search or browse for an effect, then drag it onto a clip in your timeline. Adjust settings in the Effect Controls panel.
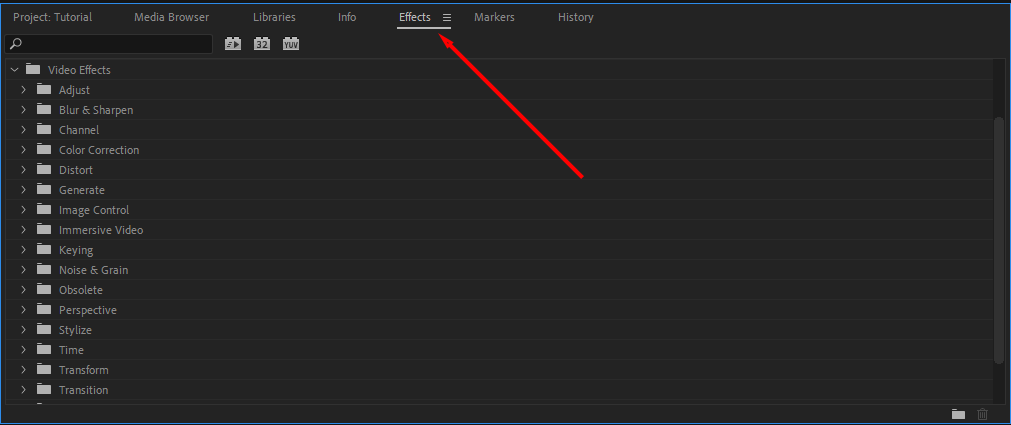
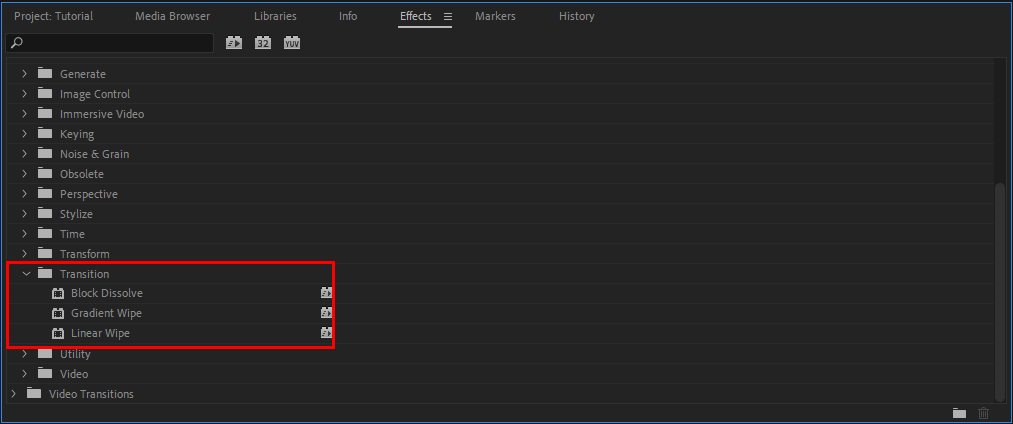
- Transitions: In the Effects panel, expand Video Transitions to browse options. Drag a transition between two clips or onto a clip’s start/end point. Adjust the duration by dragging the transition’s edges in the timeline.
Once you’ve mastered the basics, take a deep dive into some of our detailed tutorials to learn more advanced techniques:
- How to add transitions from scratch
- How to crop video
- How to customize templates
- How to overlay videos with gradients
- How to create a glitch effect
- How to add and edit keyframes for animations
- How to add adjustment layers
- How to mask your footage
How to export your video in Premiere Pro
Exporting converts your sequence into a video file that you can upload and share. You need to choose the right export settings to get the best video quality, file size, and compatibility with different platforms.
Here’s how to export your final edit:
1. Select your sequence and open the Export Settings window
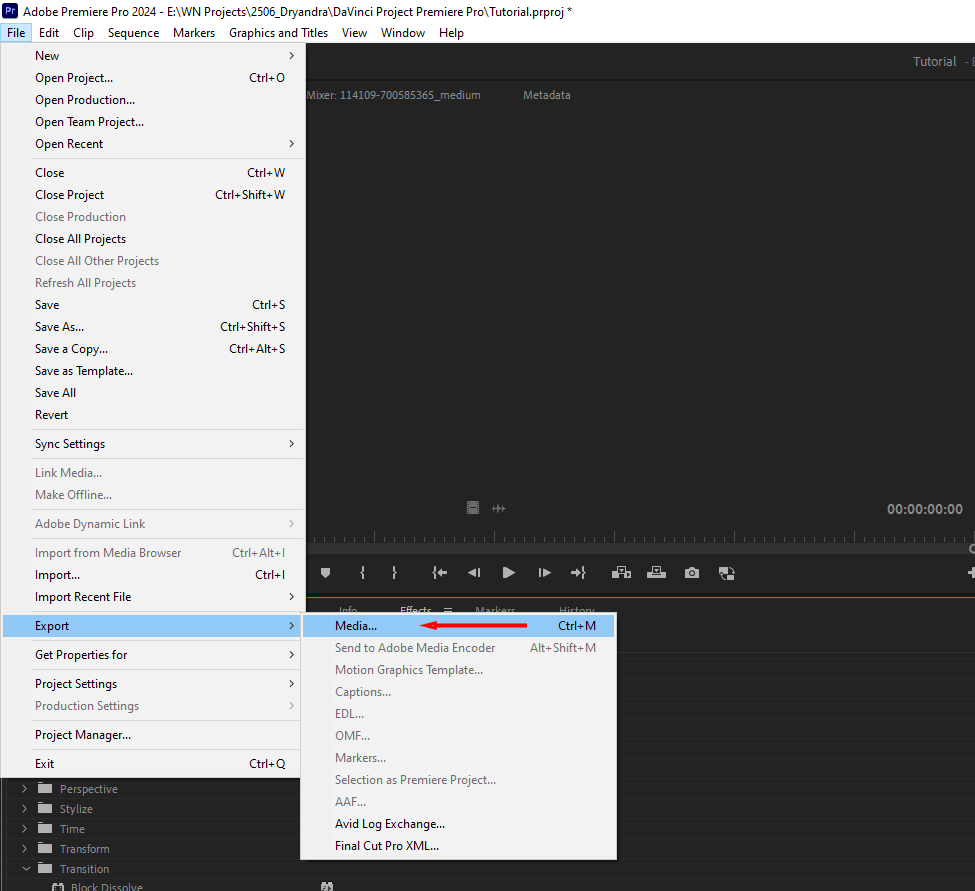
Click anywhere in the timeline sequence you want to export. Go to File > Export > Media, or press Cmd + M (Mac) or Ctrl + M (Windows). The Export Settings window will open with a preview of your sequence on the left and settings on the right.
2. Choose your format
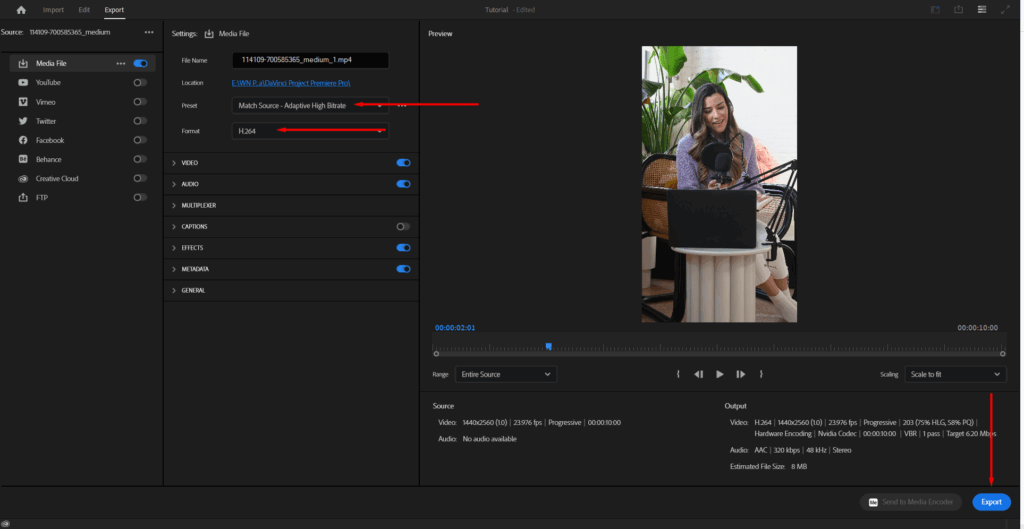
Next, you need to make sure you export in the right format. Click the Format dropdown near the top of the settings panel. Select H.264 for web uploads or QuickTime if you need high-quality files for further editing.
3. Select the right preset
Under the Preset dropdown, choose a setting that matches your delivery needs. For most web platforms, Match Source – Adaptive high bitrate maintains your sequence quality while keeping file sizes reasonable.
4. Start the export
Click the Export button in the bottom right corner. A progress bar will appear showing how long it’ll take to complete.
The render speed depends on how long, complex, and high-quality your footage is, as well as your computer’s processing power. You can continue working in Premiere while the export processes in the background.
Try out Storyblocks templates for easy video content creation
Whether you’re new to video production or a seasoned producer, Storyblocks can help breathe life into your stories. Our unlimited subscription allows you to download as many stock video clips as you need. We also provide excellent video editing tools.
Sign up today to get unlimited access to thousands of royalty-free Adobe Premiere Pro Templates, Adobe After Effects Templates, and Adobe Motion Templates.